

Starlink has changed connectivity aboard forever, and is amazing technology in its own right, but there are good reasons to consider combining it with other types of connectivity and routers to provide a more robust, usable solution.
Working Remotely
I work remotely from the boat and expect a high quality connection as much as possible. I use Google Workspace, Office 365, Slack, Teams, and a lot of web browsing . Most of those can survive a few seconds of interruption, but it can get frustrating. Where things get complicated is with video sessions using Zoom and Microsoft Teams - these are super sensitive to any sort of interruption, and it really makes the experience crappy for both ends of the call if you have any outages or significant latency.
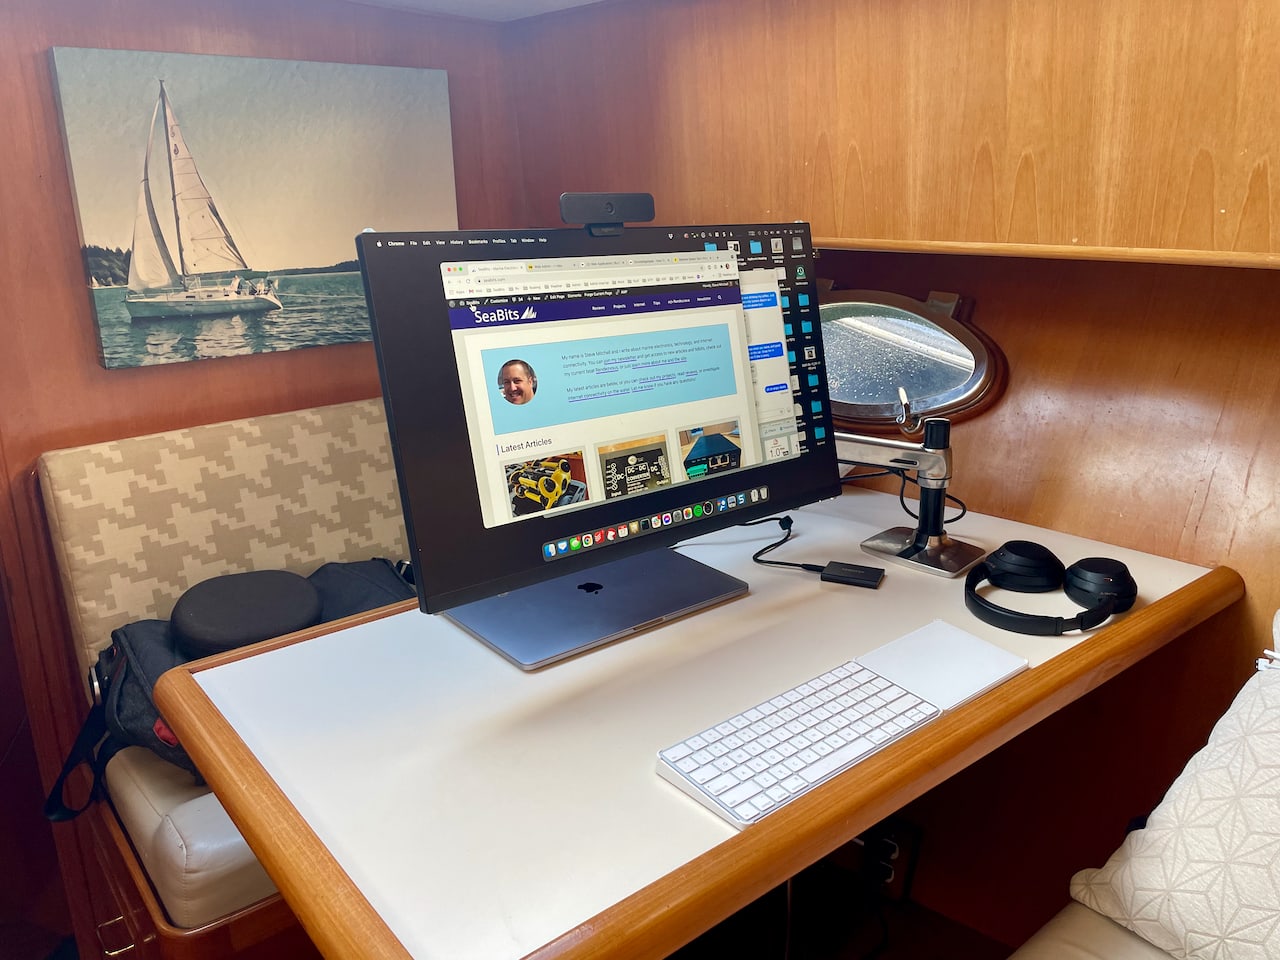
Read more about my working remotely setup....
The top features for a quality remote work setup are:
- Multiple internet connections - you need at least 2 types of connectivity so that you have a backup when one fails or becomes unusable for other reasons. You'll also need technology to switch between these, combine them in certain situations, and monitor their overall health.
- Control usage & prioritize - make sure that your work traffic is the priority. This prevents other activities on your network (the binge session on Netflix in the next cabin!) from causing issues with work.
These requirements are not something you can get using Starlink alone. They can be moderately easy to setup with other products, depending on how complicated or deep you go with the configuration, or they can require a decent amount of technical knowledge in more complex cases. Regardless, if you are serious about working remotely or have a business where you need to be connected reliably, these are the basic requirements that you should consider.
My Test Setup
I've been testing various combinations of Starlink + Peplink since January 2021 when the first circular dish became available. More recently, I've been focused on the generation 3 rectangular dish with various configurations since it is the most popular for recreational boaters. Here is my test setup:
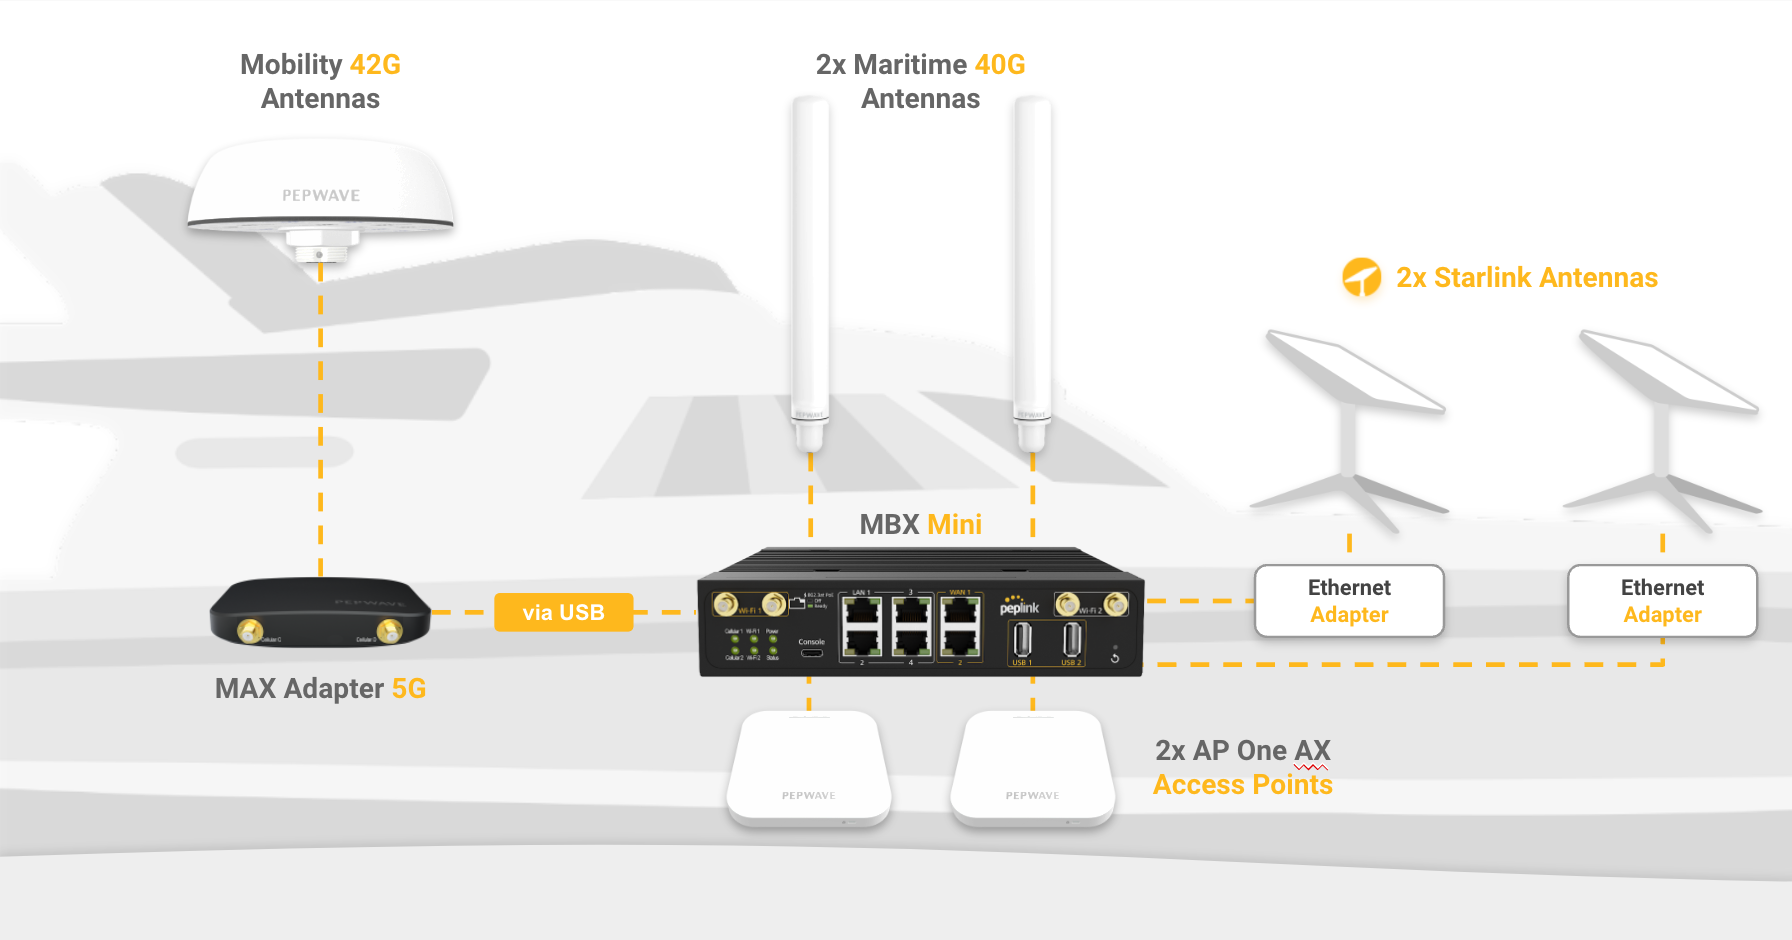
- Peplink MBX Mini 5G router - 2x 5G cellular radios, WAN ports, LAN ports, WiFi as WAN (for remote WiFi signals)
- Peplink MAX Adapter 5G connected to the MBX Mini above via USB
- Peplink Maritime 40G and Mobility 42G antennas connected to both of the above
- Peplink AP One AX access points throughout the boat
- Two Starlink dishes connected to the WAN ports of the Peplink MBX Mini 5G. One dish is setup with the standard Residential + Portability plan, and the other with the RV plan.
This gives me the ability to be connected to all three major US cellular carriers simultaneously, have WiFi as WAN to connect to a local WiFi network if I am in a marina, have good local WiFi broadcast throughout the boat, and be connected to two Starlink dishes for redundancy and testing.
I have been using this particular setup since June of 2022 and have been testing in a multitude of different locations. My home slip is in Seattle, which is a great place to test how terrible the RV version is since there are so many people with Starlink there, and things get super slow.
I also spent a month in the Thurlow / Discovery Islands in British Columbia, Canada, where there is zero cellular connectivity in most cases, which meant relying 100% on Starlink. In between, I was in various spots around Puget Sound, the San Juan Islands, Gulf Islands, and many other stops along the way. All of the equipment got thorough testing in a multitude of conditions.
Good choice to pair with Starlink
Starlink Challenges
In this section, I'm going to cover the challenges I've seen while trying to use Starlink for day-to-day use. Almost all of the issues can be dealt with by having a backup way of connecting to the internet. This is the main reason I recommend combining them for the best solution.
Starlink RV & Slowdowns
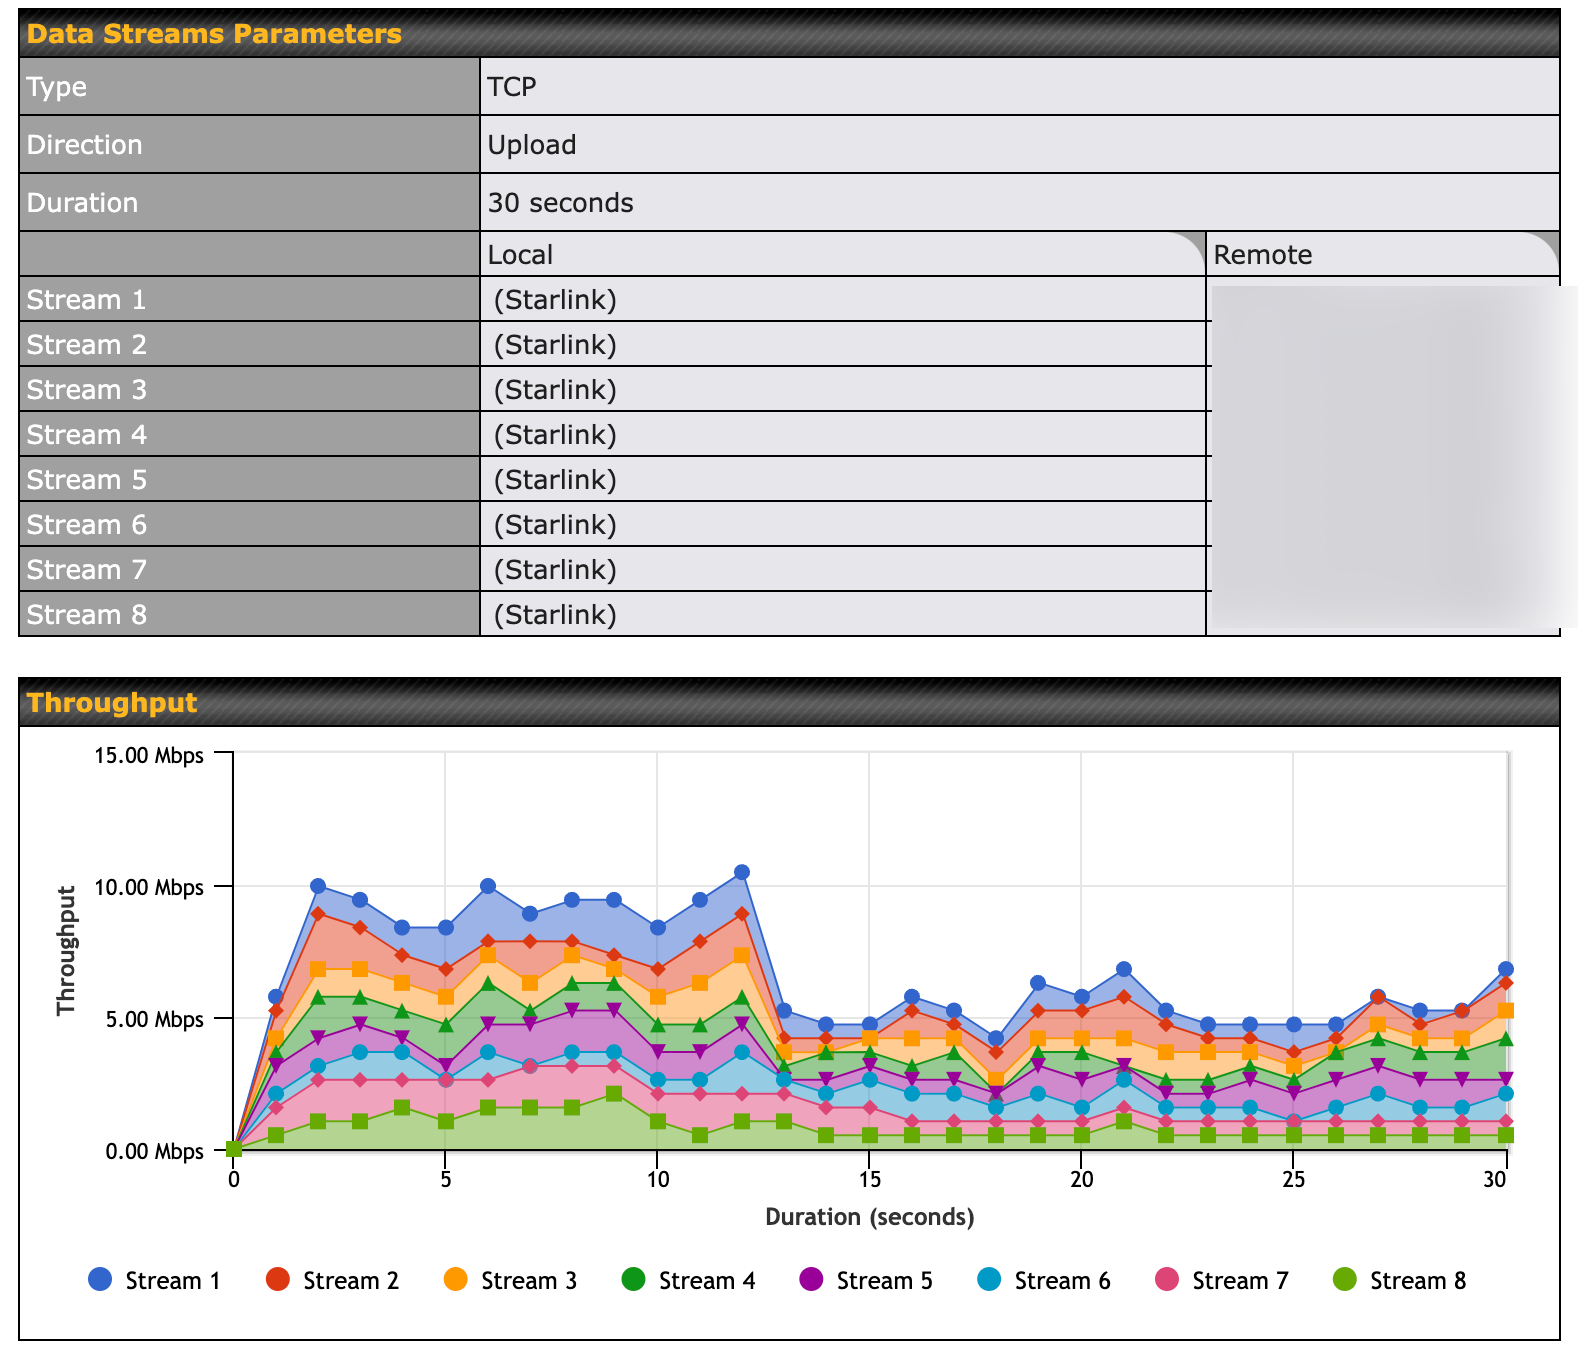
Most boaters I know have the Starlink RV version because of its availability and flexibility with billing. This particular service is the lowest priority when you're in areas with lots of other Starlink users and especially if you are outside of your home location. This can cause some severe performance issues when you are in a busy location.
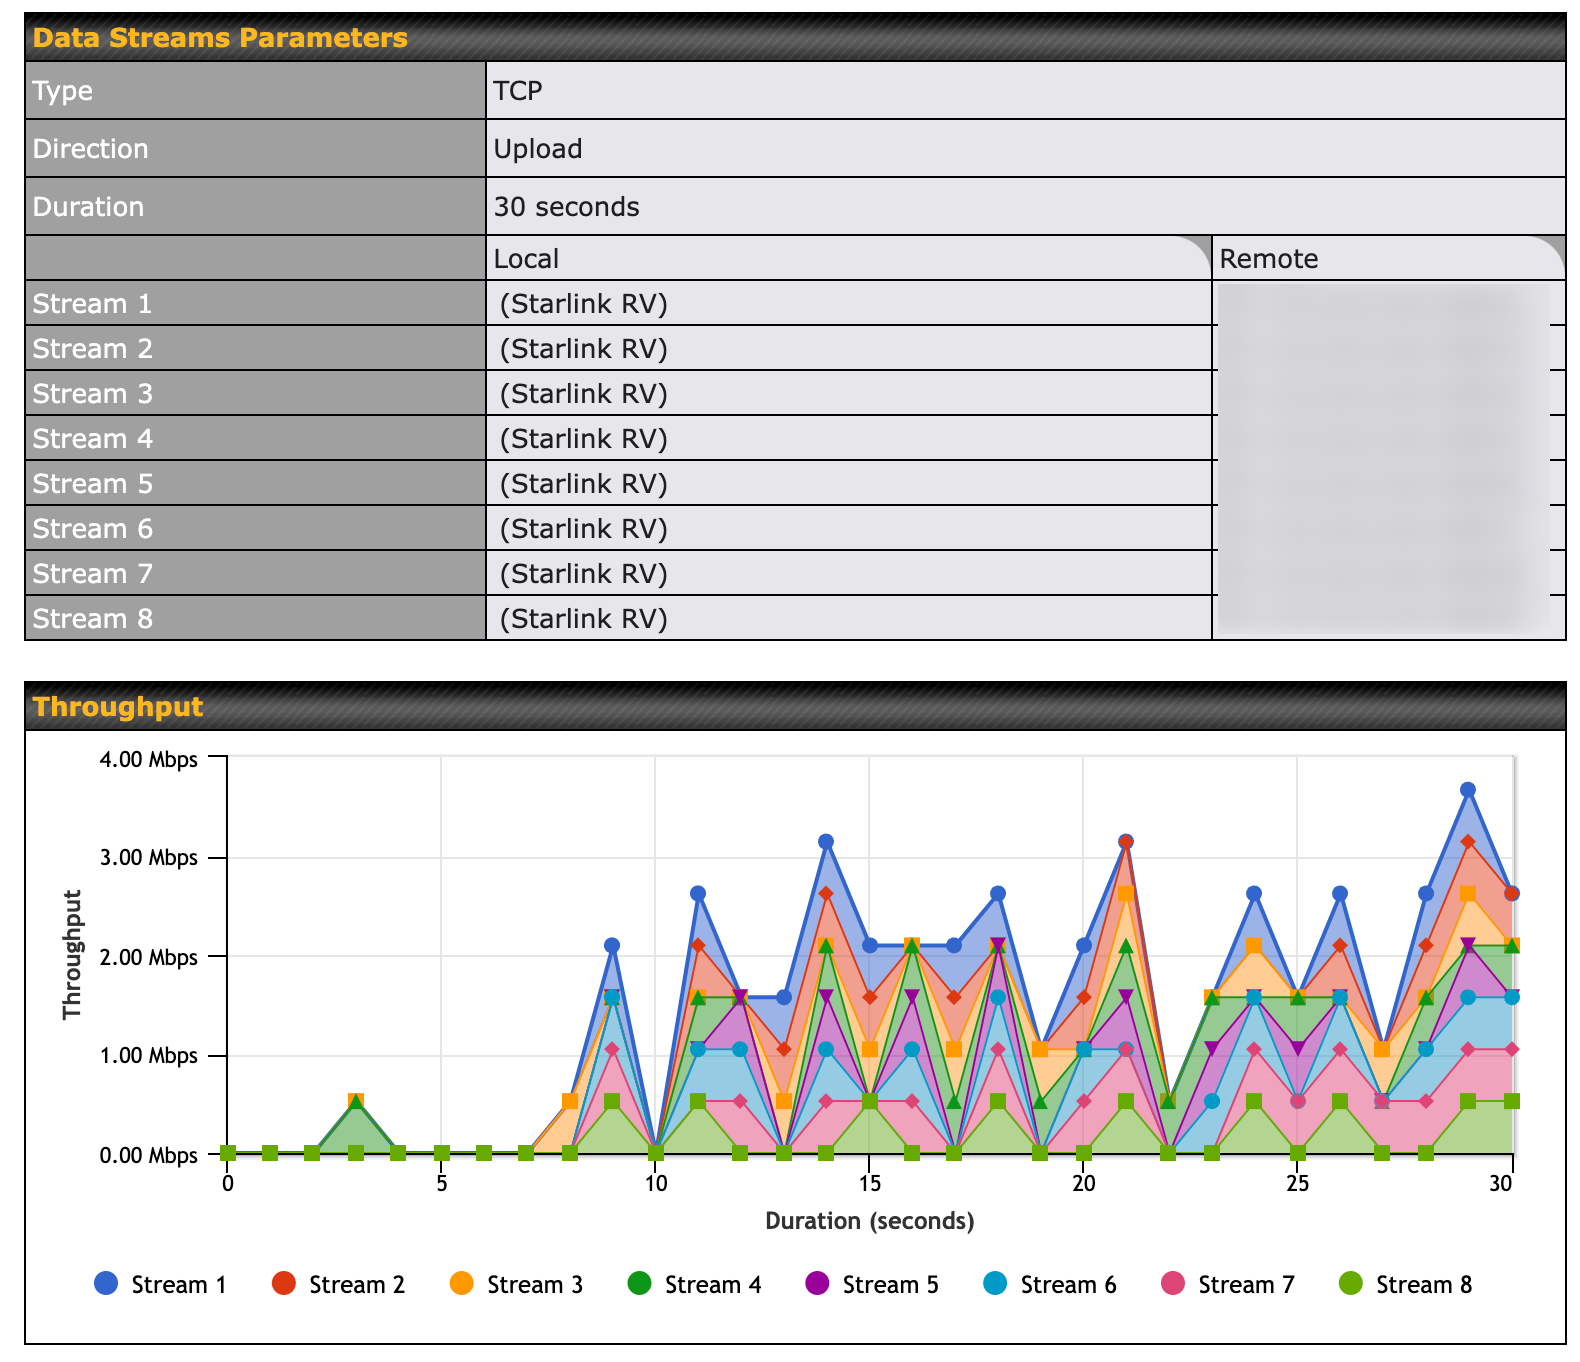
The primary place this will cause issues is with upload speeds, as you can see above. This test was performed at Elliott Bay Marina in Seattle, WA on a weekday. Elliott Bay Marina is well known for being a challenging cellular location, so Starlink has been popular within the marina to overcome that. When there are is a lot of activity, the RV service suffers because its in "last place" when it comes to priority. This really makes things like Zoom and Teams video calls almost impossible as they require between 3-4 Mbps of sustained upload to work correctly.
This is a test at the same time using the Starlink Residential + Portability plan showing more usable upload speeds. They're still lower than busy places/times, but they are usable in terms of upload speeds for video calls.
This is one reason having other connectivity types than Starlink is important for working remotely - that or using the Residential + Portability plan if you can get it.
Starlink Outages
Starlink is also a single vendor, single service, and when they have an issue somewhere in their network, it can mean zero connectivity. I've seen many of these in my testing. The satellites in orbit have to connect to a ground station somewhere to get access to the internet. If that station goes offline, or if there is an issue from that location to somewhere else, your Starlink connection will be unusable.

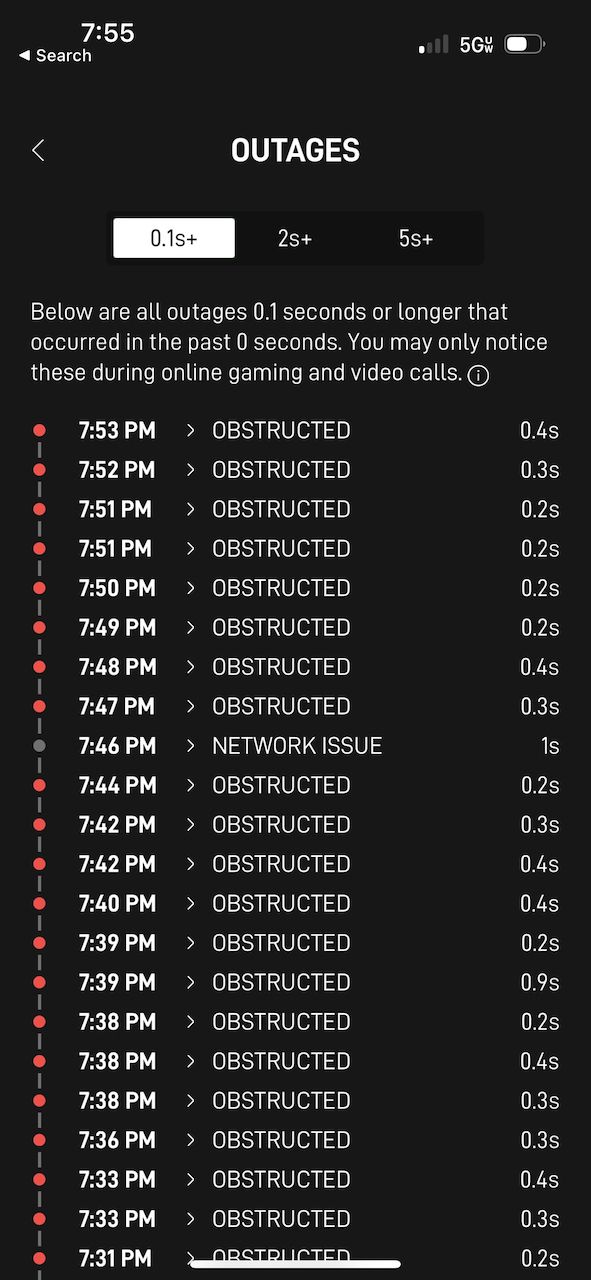
Even with an optimized mounting location, there will still be times when things obstruct your dishy, which can cause an outage as well. Outages of 2 seconds are not that frequent, but they are big interruptions that can cause video sessions to have problems. What's more interesting is to look at outages that are shorter than that (the second/right hand picture) which show a ton more obstructions and network issues. Those won't cause huge issues with video, but the frequency means that there is an issue every few minutes which might be noticeable to people on the other end.
Starlink Router Limitations
There's not a lot of configuration control with the Starlink router itself. You can't set priorities (commonly called Quality of Service or QoS), create redundant connections to multiple internet sources, or really do much for the individual clients connected to the router. I wrote an article a few years ago on using various strategies and technologies to control the usage on board which is below, and is something that I recommend folks with critical work needs aboard look at using. Almost none of this can be done with the Starlink router alone.
Of course, this is not what Starlink's priorities are - they're trying to enable internet in places that have little-to-no choices for connectivity, and most folks won't have a backup method or need the type of control you would on a boat. They're also most likely not moving and are in a fixed location, so their satellite connection will likely be more reliable.
The other thing to consider is WiFi performance and distance. I've heard of folks having issues with various clients working reliably with Starlink's WiFi setup. I'm sure they will refine this over time, but there is almost zero control over this within the Starlink app.
It's also important to think about the distance from/to the Starlink router and your boat layout. This isn't specific to Starlink, and is something I work with folks on all of the time. Having a router in a central place on the boat is a great solution for most folks, but often times there are dead or low performance zones that you might want to improve. Starlink offers a mesh node device for about $130 to extend your network, and there are other 3rd party products that you can use as well. However, they're AC powered where some other solutions out there might be a better choice power-wise, and if you are already trying to solve WiFi issues, you might want a product that has better configuration and visibility.
Starlink In-Motion Limitations
Technically you're not supposed to use Starlink RV/Residential plans while in motion, but many people still do. Recently, Starlink pushed out new firmware / software that disables the network if it detects you are going over 10 MPH. This equates to about 8.7 knots in our world, which for most sailboats and trawlers is not really that big of a factor. For other boats it means losing your network connection when underway.
I still use my internet connection while underway for WiFi calling on my cell phone, alerts & email, Marine Traffic API requests from my TimeZero PCs to see remote AIS targets, and other things. My crew and passengers might be using it for a lot more intense usage including work, streaming, and the like. Having Starlink disconnect while underway is definitely a reason to have cellular as a secondary connectivity method.
Starlink Changes!
One of the biggest challenges with Starlink is the continual changes. Portability (the ability to use it outside of your home address) only became available in April 2022. The RV plan also is only a few months old. Recently, Starlink changed their software to disable the network connection if they see you going faster than 10 MPH. What will be next?
These services and plans were not made for boats. Starlink has a priority to provide internet access to remote land-based locations as a first priority, and we're reaping the benefits of that. Who knows what the future holds - will they block all of the RV units from being used on the water once they release the cheaper marine version? Will that cost $1000/month? We don't know...
But they're also a new player on the internet market. They'll need to keep adjusting their path and goals, and some of those changes might mean that Starlink isn't usable for your use case.
Having a secondary way of connecting is a really, really good idea for when the next set of changes happen!
Cellular Still Matters
Cellular is still important if you need a reliable setup and have both available to you. Cellular carriers have been around a lot longer and don't change their access or plans anywhere near as frequently as Starlink. This means that you can rely on them more than you could Starlink if connectivity is that important to you. Their networks alone are far better designed and redundant given that they power most of the phones and emergency systems we rely on daily.
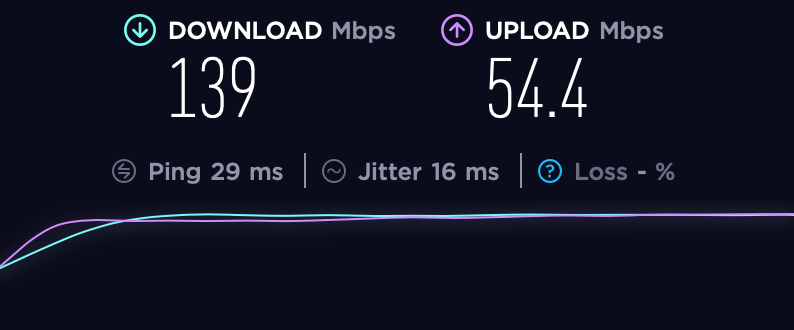
Cellular upload speeds are also usually higher than Starlink, and in some cases as the above test shows, the latency (29ms) is also better.
Having a router that has at least one cellular link + WAN/Starlink connection is a great solution to take advantage of both.
I always recommend having multiple sources for reliability. What if Starlink goes out? What if you're using the RV version and it slows down at the end of the day (which it does almost always) because of other users?
Peplink + Starlink Basic Setup Steps
So now that we've established that having both Starlink and cellular is probably the best choice aboard, what are your options?
Lots of folks lately have had the Starlink router separate from an existing system aboard and switch between two (or more) WiFi networks when one isn't working or is better suited for the situation. This is definitely an option, and is pretty inexpensive to setup.
My method below combines Starlink with cellular and WiFi as WAN to get the best setup with a single router, single WiFi network.
Starlink Ethernet Adapter
To get started, you'll want to connect your Starlink to your Peplink router WAN port using the Starlink Ethernet adapter and a cable. This is the best way to use Starlink with Peplink.
You can use WiFi as WAN, but it will affect the overall performance (potentially) of both products. If you have a higher end Peplink router with multiple WiFi radios, this is less of an issue, but you still run the risk of the WiFi connection between the router and the Starlink router being the bottleneck.
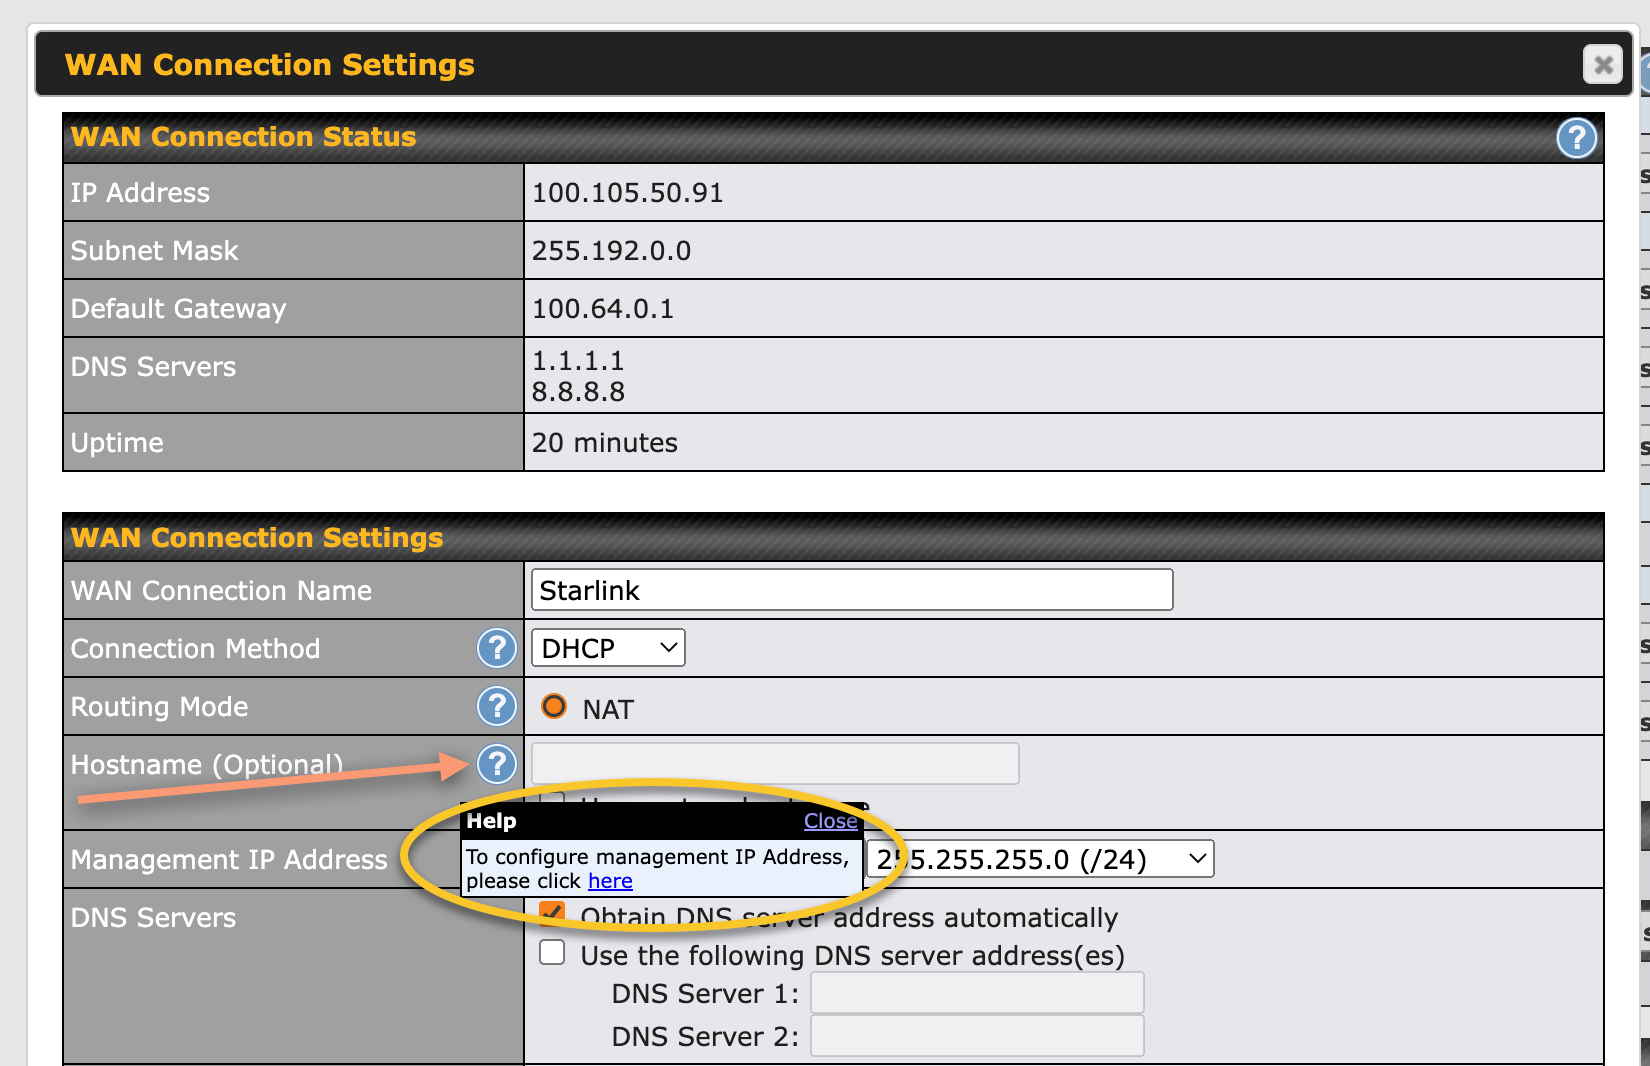
Once you have the Starlink ethernet adapter connected to the WAN port and you have verified the port is up and you have internet access, you will want to configure the Management IP Address so that you can access the dishy using the Starlink app while on your Peplink WiFi network.
- Click into the WAN connection, find the "Hostname (Optional)" option under WAN Connection Settings
- Click on the little question mark next to the "Hostname (Optional)" item.
- A box will pop up - click the "here" link to enable the Management IP address option.
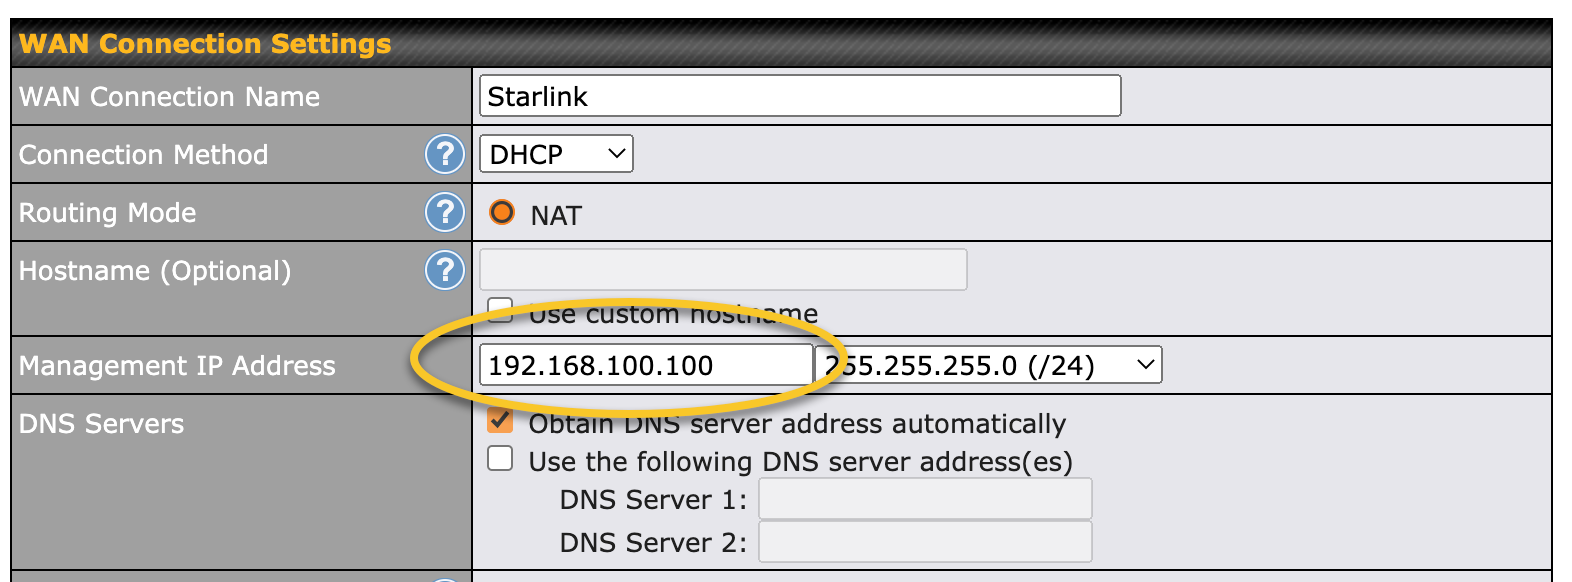
4. Under the Management IP Address field, enter in an address in the 192.168.100.x range that doesn't conflict with the router address (.1) - I chose 192.168.100.100.
You can apply these settings or continue on to the Health Check section since it is in the same screen but further down.
This setup will allow you to manage your dishy via the Starlink app while connected to your Peplink WiFi network, and also via http://dishy.starlink.com/ which you can use from any computer on that same network.
Health Check
Health checks are essential for any connection, but I have modified mine a bit for Starlink given my testing.
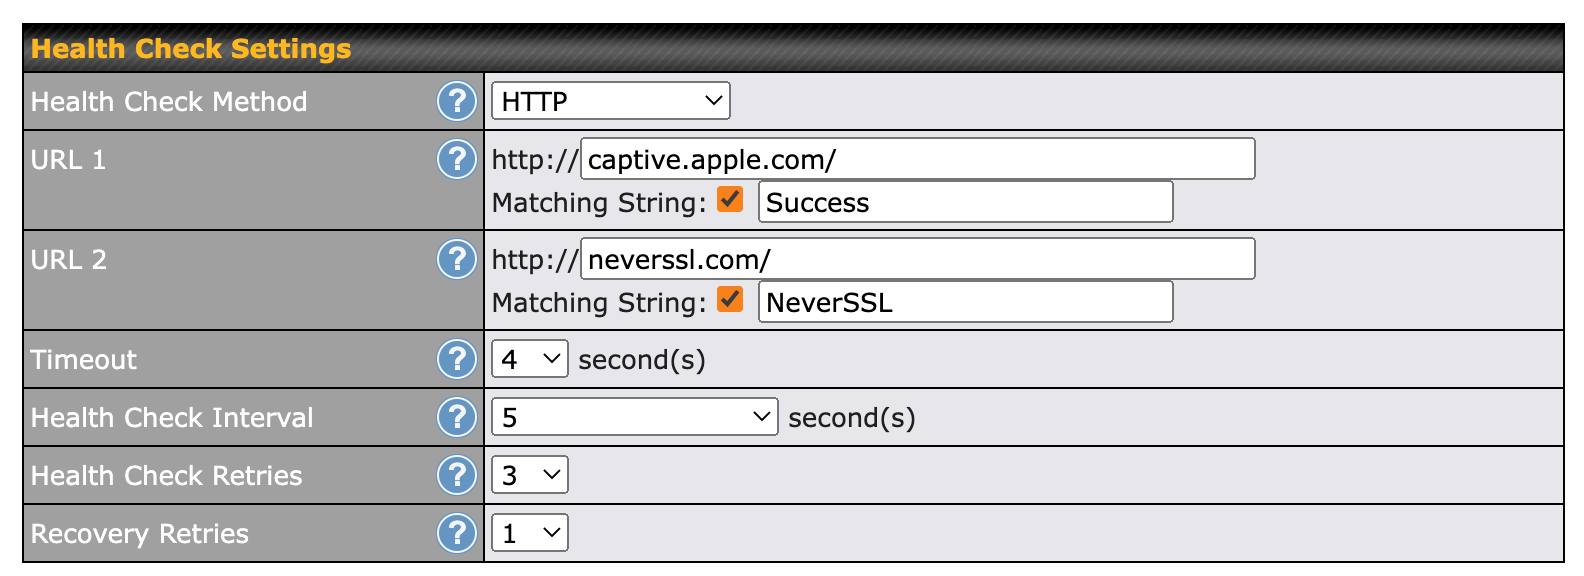
- Scroll down on the Starlink ethernet WAN connection to the Health Check Settings.
- Change the Health Check Method to "HTTP"
- For URL 1 use:
captive.apple.com/
Matching string: Success - For URL 2 use:
neverssl.com/
Matching string: NeverSSL - Timeout is 4 seconds
- Health check interval should be 5 seconds
- Health check retries is 3
- Recovery retries is 1
These settings use two reliable websites to check against to see if they are reachable, and it looks for specific words on the pages to ensure that everything is working. It tries to do this every 5 seconds, and it will consider the Starlink connection failed if it fails 3 times. If it succeeds once, it considers the connection back up again.
This means it could take 15 seconds before the connection is flagged as failed, but is about as aggressive as I would be - otherwise with transient issues you might cause the connection to be listed as down when it really isn't.
Upload / Download Bandwidth
Also in the details for the WAN connection connected to Starlink, you should set the upload and download bandwidth limits so that other features within the Peplink router understand the overall bandwidth available.
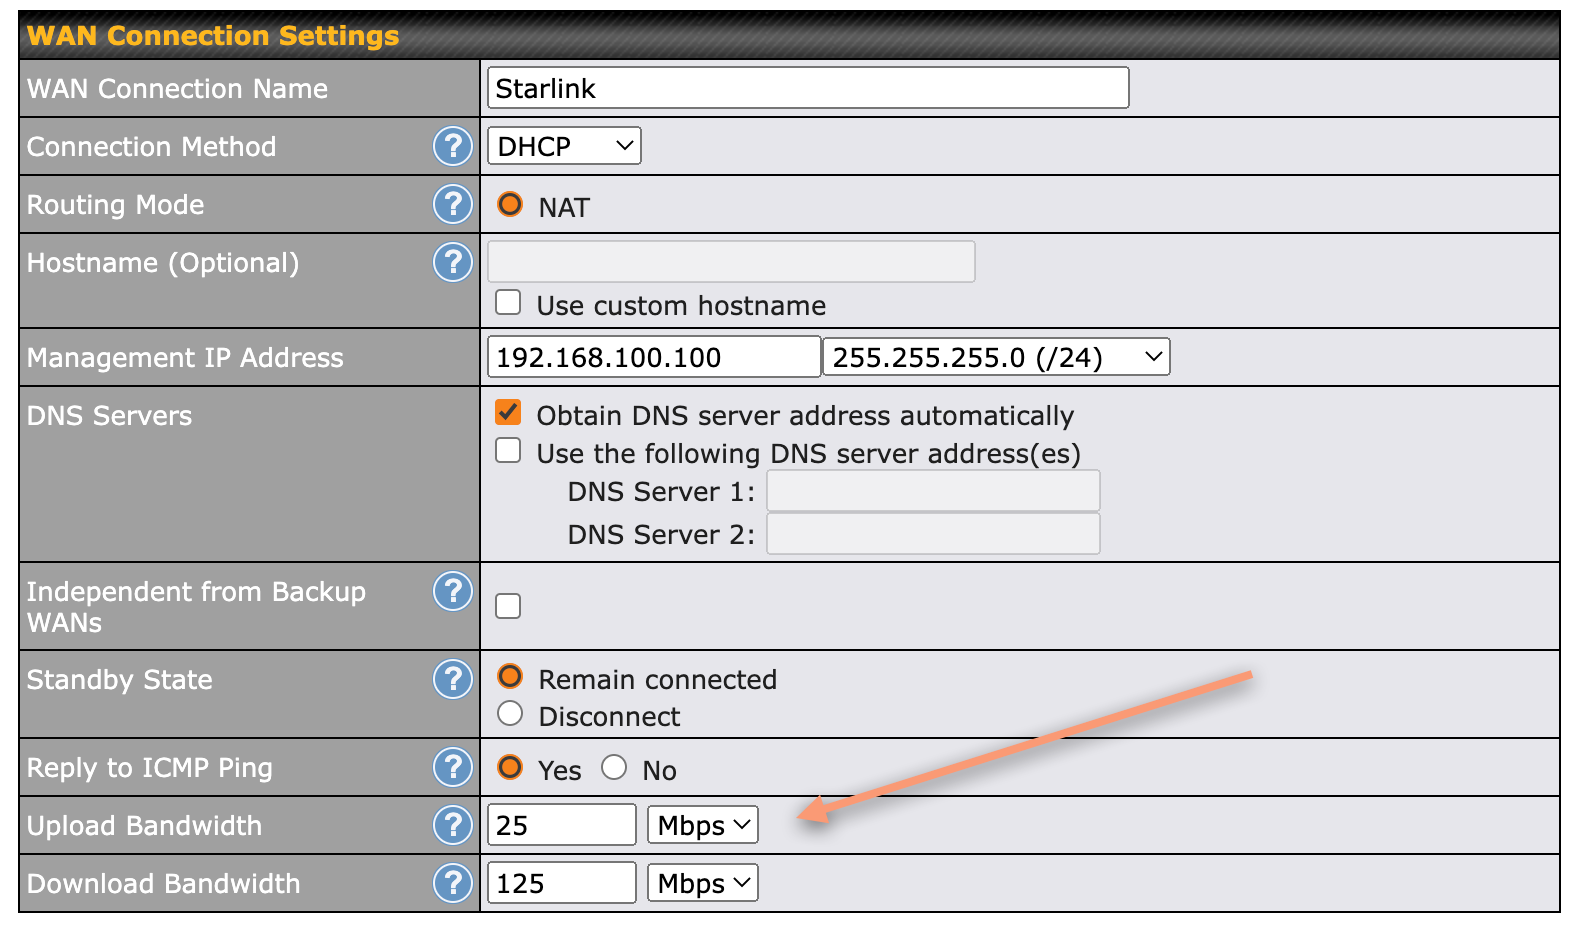
Scroll down in the details page for the Starlink connection to the WAN Connections area. Set the Upload and Download Bandwidth to something similar to the above. I choose conservative values rather than the maximums so that calculations are more realistic. These are the average numbers I see on a daily basis, so you may need to do some testing to get these for your area/situation.
These numbers are used with the SpeedFusion feature and other load balancing algorithms to calculate which internet connection to use when you're using them in a redundant fashion.
Bypass Mode
Once you have the Starlink router working over ethernet and the health checks are working reliably, I would recommend turning on Bypass Mode. This turns off the WiFi radios in the Starlink router and uses the ethernet adapter only. There are two reasons for doing this:
- Less WiFi networks - less WiFi networks are better. Boats already have too many, and if you're in a marina, you're familiar with the hundreds that are near you from chart plotters, hotspots, routers, and everything else. 2.4Ghz WiFi in particular is crowded, and if you can eliminate one more network, that means your Peplink equipment will have a better time doing its thing.
- Less work for Starlink? - my experience with most devices is that the less they have to do, the better they perform. It's also just less complexity.
Keep in mind that when you do this, you can't connect to the Starlink WiFi network until you perform a factory reset to get the WiFi network back. That shouldn't be an issue if you followed the instructions above to enable the management IP.
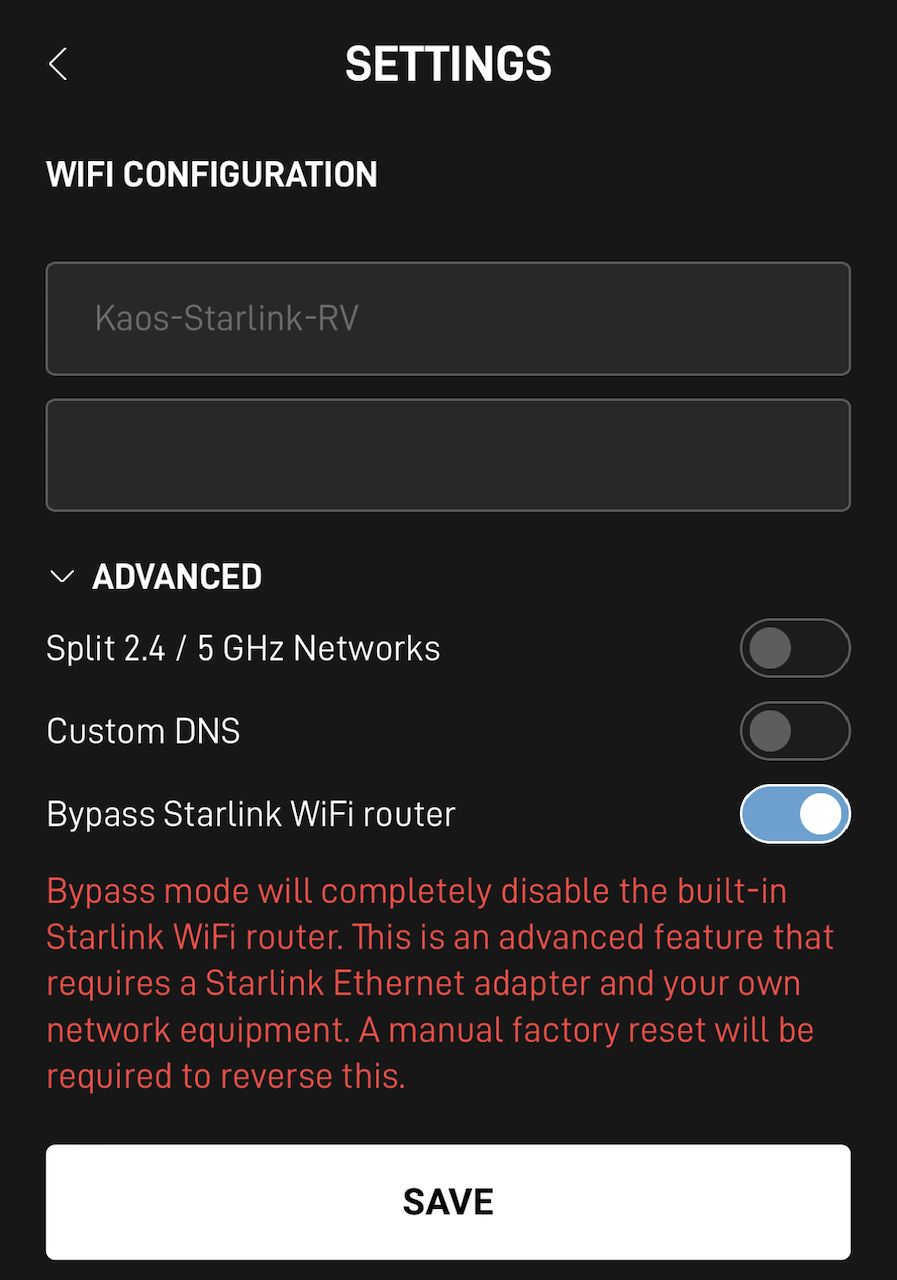
- To turn on Bypass Mode, go into Settings on your Starlink App.
- Expand the Advanced area
- Turn on the toggle for "Bypass Starlink WiFi router" and click Save. Follow the prompts
The unit will reboot - it can take a bit longer than a normal reboot - not sure why, but don't lose hope if it seems like a few minutes.
These are the basics to getting Peplink + Starlink to work together, but to take advantage of key features, you need to configure SpeedFusion and related settings.
If you don't want redundancy, or don't have a router with a cellular connection, you could stop here and skip the rest.
Peplink + Starlink Advanced Setup
To get the biggest benefit, there are additional setup steps required. Some of these steps will vary depending on the type of Peplink router you have - the number of cellular connections, etc.
Priorities
One of the most basic features of Peplink products is to be able to control the priorities of your connections.
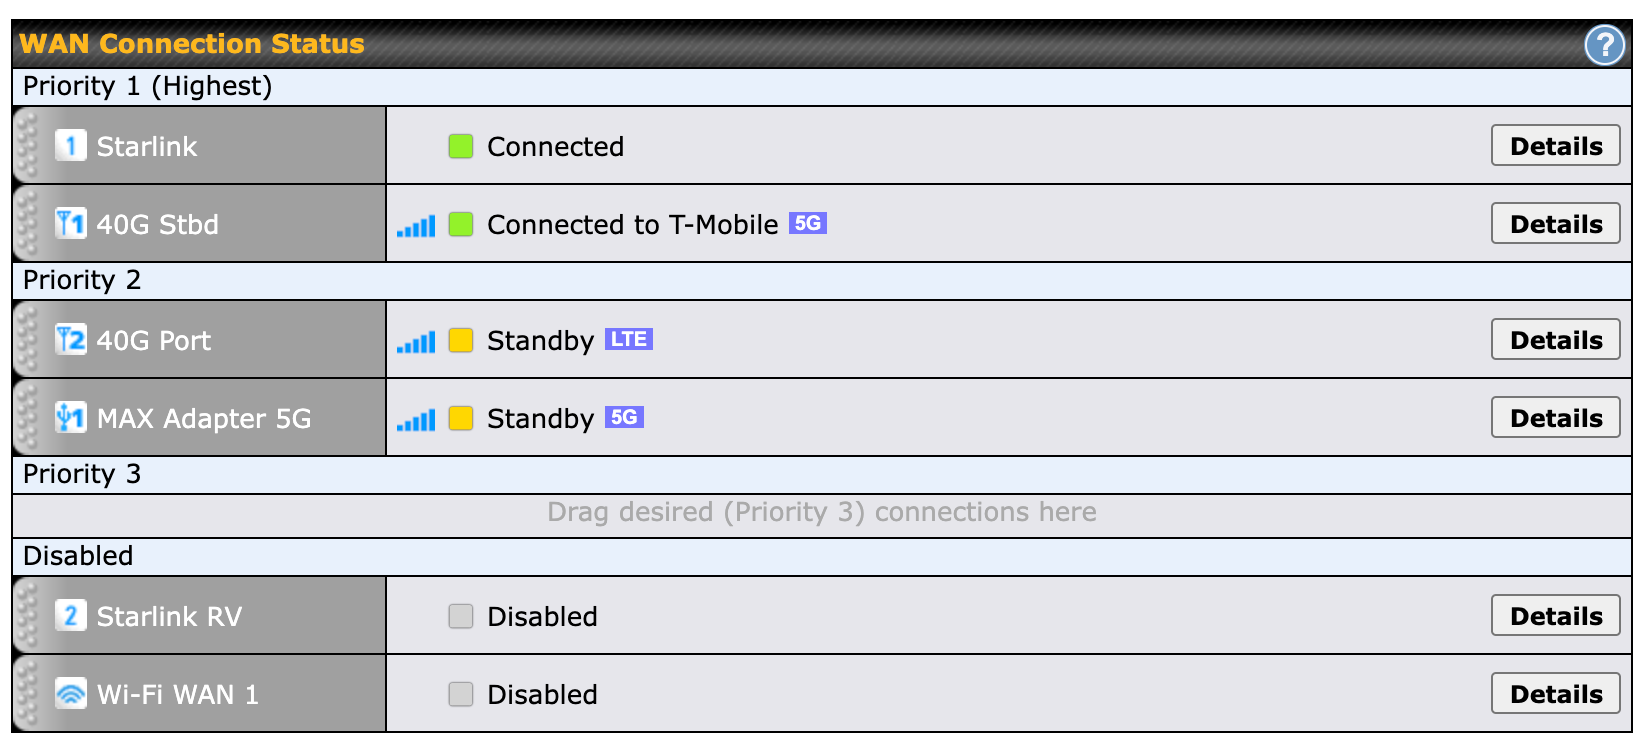
Depending on your location and work criticality, as well as your cellular plan limits, you may wish to have both your Starlink connection and a cellular connection in the same priority so that they share duties of keeping you connected. This is especially useful when using SpeedFusion (next step) so that there is no delay when Starlink fails - otherwise, the health check has to fail before it will begin using Priority 2 items which can take 15 seconds.
However, keep in mind by doing this that when we configure SpeedFusion below, you will be using bandwidth on both connections - you'll need to keep this in mind depending on your monthly bandwidth limit for your cellular plan. The usage is limited to how you configure things and usually will only include your critical work apps, but it is still a consideration when planning.
If I am on a critical video call, I always have at least one cellular connection in Priority 1 with Starlink to provide complete redundancy.
SpeedFusion Connect
The next step is to enable SpeedFusion Connect. This is technology that Peplink has had for a few years that really sets their solution apart from others. It allows you to combine multiple internet sources and provide reliable, redundant, and optimized connectivity for critical traffic and devices.
It does this by combining two or more internet connections and sending parts or all of your critical traffic over those connections at the same time to a location in the cloud, watching the connection quality, and changing things on the fly to provide the best result. I'm simplifying the entire solution, and I'm not going into all of the settings and details in this guide, but will give you enough to be dangerous.
That being said, there are a lot of steps here, and they have changed slightly every few months as Peplink refines things, so be aware.
SpeedFusion Connect is a paid service, but you get an initial amount with almost all initial purchased Peplink products. As an example, for 1TB it's $40 - very affordable for the features it provides. If you use it for critical traffic, it would be hard to get through that amount in a year's time.
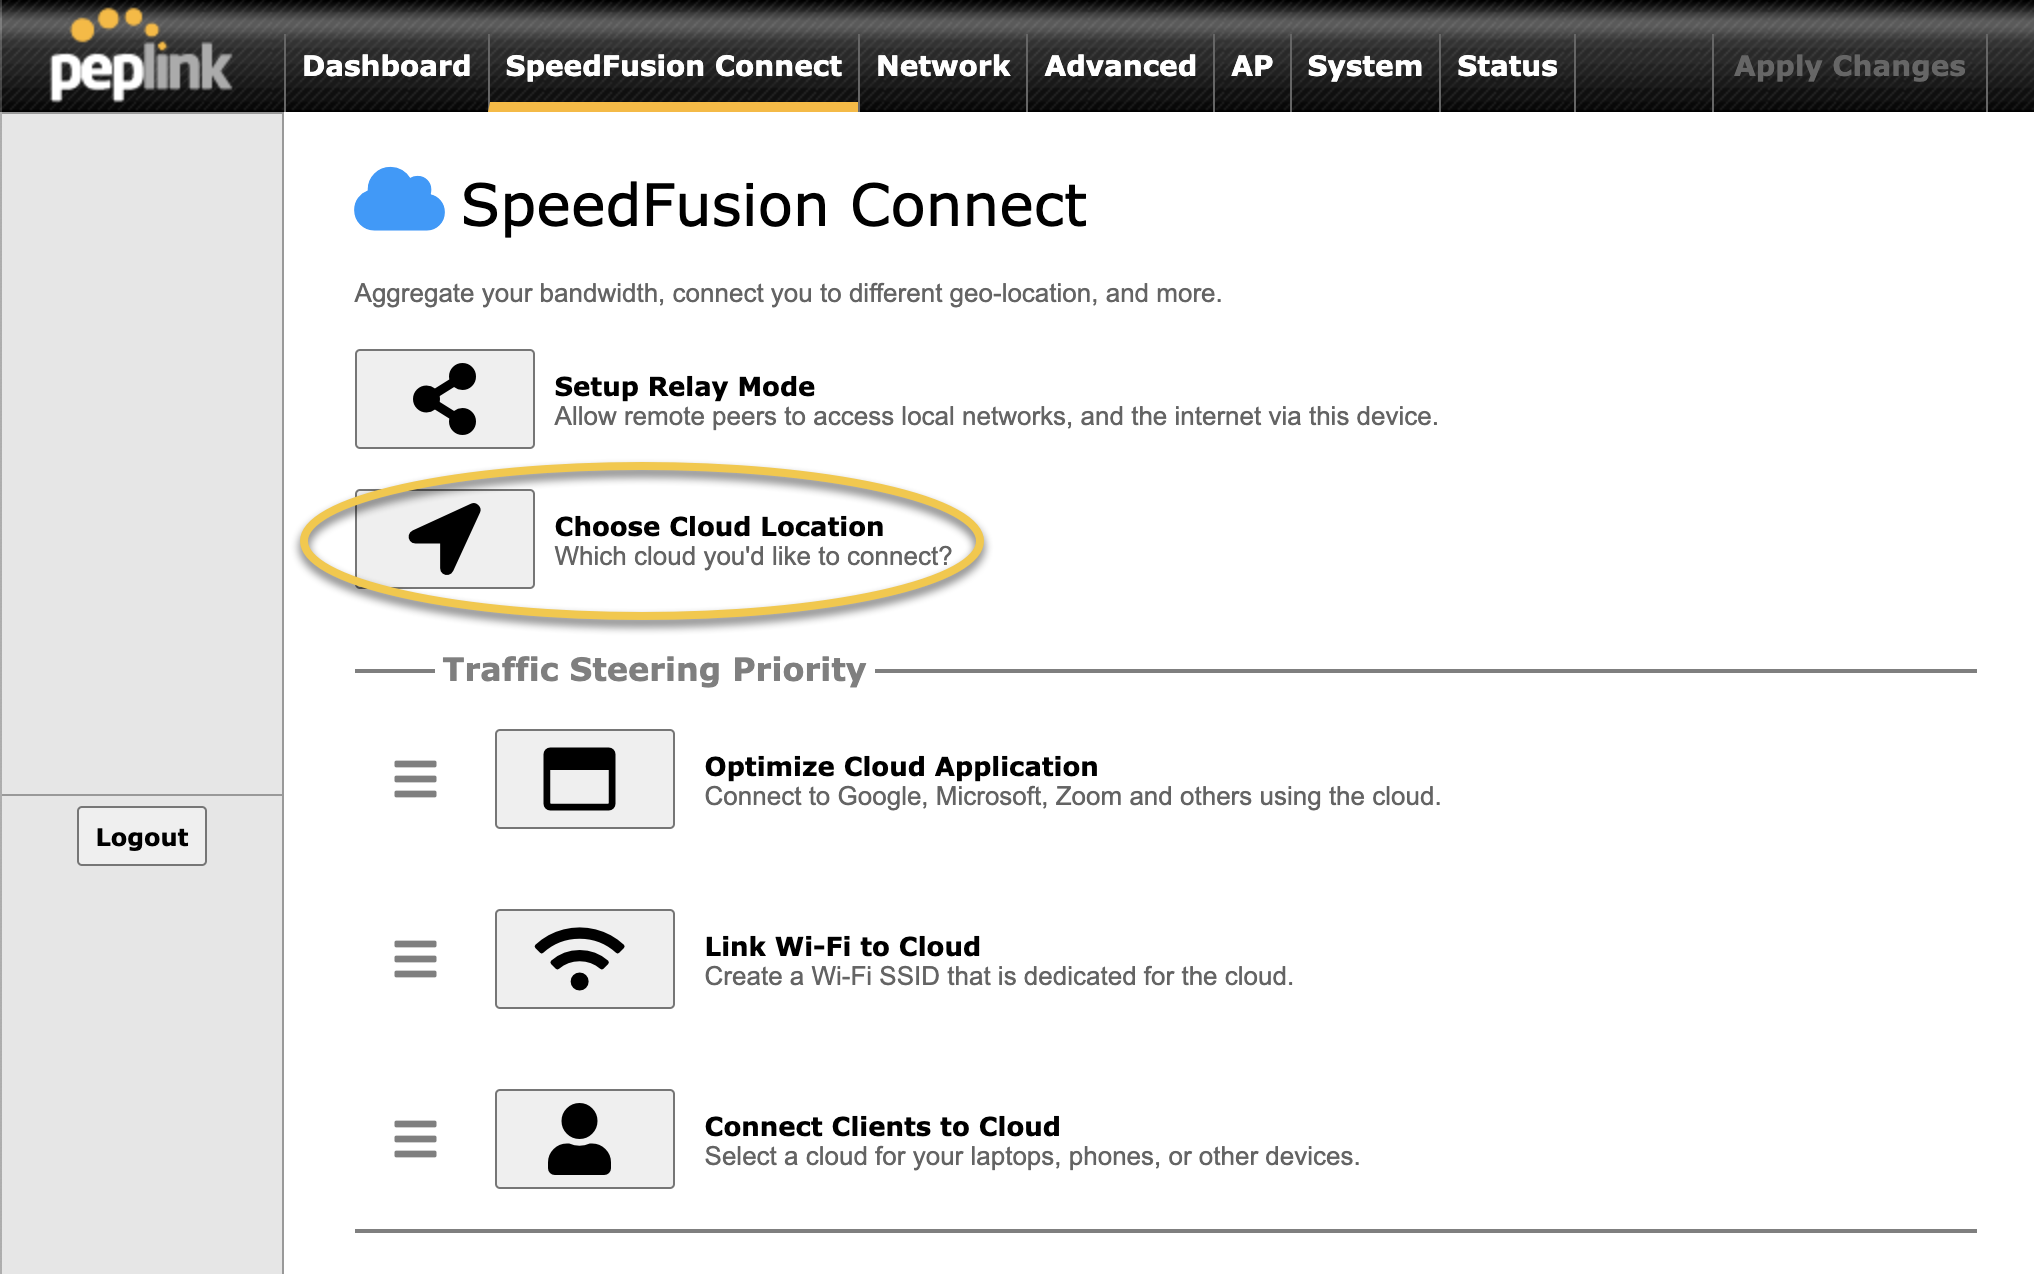
Once you sign up or activate your existing subscription, you'll need to go into SpeedFusion Connect and Choose a Cloud Location.
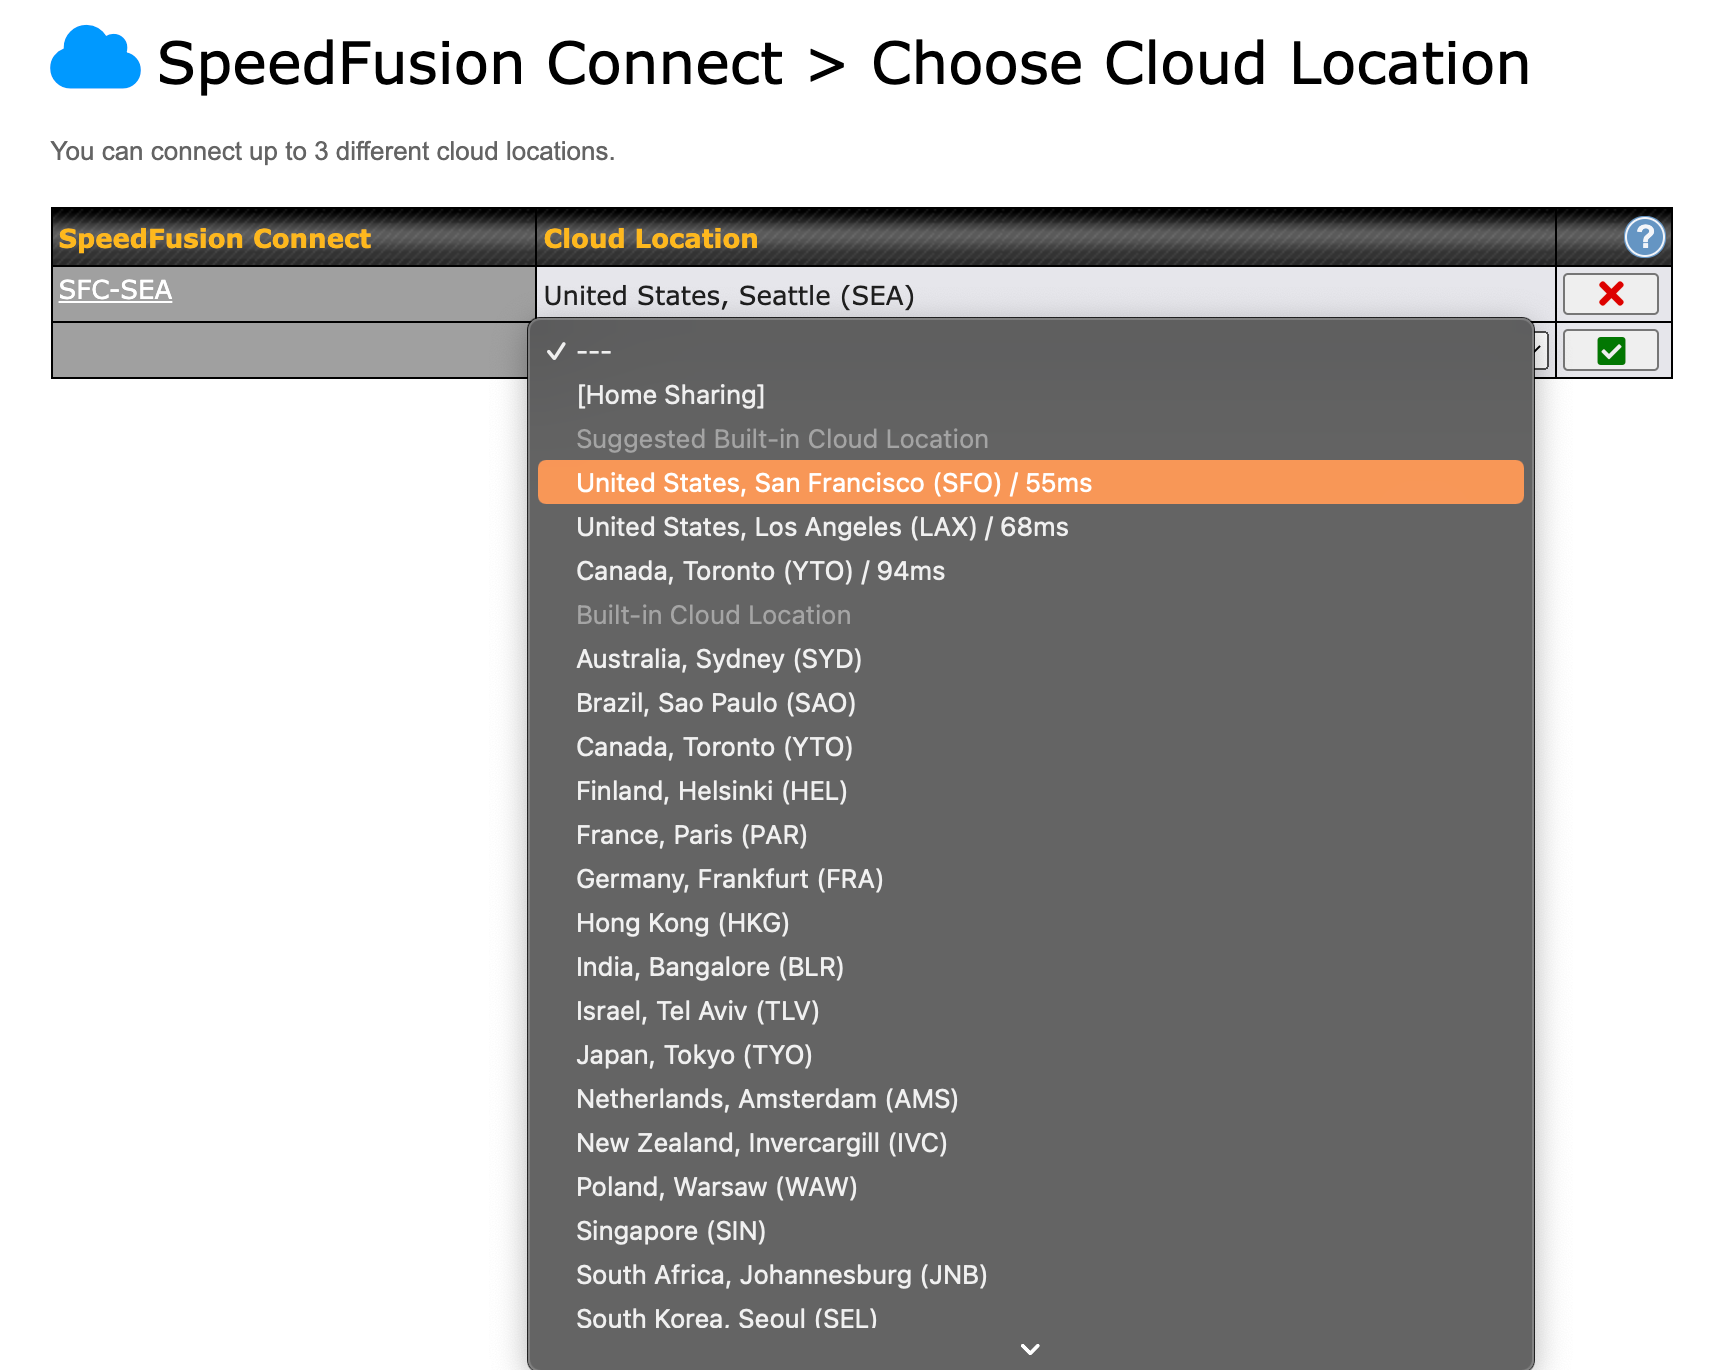
You'll then be presented with a list of locations. Choose the one closest to you. Once you've selected a location, click Apply in the upper right and save the configuration.
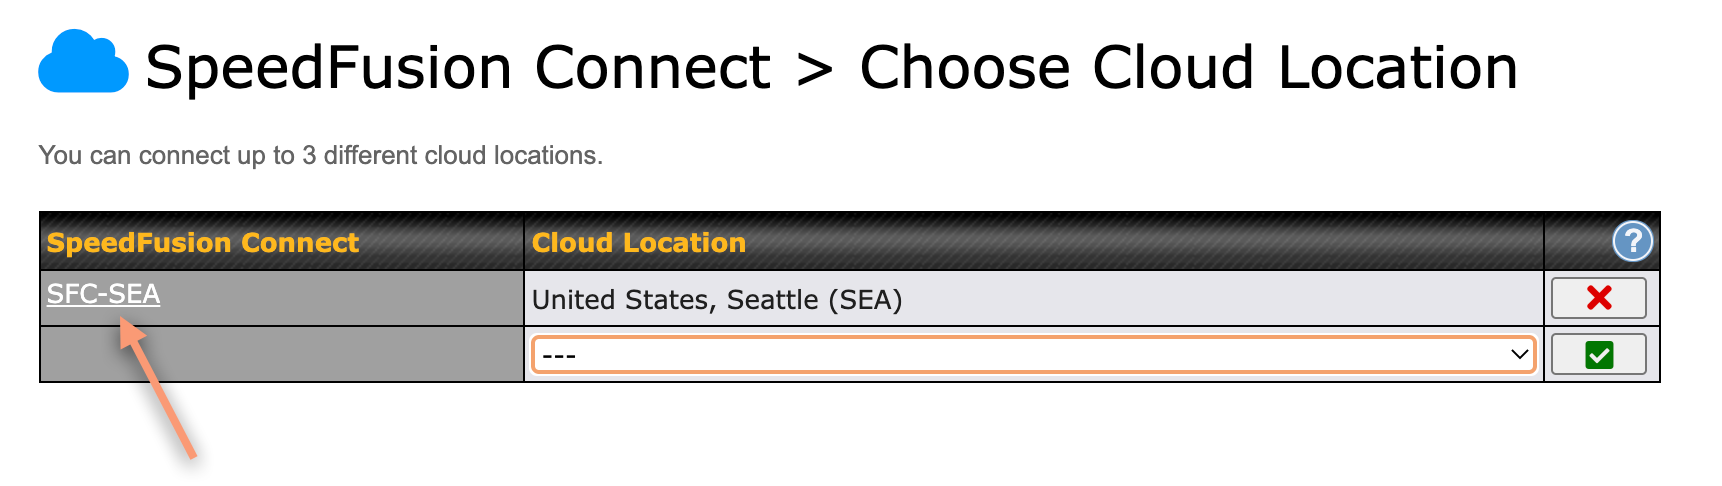
Once that has saved, click on the location you selected to see more of the details.
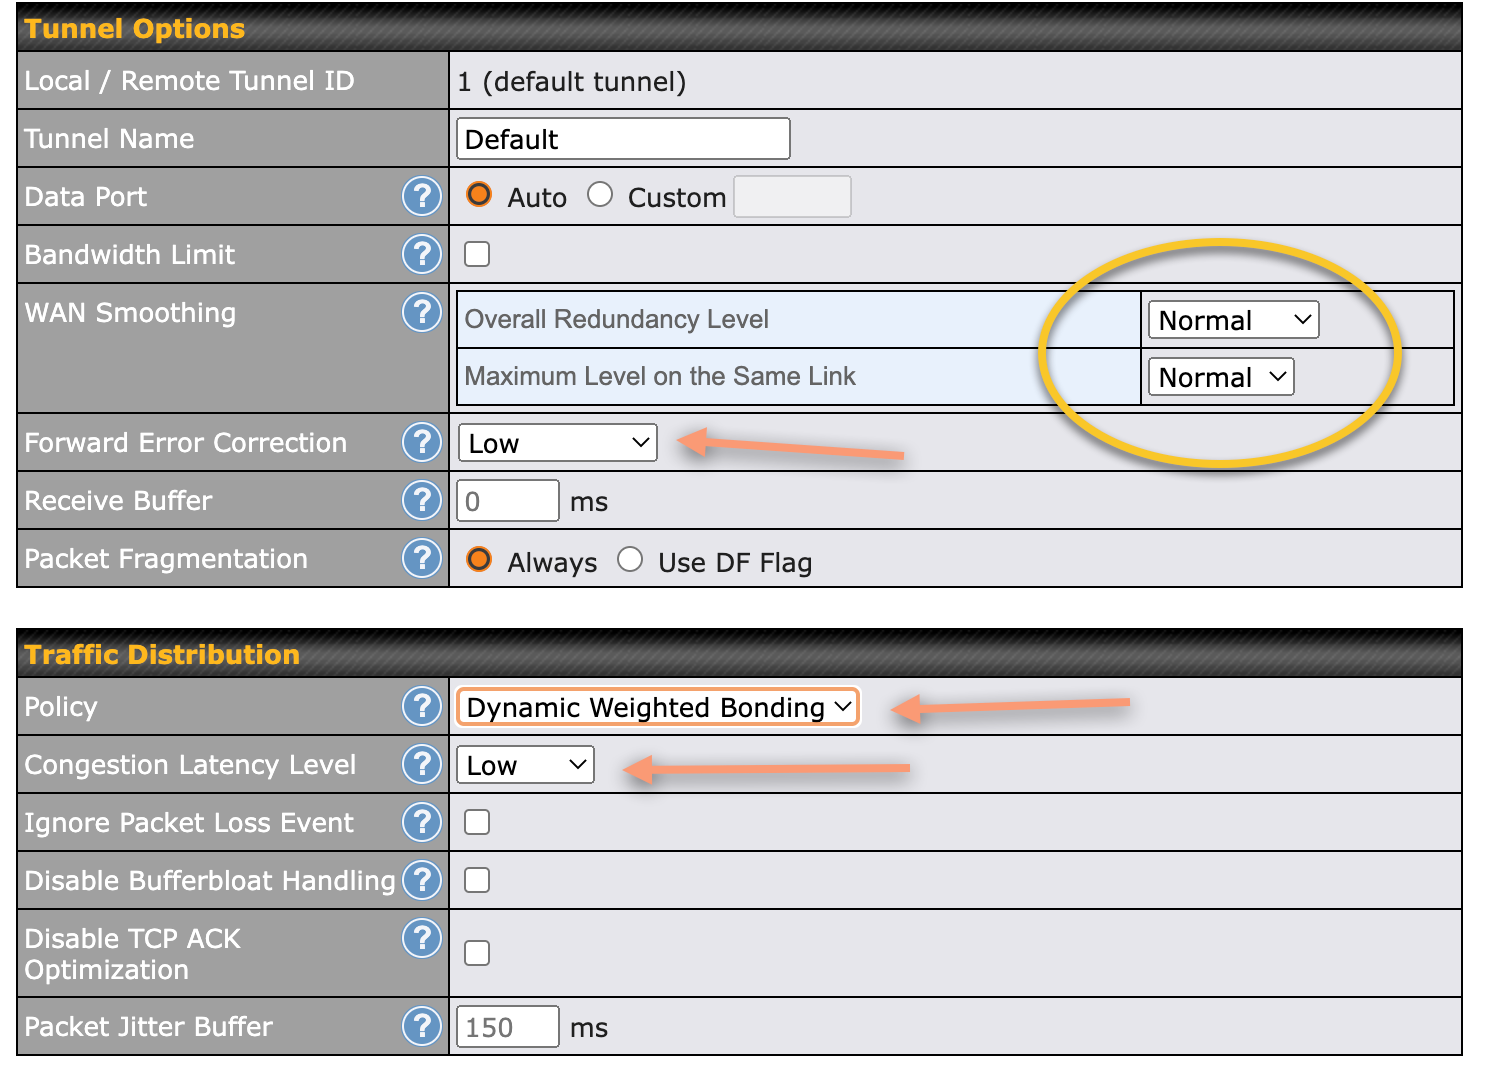
This is where it gets a bit more complicated. These are the settings that dictate how the connection is optimized and what happens to the various internet connections and traffic.
WAN Smoothing - this helps with both packet loss and high latency. I set both options to "Normal".
Forward Error Correction - abbreviated as FEC, deals with packet loss. It will send duplicates of traffic to prevent lost packets. I set mine to "Low".
Policy - I use "Dynamic Weighted Bonding" as it is built for cellular and Starlink-like connections. This is how the outbound link is selected when traffic is needed to be sent out.
Congestion Latency Level - I use "Low" which monitors the congestion level of a connection. This setting is a bit more aggressive, but I would prefer not to be sending out Zoom video over a link that is not doing well.
These are the settings I've found to be the most useful to maintain high quality connections for critical work apps. Keep in mind that all of these can be adjusted depending on many, many factors - the quality of your cellular connections, if you're underway or at anchor, the speed of all of your connections, and many other factors. This is what works for me, and your mileage may vary.
Using SpeedFusion Connect
You have the basic SpeedFusion Connect up and running, but none of your devices or traffic is actually going through it yet. You have to specify the devices or types of traffic that you want to send out this connection. There are two options I recommend:
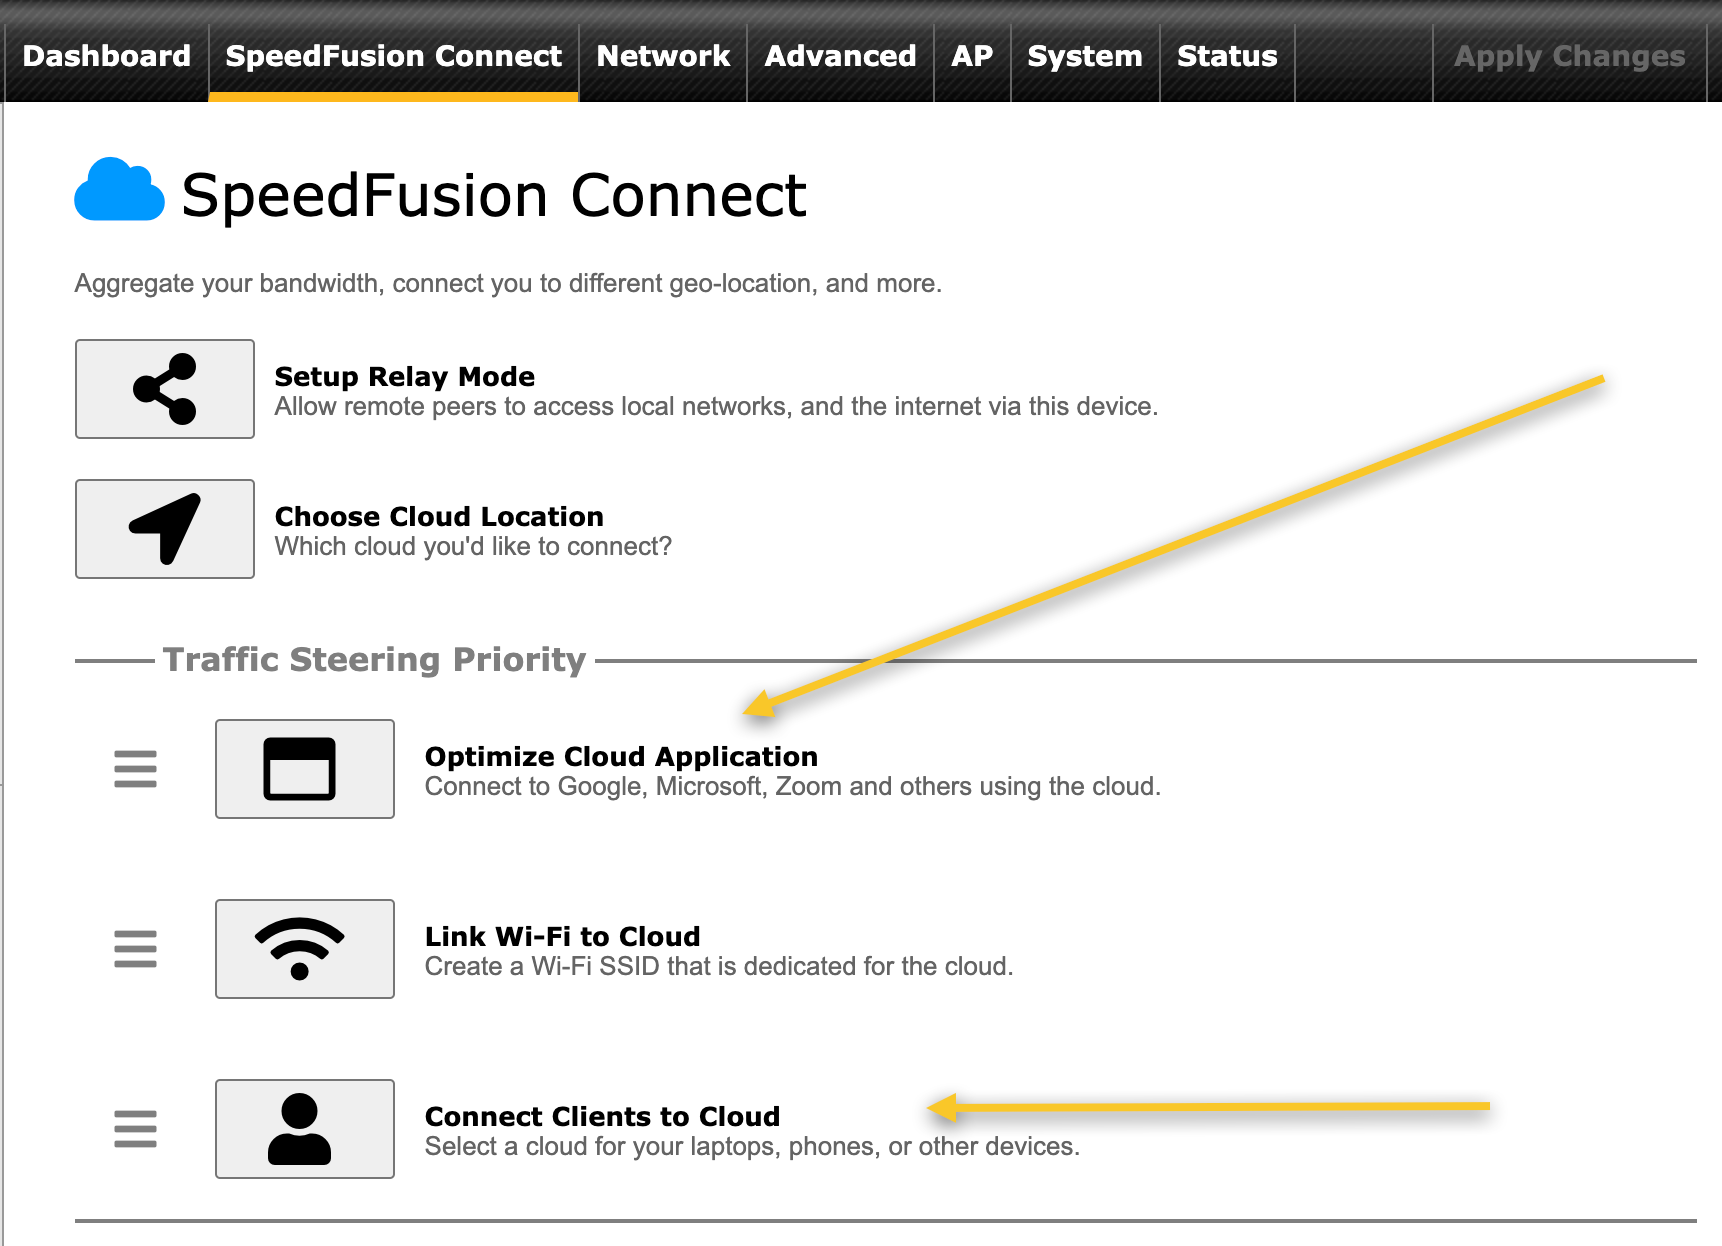
Optimize Cloud Application allows you to choose specific types of traffic, regardless of what device on your network generates it, to send out the SpeedFusion connection, making it more reliable, etc. This is the one I recommend using the most, and the one I use for almost all of my configurations both for my own network, and those folks I setup through consulting.
Connect Clients to Cloud allows you to pick specific clients to use SpeedFusion for everything they transmit. Be careful with this option, as this means everything from the computer or device in question will use the SpeedFusion connection. This might seem like a good thing, but think of software and app updates, and other non-critical traffic. Some of those are huge, and could burn through your bandwidth limits quickly.
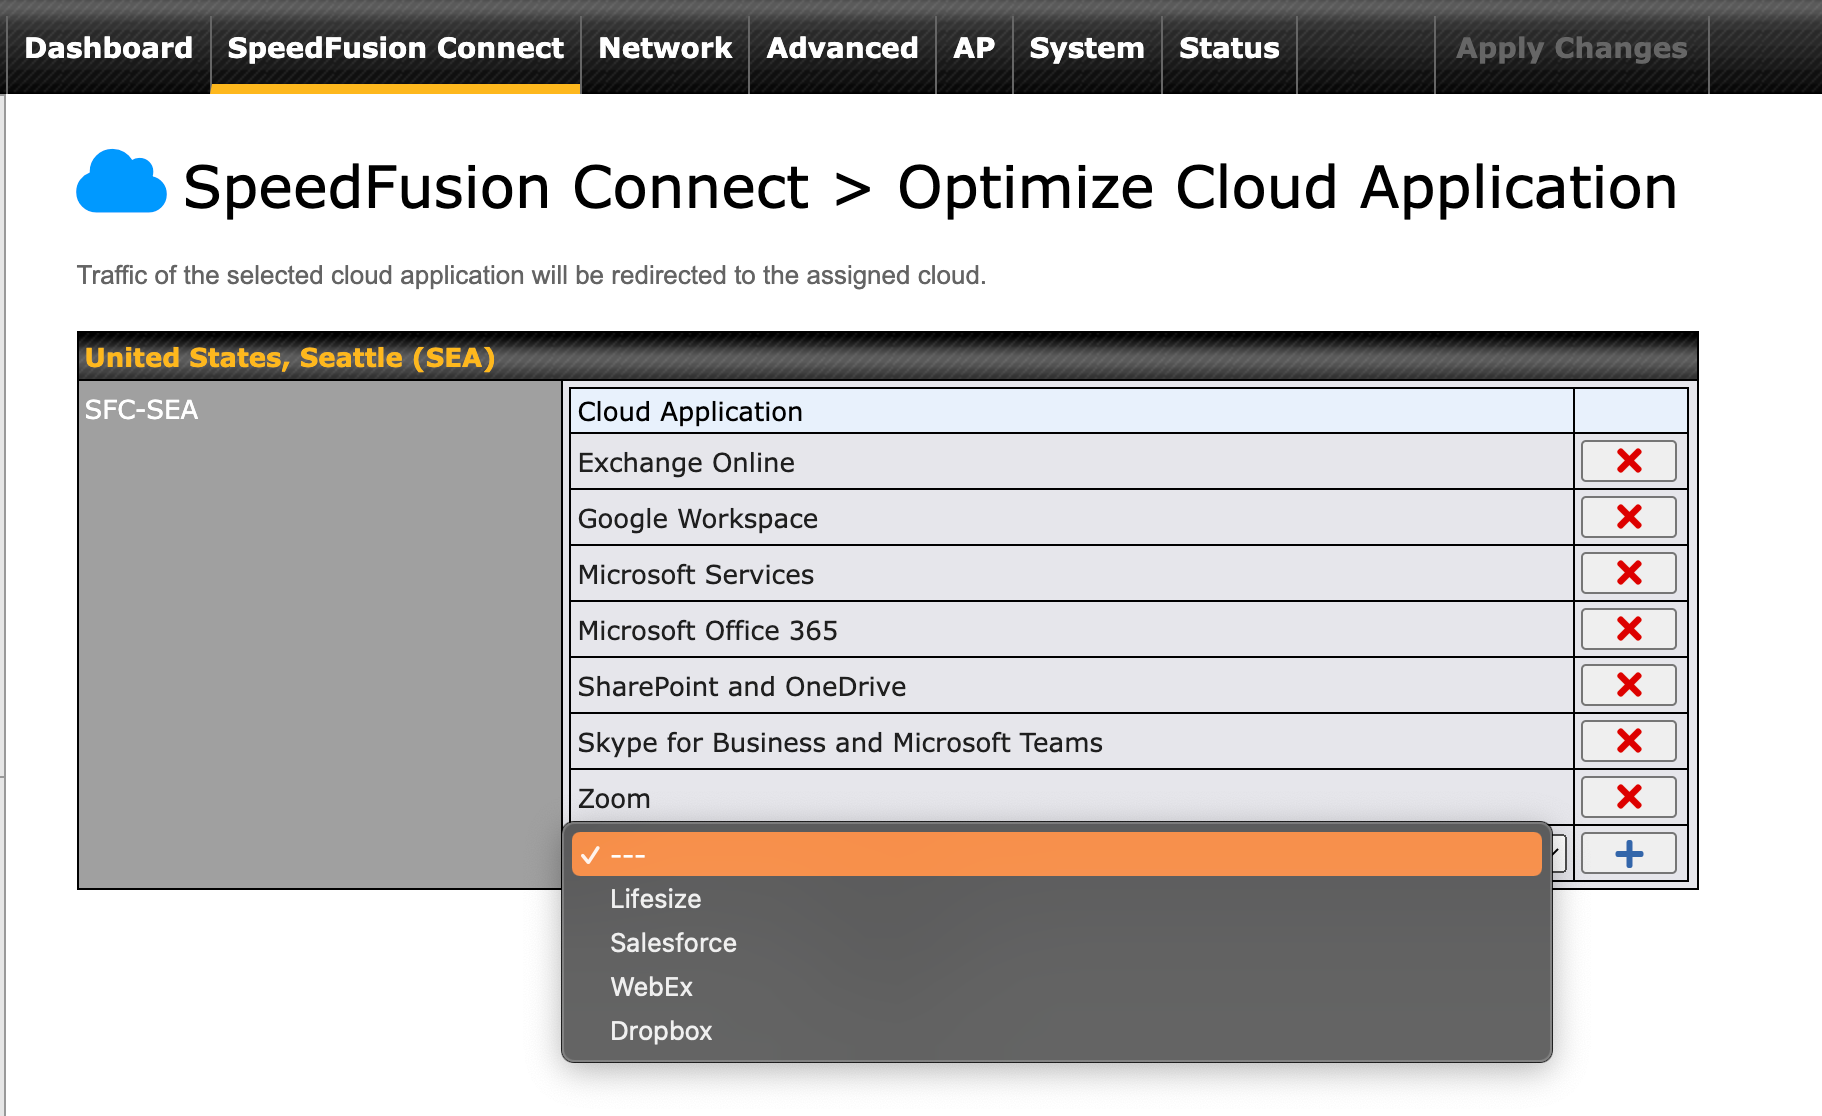
You can choose from a list that Peplink maintains (and has added to with future releases) of the most popular business applications that you might want to send out your SpeedFusion connection. As I mention above, this is the way I use the system 99% of the time, and it works great. It ensures my office applications and video and audio sessions are using the most redundant connection out of my network.
Other Settings
In order to get the most out of your SpeedFusion connection, I also recommend these settings.
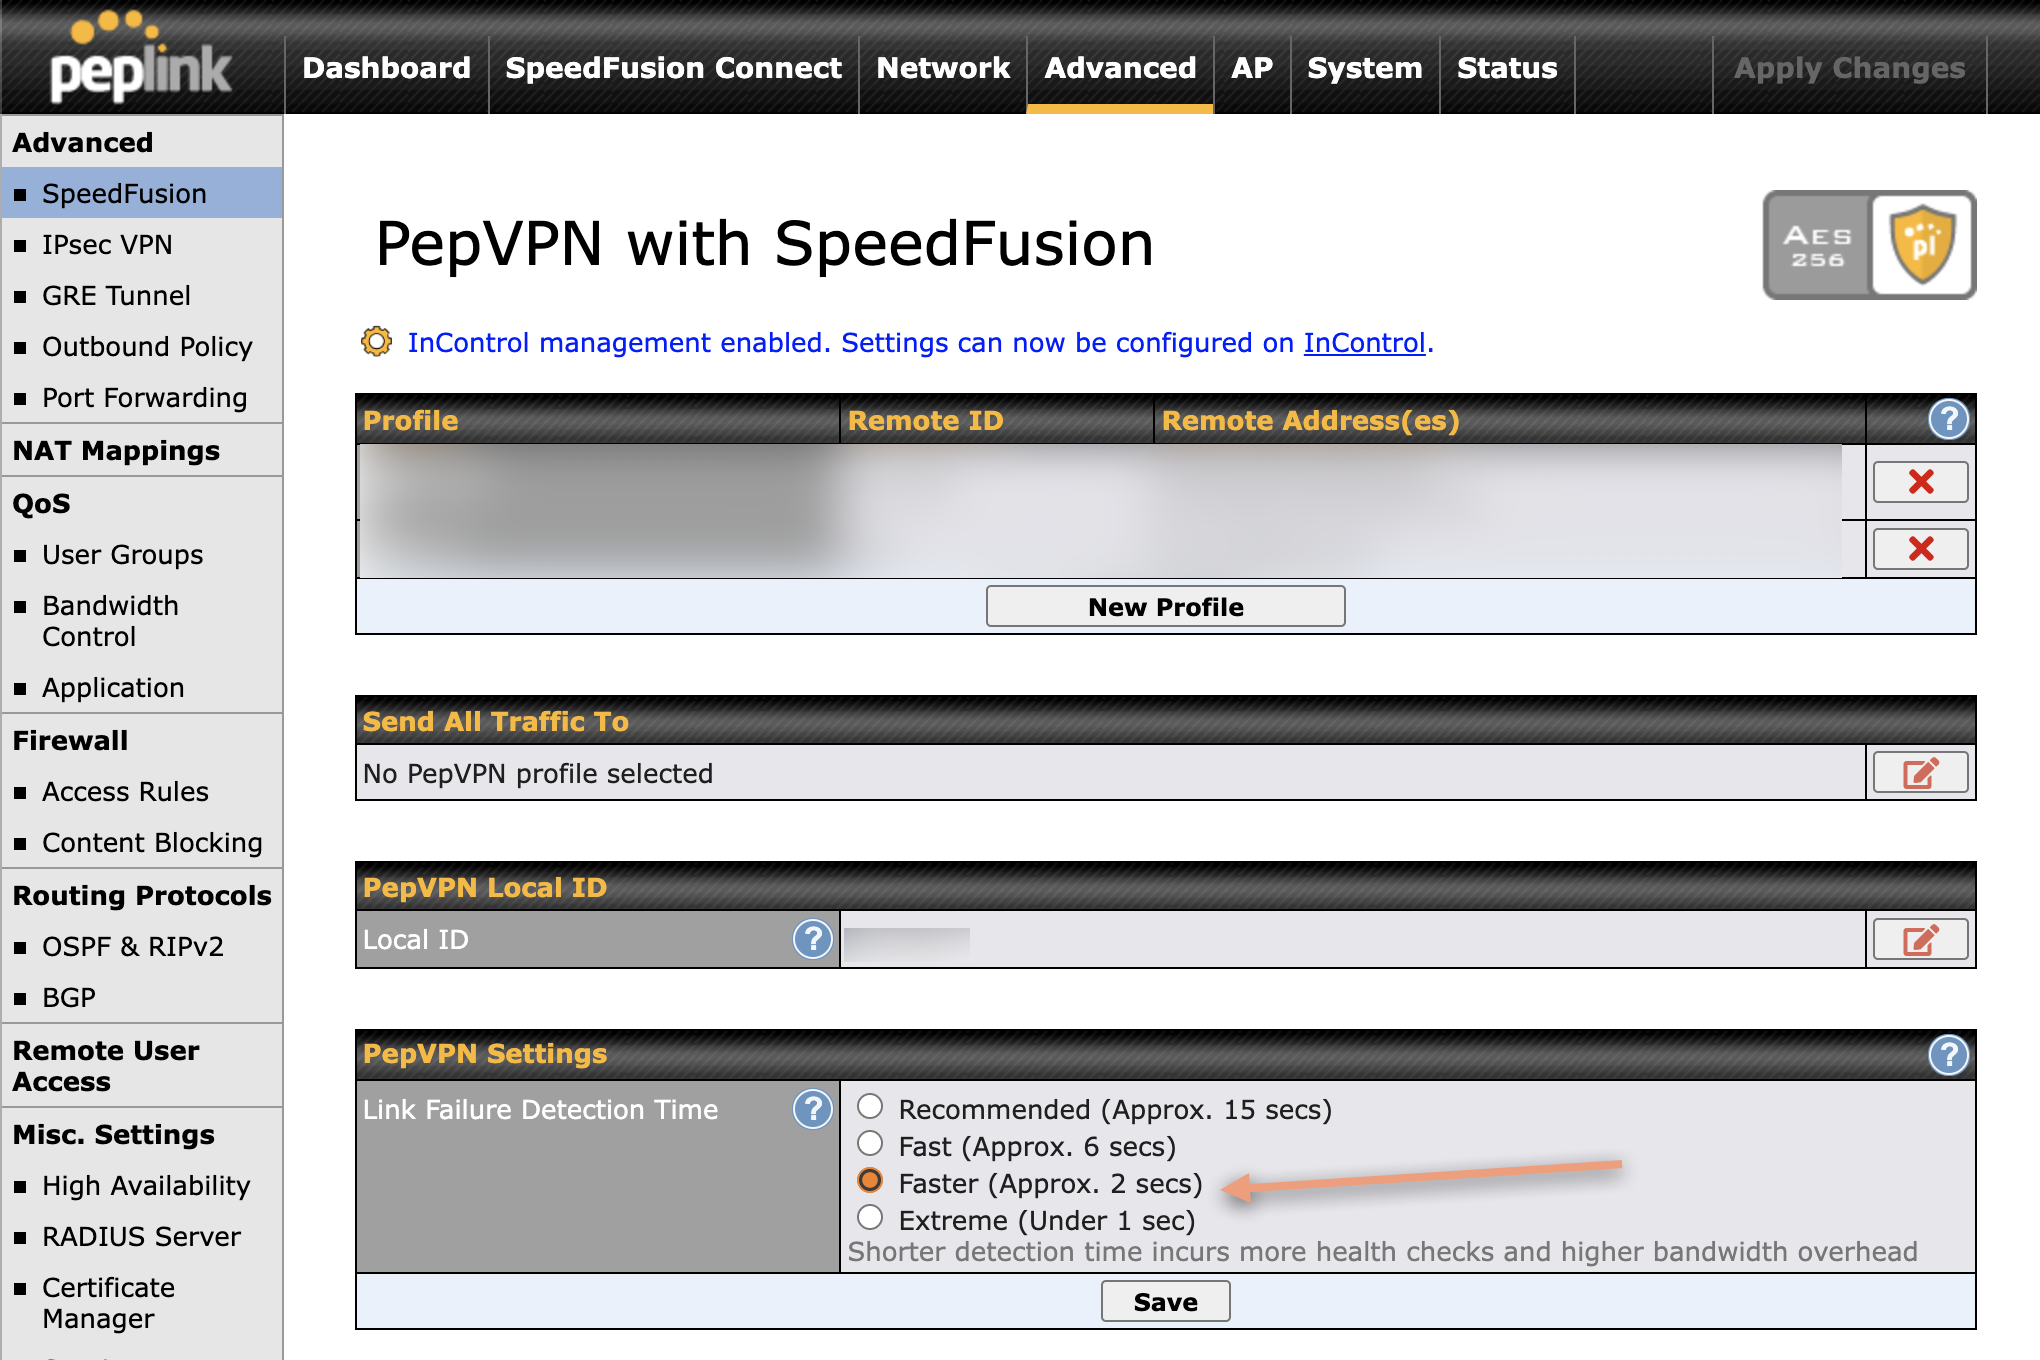
In my product under Advanced > SpeedFusion (can be found elsewhere on other products) you will find the above screen showing options for PepVPN with SpeedFusion. Under the bottom box, PepVPN Settings, I always select "Faster" which is the time it takes to notice a failed connection when using SpeedFusion.
These checks are different than the health checks we set up earlier. The health checks are for the health of the overall connection - does it actually have internet access, etc. These checks are whether the connection is good enough to deal with the traffic across it, and whether it is connected to SpeedFusion Cloud.
By changing this to Faster, it will result in more checks of all of your connections, which means more bandwidth used, so be aware with cellular connections. However, I want failures to be detected as quickly as possible, this is the best setting without being too extreme.
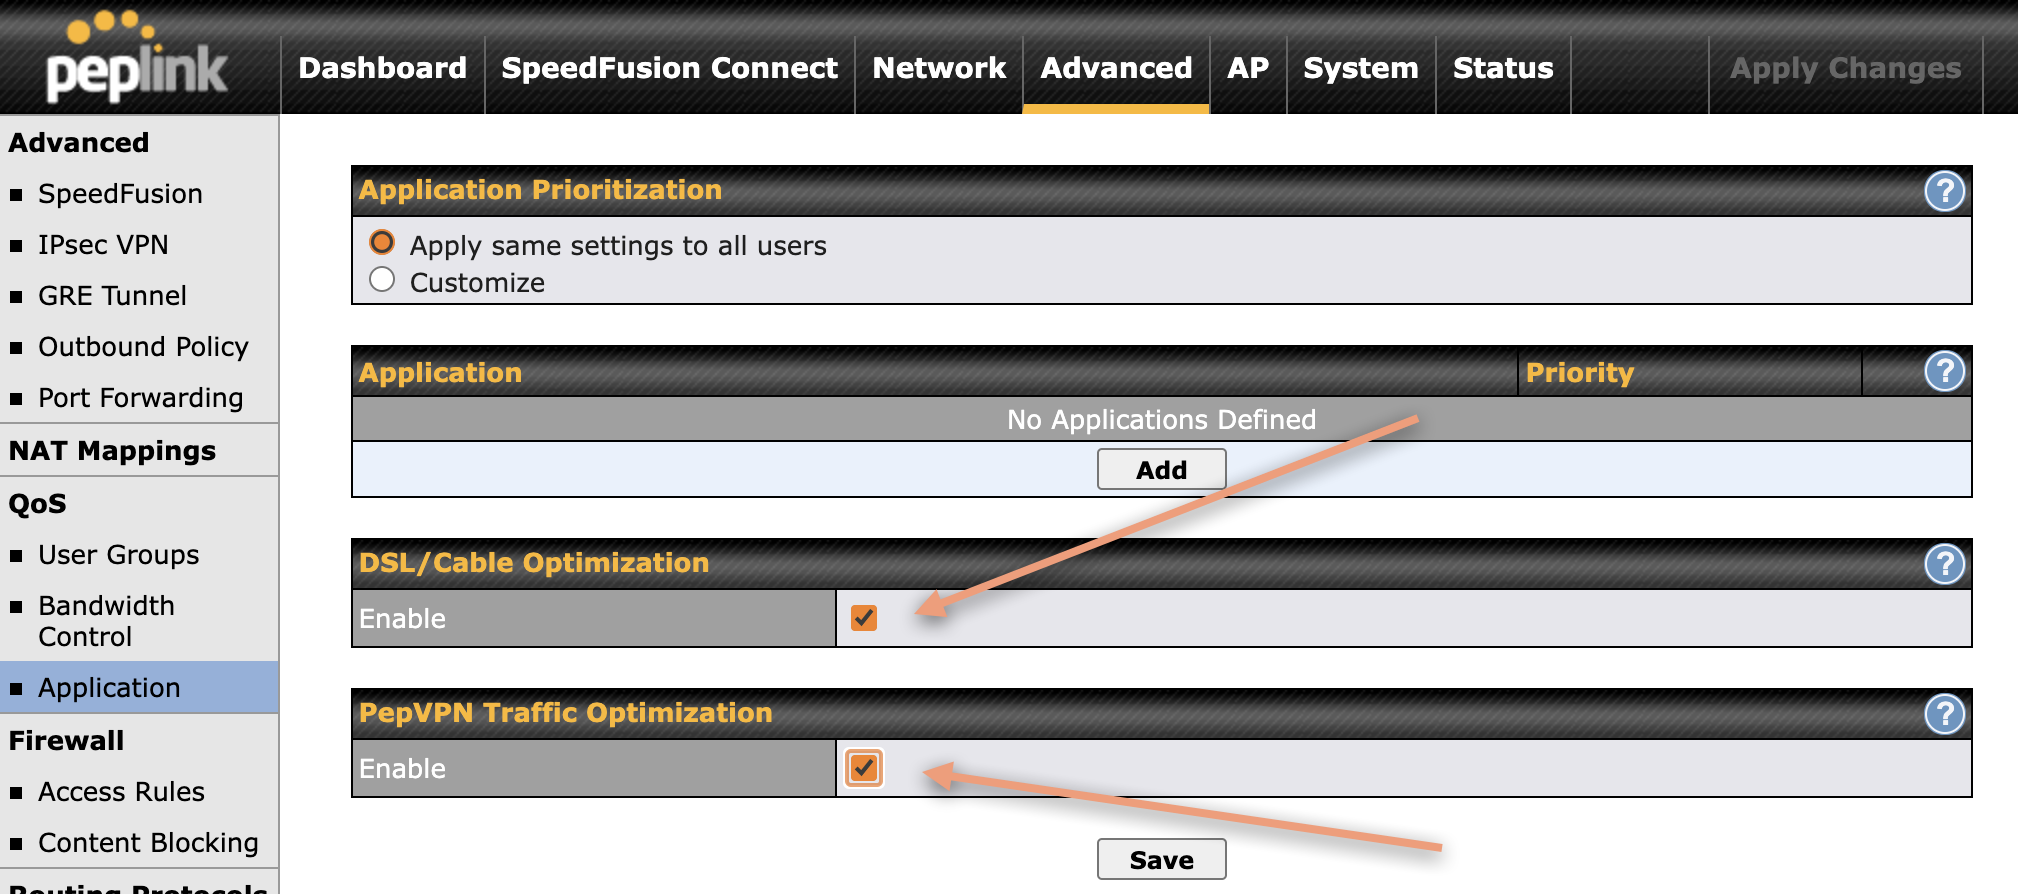
Since both Starlink and most cellular connections have asynchronous bandwidth (higher download vs. lower upload), you will want to turn on the two options shown above. In my Peplink product, they are under Advanced > Application, but they can also be under Network > QoS > Application.
Both use the info you input under Upload / Download Bandwidth above for the Starlink connection, so make sure to do that. It will also help if you do the same for your cellular connections.
These options ensure that you don't overwhelm the upload side of the connection when things are busy, and also make sure that the SpeedFusion traffic takes priority over other traffic on the connection.
Monitoring SpeedFusion
At this point, you have the SpeedFusion connection configured, and have chosen some traffic types to send out the link, but how do you know if it is working?
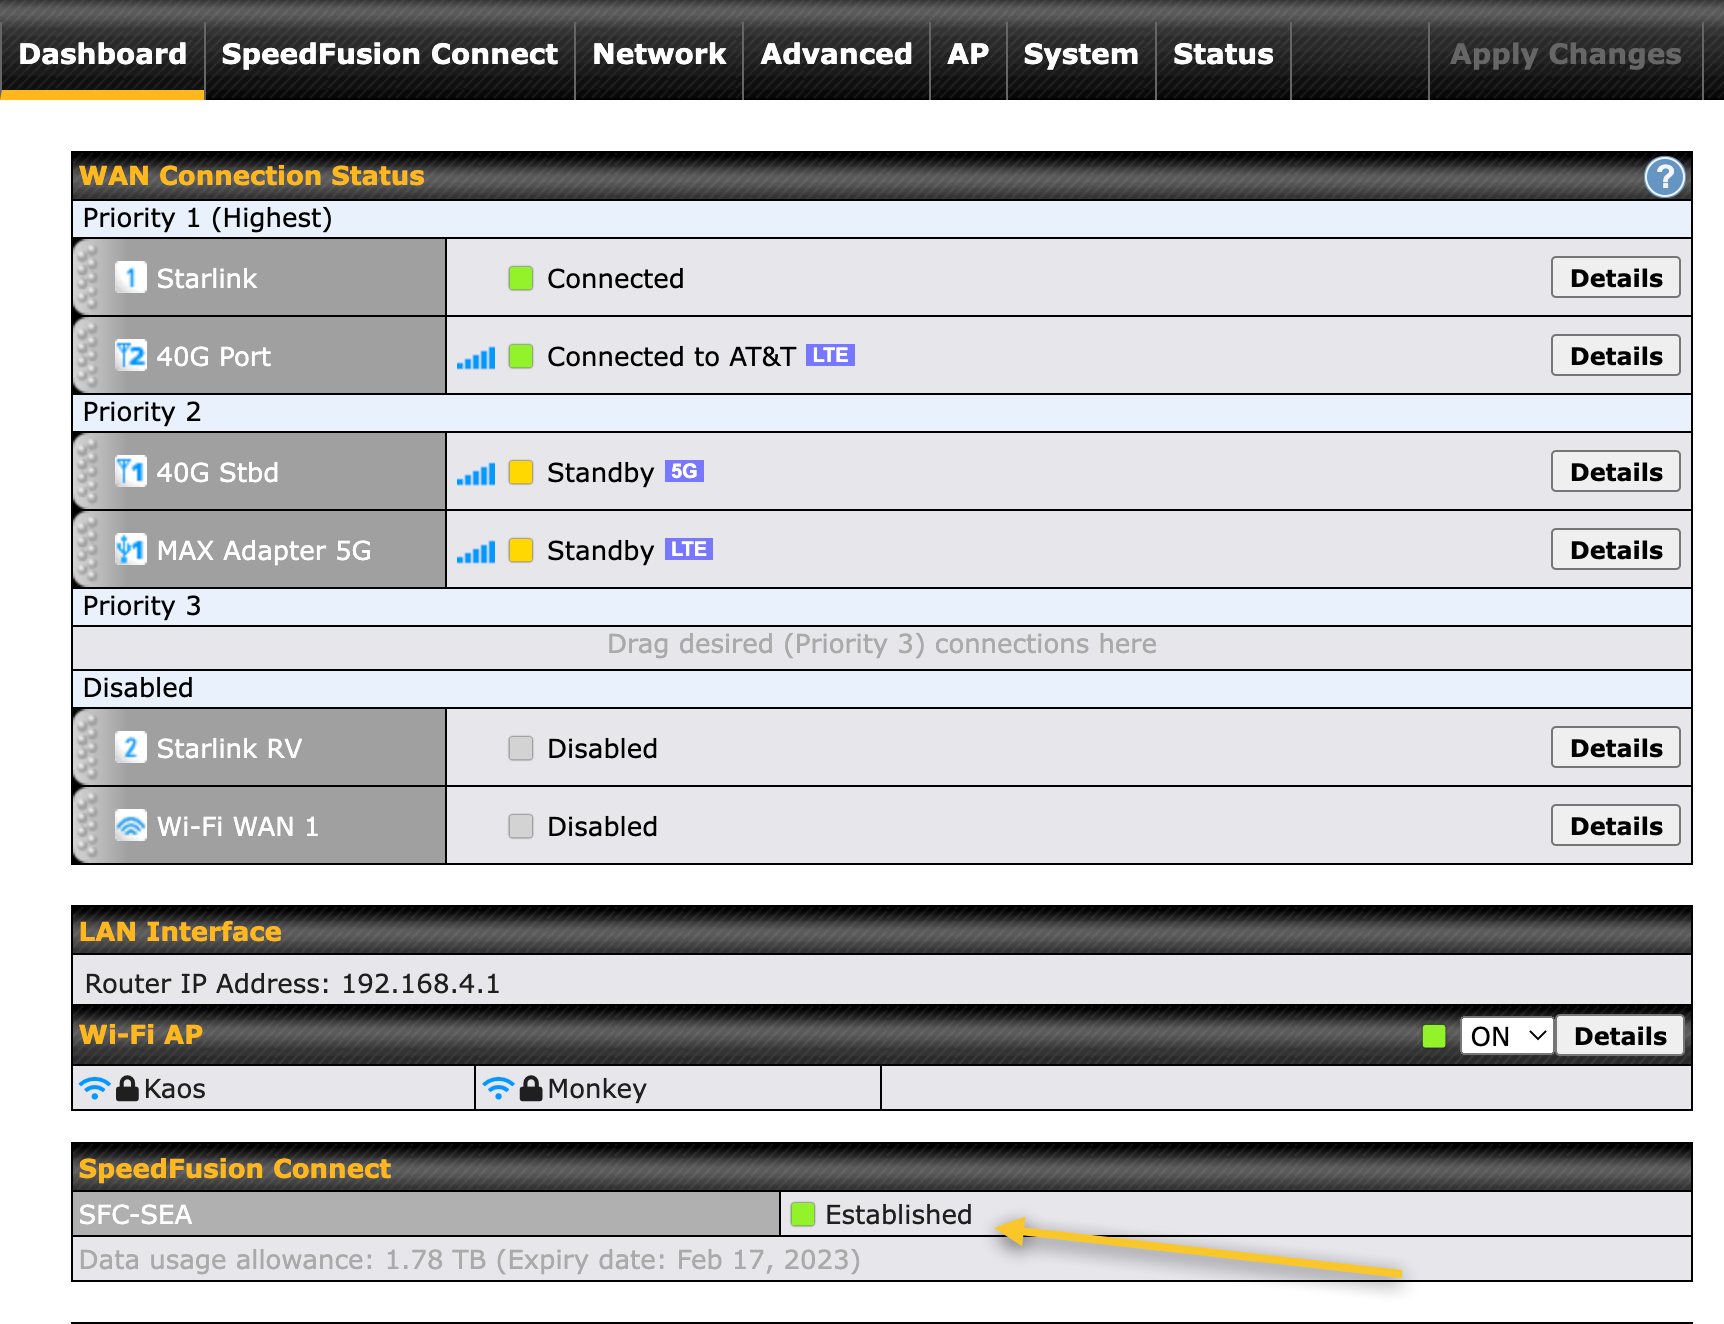
On your Peplink dashboard, you should see a "SpeedFusion Connect" section if you scroll down. It should show if you are connected, and details about your plan and data usage.
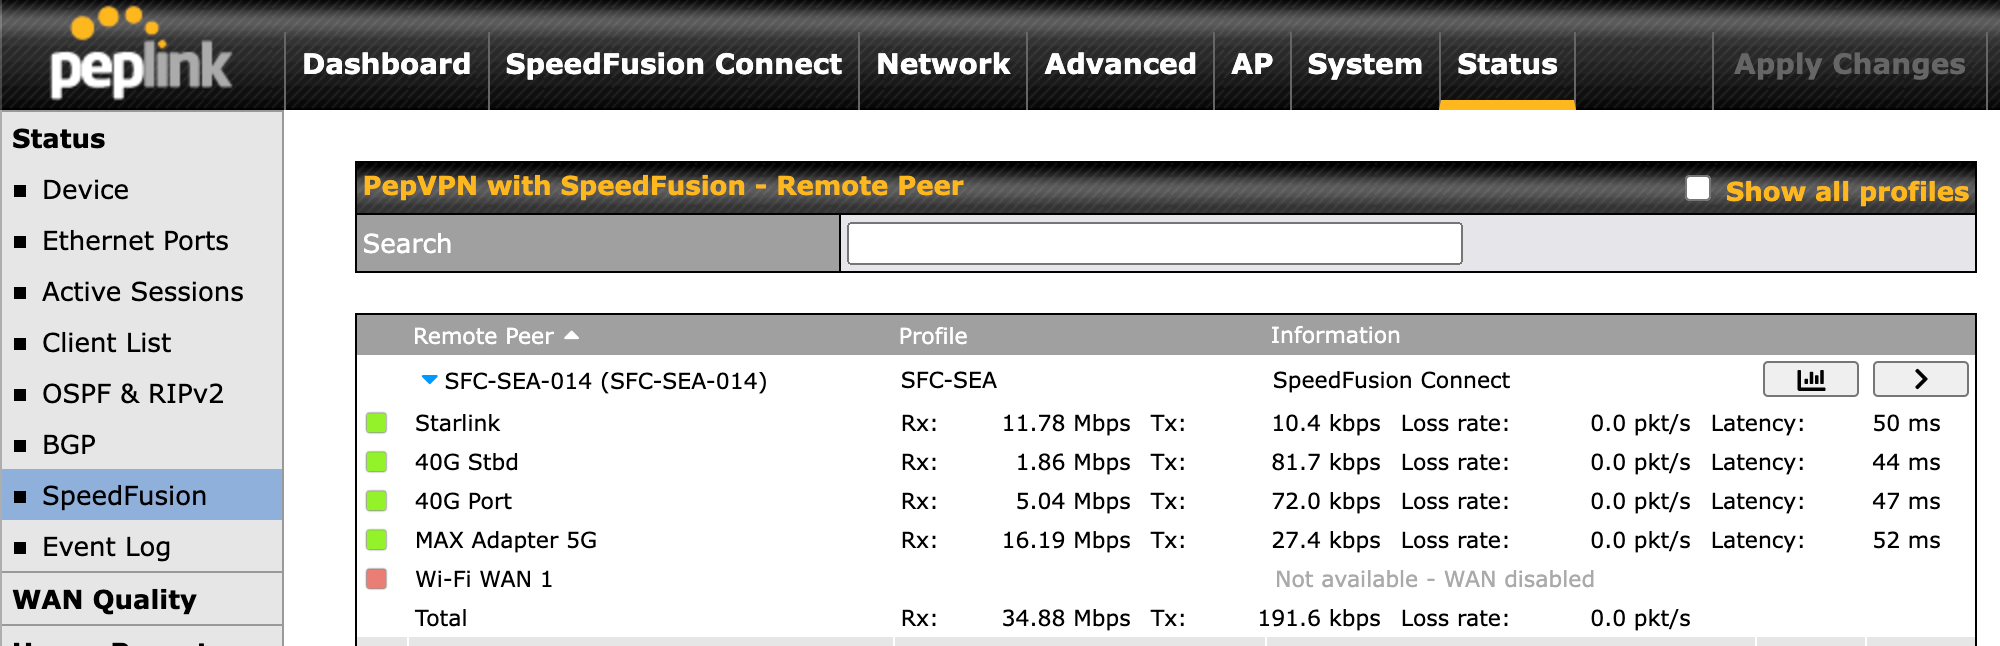
You can also head over to Status > SpeedFusion and see the status of each internet connection, upload/download speeds, latency and packet loss. If you click on the little graph icon above that, you can immerse yourself in lots more details for those wanting more real-time data. I have the above screen open almost always while in meetings to monitor the status of connections and latency.
To test SpeedFusion, you can add a client into the "Connect Clients to Cloud" list that I referenced above, and do a SpeedTest or other method to generate traffic. You should be able to come back to this screen and see the stats real-time. Remember to remove your device from the list after testing. Another good way to test is to use some of the apps you configured to use the connection, or start a test video call with Zoom or Microsoft Teams, and watch the stats on the page above.
Limitations & Notes
SpeedFusion throughput limits
There are limits on the maximum license and hardware capability for SpeedFusion. The first is in the license or service you buy from Peplink. Most of them are capped at 200Mbps, which should be more than enough for most people, but if you're doing constant SpeedTests through your SpeedFusion tunnel (you know who you are!) you might notice this cap.
Each type of Peplink hardware and router have limits for this as well. For instance, my MBX Mini 5G has a limit of 600Mbps, the BR1 Pro 5G has a limit of 400Mbps, and the MAX BR1 Mini (HW3) is only 80Mbps. These are also best case numbers, and I've seen them be less than this in the real world.
This cap really shouldn't affect your day to day use as long as you are selectively using SpeedFusion for only a part of your traffic. If you decide to run all of your traffic through it, or have a very busy system, you may run into this limit.
SpeedFusion Cloud Names & Security
When you do SpeedTests you may notice strange names for your source such as "Choopa". This is because your traffic is actually being sent across your internet connections to a location that Peplink maintains in a datacenter in the cloud. This usually doesn't affect most applications like Office 365 and Zoom, but it can cause problems with apps or websites that check where you are "coming from". Some of these may be for security reasons, or to prevent people from using VPNs (which SpeedFusion is considered) to get around streaming or security restrictions. Keep this in mind if you have issues with corporate applications or if you decide to use SpeedFusion for streaming.
Conclusion
Starlink is game-changing technology for boating and many other markets. I personally rely on it for most of my connectivity needs, and it has enabled me to work remotely in even more places than ever before. But it can't be used alone reliably, and shouldn't be used underway at all.
Combining both Peplink and Starlink allow for a very redundant and controllable network setup aboard. The basic configuration is pretty easy to get going. Doing a bit more configuration can provide an even more usable setup by leveraging SpeedFusion and other Peplink features.
Archived Community Comments
These comments were posted on the SeaBits forum before February 2026. Scroll down to join the current discussion.
Thanks, great detail!
I’m looking to install the high performance flat dish on my new yacht (Maritimo M60). I don’t work on the boat and I’m looking for something to stream my Roku in places that have cellular congestion.
I plan to put Roku on each TV. How far will the Star Link router reach?
That’s a hard question to answer definitively. Boats aren’t like houses in that there are a lot more surfaces and materials that tend to mess with or block WiFi signals. It would depend on where the TVs are going to be located, and where the Starlink router is located.
Most boats around 60 feet or longer I have designed solutions for require two access points or WiFi routers for good coverage throughout the boat, especially further belowdecks.
Starlink does have a mesh product, which is essentially a second WiFi router that extends your range, but it is Starlink specific. I am not a big fan of using their equipment in general because of the lack of control and options. But it is an easy way to add more capacity.
So I’ve been experiencing an odd situation with my Starlink that I have connected via the ethernet adapter to my Pepwave MAX BR1 Pro 5G that I’m hoping someone here can help me sort out.
For reasons unknown I can’t surf too or ping Google.com, but I can ping 8.8.8.8. I can also both surf too and ping Yahoo.com. When I connect directly to my Starlink via the Starlink router I can access Google and do everything else as normal though. So my feeling is that there is something going on with my Pepwave but for the life of me I can’t figure out what that is.
If anyone has any ideas on this, or could help me troubleshoot it I would be eternally grateful. Thanks.
So it’s just Google you can’t access? Any success since you posted this?
What are the benefits of having both RV with motion and the high-performance dish together via Peplink?
Will Starlink allow both on the app and account? I was reading an article on Peplink’s website there was a recommended configuration.
I have both the rectangular dish using the RV plan, and the flat high performance dish using the RV plan - I assume that’s what you were asking about?
Having both just means that I have some redundancy if one of the dishes has a hardware issue, or if by some chance, once is obstructed and the other isn’t (rare).
I wanted to know if you could have 2 Dishies on one account? I have the RV version now and just purchased the HP flat to replace it and just noticed your setup on your website having both. The cable for the HP is huge and difficult to get through my hard top area and was just thinking about keep my RV version that seems to work fine at Elliott Bay, but haven’t tried is underway or on anchor.
I have two dishes on one account, so that’s not a problem. I had 3 at one point.
I have 3 dishes aboard right now and the Flat High Performance definitely works better at anchor and underway than any of the others.
Steve, thank you for the great article. I followed it and been able to setup SL + Peplink with no problem. I do still struggle with actually understanding the concept of ‘Management IP Address’. Specifically, why is it the 192.168.100.100 address that you put in. For this to work on my boat I had to put in 192.168.50.100. My default LAN is 192.168.50.1. Is yours on 192.168.100.1? But then that’s the dishy address. As you can see I’m confused.
Another thing I noticed is that if the SL is online but cannot connect, and the healthcheck fails, the SL app will not connect to the dishy through Peplink network. It will if I connect directly to SL wifi. It seems like Peplink is somehow blocking that connection when healthcheck fails. If I disable healthcheck, the SL app will connect fine through Peplink.
Best regards,
Maciek
Steve,
My kit came with a CAT6 RG45 terminated wire able to plug directly into the PoE, thereby eliminating the need and additional draw of the Starlink WiFi router and the Ethernet adapter.
I was able to get a connection (not perfect but workable) using a small Gb NetGear Switch between the HP antenna and the PepWave MAX-BR1-PRO-LTEA-W.
Static: IP of 192.168.100.99
Mask: 255.255.0.0
Gateway: 192.168.100.1
I have not tried your solution for the Health Check yet.
Have you tried this direct connection and if not, why?
Thanks,
Pierre
Hi Pierre,
Which version dish do you have? The original circular one (which is what I suspect), the rectangular RV/residential one, or the more square-ish High Performance/Maritime version?
In the US, the RV/Residential and HP/Maritime versions require either the Starlink router, or the Starlink power supply in the case of the HP/Maritime version.
The older circular dishes came with a router, but the router-to-dish cabling was standard ethernet, and you could send PoE down it to power it. I have one of those dishes in use, but they aren’t as performant as the newer ones, and aren’t sold or shipped as often here in the US anymore.
Steve,
I have the (HP) High Performance newer antenna, hence my question.
Once I have a direct internet connection working properly with the POE, I intend to remove it and provide my own 24Vdc to 56Vdc POE and get my internet connection directly from there.
I have not checked the POE wiring of the Starlink POE adapter yet, I suspect that it will be the same Starlink specific wiring as the older versions.
Cheers,
Pierre
Then I’m not sure I understand your question… Are you asking whether I’ve used the cable only version? Yes…
The Flat High Performance, at least in the US and Canada, requires that you use the provided Starlink power supply. It does come with an ethernet cable which you can use to connect it to a router, but you still need the Starlink power supply. You don’t need the router.
I did an overview of the Flat High Performance dish at Starlink flat high performance in-motion dish initial impressions
There are a number of folks who have figured out the pinouts to the dish and gone as far as trying to provide PoE power without the Starlink power supply, but at 320W of total power, that’s going to be a pretty specialized or at least industrial version of a supply - different than the hacks that a lot of folks have done for the smaller dishes.
Thank you Steve, can you share the Peplink configuration when you were connected directly to the POE. Also, were you using a switch in between the Peplink and the POE.
Thanks,
Pierre
The same management IP address that I cover in this article can be used for the round dish. That’s the only special thing to consider. With my particular hardware setup, I used the provided Starlink power supply that was sending PoE to the dish, and no switch in between. Some older Peplink hardware does perform better with a switch in between due to a hardware incompatibility.
Posting again in hope of an answer
Steve, thank you for the great article. I followed it and have been able to set up SL + Peplink with no problem. I do still struggle with actually understanding the concept of ‘Management IP Address’. Specifically, why is it the 192.168.100.100 address that you put in. For this to work on my boat, I had to put in 192.168.50.100. My default LAN is 192.168.50.1. Is yours on 192.168.100.1? But then that’s the dishy address. As you can see, I’m confused.
Another thing I noticed is that if the SL is online but cannot connect, and the health check fails, the SL app will not connect to the dishy through the Peplink network. It will if I connect directly to SL wifi. It seems like Peplink is somehow blocking that connection when healthcheck fails. If I disable healthcheck, the SL app will connect fine through Peplink.
Best regards,
Maciek
Great article. I used very similar health check settings but I’m struggling with the configuration. Peplink continuously sends me disconnect warnings although the Starlink connection is very solid with no obstructions. This leads to instability in my speed fusion setup because peplink each time tries to do a hot failover. The Starlink app does report very frequent issues of the satellite not connecting to the internet but each one of these outages rarely lasts more than a second.


Hi Steve,
Would you have any updates to these recommendations when using the Bypass function with the RV/Roam systems? As the SL router is altogether Physically bypassed, is there suggested changes to protocol?
Also, an anecdotal question- Having recently commissioned a RV high performance with a BR1Pro 5G I experience anticipated performance in stock setup through SL router but, when bypassed the speed drops to a crawl (and there is a warning of “Poor Cable Connection”). If the router is reverted to factory settings, performance increases 10-fold.
Is this an isolated case, or a known phenomenon?
Best regards,
Brian
The 192.168.100.0 networking range is the Starlink router uses to communicate between itself and the Peplink. 192.168.100.1 is the IP address of the Starlink router itself and is how the app you have on your phone communicates with it.
By setting a management address of 192.168.100.100 on the Peplink, that allows the Peplink to route the traffic from the Starlink app on your phone so you can manage it.
Sounds like you might have other configuration or network issues. The health checks and management setting is something I’ve used on hundreds of setups without issues.
That seems like you might have some sort of issue with the dish, or an obstruction. Looks like you’re getting an interruption every minute. Really the only way to get 100% reliable connectivity if you can’t fix that part is to have both your Starlink and cellular connections at priority 1 so they are both being used at the same time.
That way the cellular connection will cover the outages from Starlink, but you’ll have slightly better results with the lower latency Starlink connection when it’s up.
The downside is that it will use a lot of bandwidth on your cellular plan which might run you up against an overall cap of some sorts.
I think I cover some of the bypass bits in the article. In general, there’s not much you have to do other than add a management address.
If you’re seeing poor cable connection, you likely actually have a bad cable connection, or something funky with the WAN port on the router. I’ve seen this a few times, once with one of my Starlink setups, and it actually turned out to be a bad ethernet cable/ethernet adapter on the Starlink side.
There are performance challenges with older Peplink products that cut performance down much lower when cabled versus when using WiFi as WAN, but the BR1 Pro 5G is not one of them. This sounds like some other sort of issue.
The issue was an incompatibility between the Starlink and the Peplink transit Ethernet chipsets. I installed a dummy switch between the two (Peplink recommendation) and that solved it.
Ah! You must have one of the hardware platforms that I noted in my article that points to this forum post: Peplink | Pepwave - Forum
The super-old ethernet chipsets they were using caused issues that couldn’t be resolved without a switch in between. Not the best solution, but Peplink isn’t a huge vendor that Starlink really cares about, so getting them to change something was not going to happen. It also appeared to affect a number of other products out there using similar or identical ethernet chipsets.
Steve, appreciate the article… read it the first time when it came out, and again today… since I have my Max Transit Duo Pro configured and running with multiple cellular, and the refurb Gen3 SL is inbound. So the obvious question: any updates/changes/advice for the Gen3 SL?
I’m on Residential to start, but will switch to RV after tested and running. And setup fusion (finally). And 12VDC power.
Any thoughts, relative to your article given the Gen3 ?
Thanks, David.
Hi David,
I’ve not found anything so far that would require a different setup or configuration with Peplink and the gen3 dish. Everything in the article seems to still apply. Of course, if you want to use things underway, the High Performance dish still continues to be the best choice, but the residential/RV dishes work as well as long as you don’t go too fast.
I also have questions about the Standard Gen3 set up for use with my Peplink MAX BR1 Mini.
The new Standard dish has ethernet ports. Does that eliminate the need for an Adapter for use with the Peplink router? If so, is the Starlink cable, router and power supply still required? Does the non-actuated dish still require power?
I now realize that it is the router, not the dish, that has ethernet ports. Does that mean the router must be retained for ethernet connection to Peplink?
If you are going to use the gen3 without an aftermarket power supply or other kit, you’ll need to retain the Starlink router and connect it either via Ethernet or WiFi as WAN. If you don’t want the WiFi network to be broadcast from the Starlink router, and want your Peplink to do that instead (which is the usual choice), you can put the Starlink router in bypass mode which I believe I cover in the article that is connected to this forum post.