

One thing I found early on with Rendezvous is that a camera on the side of the boat seemed like a pretty important thing to have while docking. I’ve had a system in place now for a year and am very happy with the results.
I’ve had a lot of experience with cameras at home, multiple remote properties, and on the various boats. I’ve used AXIS, Mobotix, Dropcam/Nest, UniFi, Arlo, Blink, and a few more that I’ve forgotten about.
However, cameras seem to be as controversial or as personal as the best type of anchor, the best brand of engine, etc. These are my experiences and what I’ve found to work best after a lot of research around where I want to display them, and having spent a long time using a wide range of camera manufacturers. Nevertheless, a lot of the choice has to do with how I personally wanted them displayed and how I wanted to use them.
Defining my use case
I initially got distracted by the many cameras available in the market. I realized that I needed to narrow down what my real use case was, and chose the following criteria:
- What – what did I want to look at?
- Location – from where was I going to use the camera output?
- Display – how was I going to look at the output?
- Reliability & quality – what resolution and quality did I need?
What
The first thing to figure out is what I wanted to look at. For sure, I wanted a clear view of the port side of the boat near the dock, as that is the side I dock on, and I could not see the edge of the boat well from any driving position. In addition I wanted to see the engine room as well.
Location
Now that I knew what I wanted to see, where was I going to look at it from? Initially, I thought “everywhere!” and wanted to consider WiFi and phone apps, etc. but that really muddied the waters in terms of solutions.
The most important places to see the camera images were from the flybridge and salon driving stations. That’s where I am when docking, and while underway. The images from the dock side or the engine room will be critical from both of those locations. Sure, it would be nice to see the engine room or dock while in bed, but I could do that another way, and it’s not the main reason.
I find a lot of technology and boat decisions are compromised, or needlessly complicated, by adding too many requirements, or by being distracted trying to have things everywhere, all the time. I say that, knowing full well that I have far more connectivity devices, servers, internet connections, and NMEA 2000 devices doing random and duplicitous things, but for critical systems like autopilots, radar, and things like this, I do like very focused and simplified solutions.
Display
Now I needed to figure out how to view the output of the cameras. I considered a dedicated monitor, but would need one at each location, and it would take up extra space. Using a portable screen like an iPad or otherwise also didn’t seem to be a good method because of sun and heat issues, plus it takes up more space again. Additionally, I hate when I need something and it is discharged or not at the helm station I need it at.
I decided that the best way view things would be if I could see them on both MFDs and a PC. With my investment in Furuno equipment, I found that the best solution was cameras from AXIS, which Furuno, TimeZero and Coastal Explorer all support. Using displays that were already in place seemed the most efficient. This met my requirement of being able to see it at both locations, and it could be viewed by PC software or on MFDs.
Reliability & Quality
I wanted cameras that were good quality both in reliability and image. Having an HD image was not that important since I am not displaying this on a TV – just using it for docking and monitoring while aboard. I did want very reliable cameras, not dependent on WiFi or internet connections, and using DC power so that they always worked even if there was an inverter or other failure.
Security Cameras
I believe that security cameras and “underway” cameras are a different class of product.
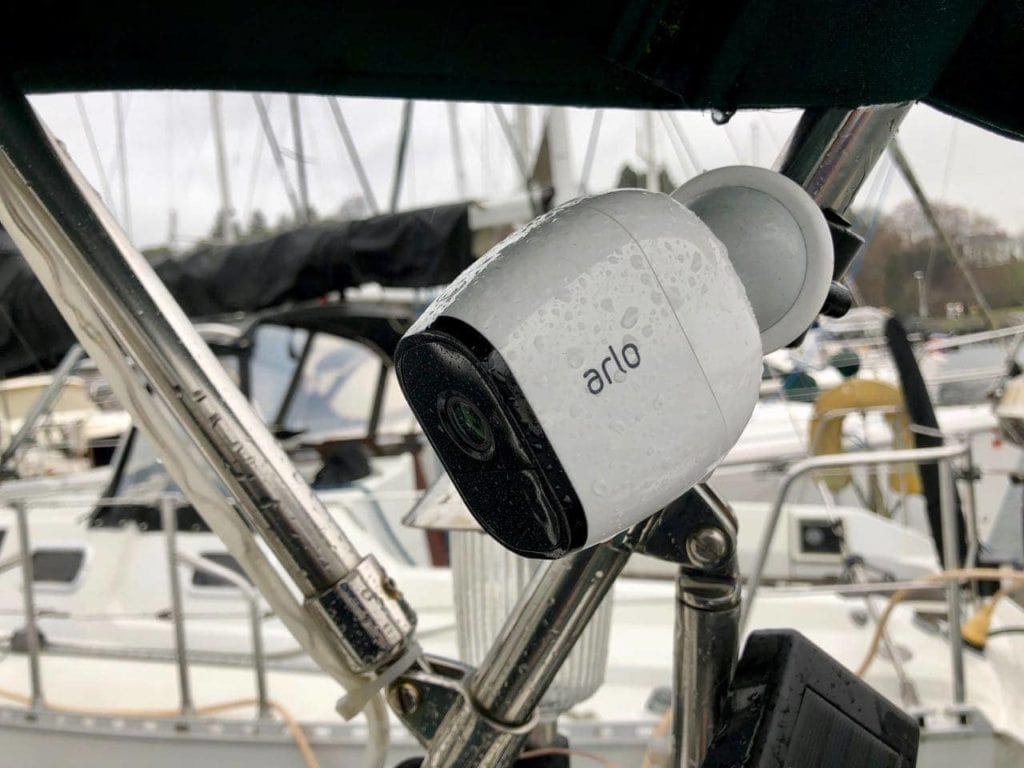
Security cameras should be located in strategic areas to protect the boat, and be able to alert you no matter where you are. Products from Arlo and others are really good at this, even over low bandwidth cellular links and the like.
Most of the time you aren’t aboard when you want a security camera to work, so having the cloud or a remote server involved is important. Relying on an alert from a local server on the boat (or a remote home, etc.) has some limitations. First, you have to hope that the server doesn’t get stolen if there really is someone getting aboard. Second, and more importantly, if something bad is happening aboard, getting connected into the boat remotely and viewing the footage can be very concerning and take critical seconds.
By using cloud or remote cameras, the footage generally will be available faster and in a place you can get to quickly.
I’ve tried to use higher quality local cameras remotely, and there are a lot of challenges – bandwidth being the biggest. There’s also just not as many nice features as dedicated remote security cameras. I still use Arlo cameras aboard Rendezvous, and wrote about them when I had them on Grace in Easy security cameras on the sailboat via Arlo. I’ve been testing some new ones as well that I hope to write about soon.
For docking and underway, using Arlo or other cameras is not feasible since they have no way of producing at live video locally, and send it up to a remote server, with a huge delay in some cases. And they also require internet access, which you do not always have when docking.
I did look at the whole suite of security cameras and car backup cameras, but I wasn’t happy with the quality of many of them, and how you had to use their wiring, their screen, etc. – basically end-to-end setup. It seemed nice at first, but as I considered having to run cables all over the place, and only end up with one screen at one location, it just didn’t work for my use case of where I wanted them.
Camera Server
After looking at the various camera versions supported, I started noticing that there were limits in MFDs when it came to individual cameras, both analog cabled cameras, and IP or WiFi cameras.
Analog cameras typically plug in directly to an MFD through a dedicated cable – my Furuno TZT2’s have 2x RCA connectors each. That means I’d have to run dedicated cables from the camera locations to the MFDs, which is not so fun. In addition, there are limitations to how you can share the camera from the MFD to other units, and sharing them with PCs is almost impossible this way.
Network-connected cameras are very popular, and supported by Furuno and TZ/CE as well. Both ethernet and WiFi cameras exist, although for this sort of critical camera, I would prefer a wired connection.
I noticed that the Furuno TZT2s had limits on these types of cameras – you could only display one camera in a split screen configuration, or 1 large screen camera. This was pretty limiting, but I found similar limits on other MFDs hidden away in release notes. I suspect that it has to do with processing and rendering the video from the remote camera, which takes a decent amount of CPU. If you’ve ever connected to a good quality camera, or even run multiple YouTube videos at the same time in a browser, you know it can take a decent amount of power. MFDs are not known for having huge processing power, and they definitely focus it more on maps and sounders than anything else.
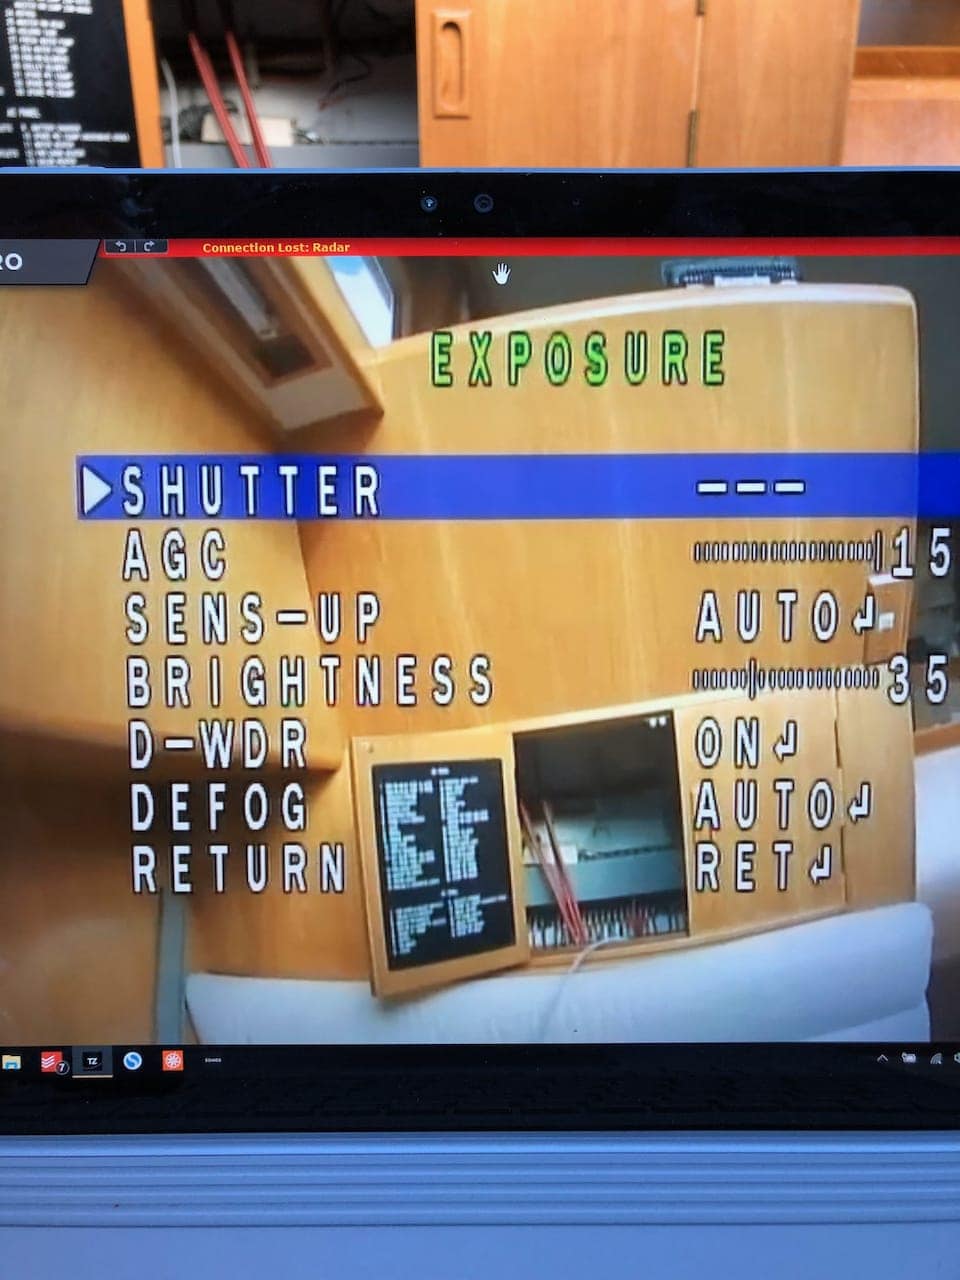
However, the TZT2 supports AXIS Camera Servers, more colloquially known as video encoders. After a bit of investigation, and this excellent document on setting up cameras with the TZT and TZT2 line from Furuno, I found the AXIS M7104 Video Encoder.

Video encoders are an interesting product – they’ve been around a long while, and I used some of them back in the day for monitoring data centers and such, minus the ethernet connectivity. The benefit they bring is that they process and deal with the video on board, and output a number of different streams and layouts. This means the Furuno TZT2 can display one camera, a split of 2 cameras, or all 4 cameras, with the layout and rendering being driven by the encoder itself.
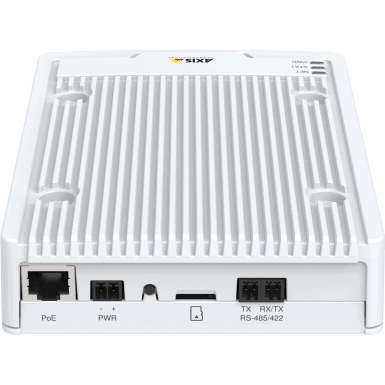
The encoder has an ethernet jack that can also deliver power to it via power-over-ethernet, a power connector, reset button, SD card for recording locally, and RS-485/422 connectors for automation and such. I cabled the ethernet port into my Furuno network, and did some quick configuration.
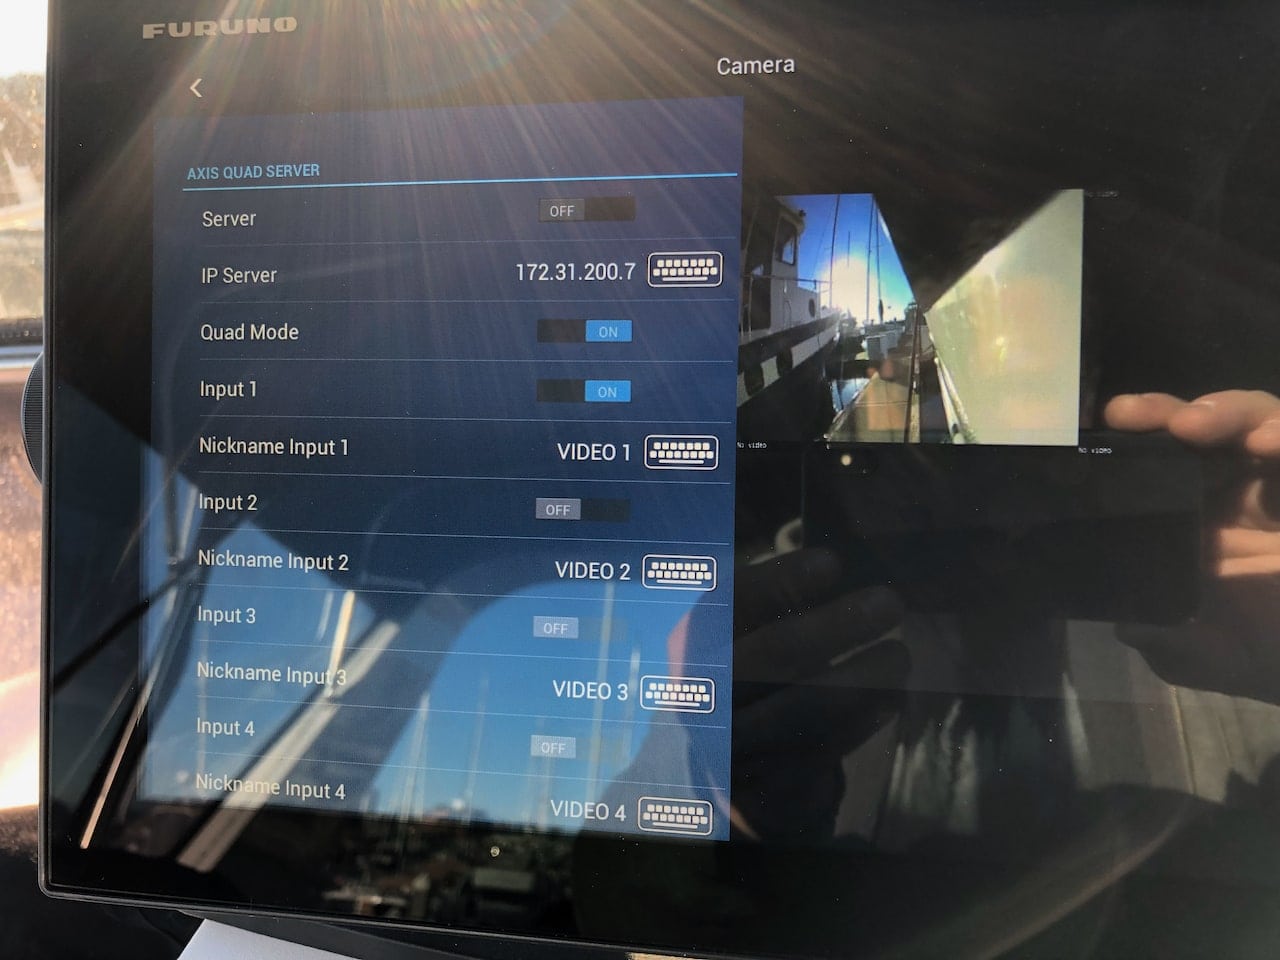
Sorry for the bad pic, but it was a sunny day. I’ve configured one of the “AXIS Quad Server” entries in the TZT2 by simply enabling it, and choosing both Quad Mode, as well as enabling individual inputs and giving them meaningful labels.
I experimented with a few different options in the video quality, but in general, I followed the Furuno document I linked above as closely as possible and everything worked well. The AXIS was recognized and working, so now it was time to test some cameras!
Testing Cameras
You might notice that there are four connectors on the front of the M7104 – these are BNC-style analog video connections. Analog!? Why would you want to use older analog cameras over a digital solution? Well, I found that the range of available cameras available in the analog world was not only far greater, but they were considerably less expensive than their digital counterparts.
Lots of the newer cameras that use ethernet have wide fisheye lenses, digital zoom, can be moved around or rotated, etc. but few are truly marine grade unless you spend $500+ on a camera from one of the usual manufacturers. Analog cameras can be powered by your DC battery bank, are much cheaper, and have really good optics.
I also looked at but discounted most of the high definition cameras mainly due to cost. If I were displaying this video on a TV or other large screen device, or recording all of it to examine license plates or something else in the distance, then HD would make sense. If I’m displaying it on MFDs or a PC, even with a nice 22″ computer monitor, I’d likely only use half of the screen or closer to 720p resolution anyhow, so it didn’t make sense to pay 2x for an HD camera for docking.
When you look at analog cameras for a camera server like the AXIS, you’ll find that they only need to be standard definition analog cameras, no other weird requirements or specific protocols, which really opens up a lot of options. You can use PTZ or controllable cameras with the AXIS, but it requires a bit of extra wiring. If you are looking for a steerable or zoomable camera, it might be better to look at the more modern digital cameras that operate over ethernet or WiFi.
For me, I wanted a consistent, never changing site picture that my mind would always be used to for docking, so fixed analog cameras made a lot of sense.
To start testing, I pulled the camera wiring through the engine room intake vent and used 3M Command Strips to stick the camera to the side of the boat. I did this for about 5 different cameras and in a ton of different locations. It was winter, with really cold temps, and I didn’t think it would work for many reasons. However, I kept the 3M strip in my pocket and warm, and the cameras stuck to the boat like they were permanently mounted. I even went on a 2 day trip to Poulsbo with one attached this way unintentionally!
The AXIS camera server made it easy to test placement – I could take the PC outside on the dock and adjust things while moving the camera around. AXIS has a bunch of other settings as well, including stretching and filling the image, flipping it over, and many other options. Some of these were necessary to use depending on the camera I was testing, and it gave me a lot of flexibility.
Above you can see a shot from the cheap black camera ($50) I started testing with – not super useful in terms of the field of view. As I came into the dock, I would really only see things once I got deep into the slip, and I couldn’t see the fenders or the wider part of the stern.
I tried cameras facing forward and aft in the same location thinking that would give me a better overall site picture of the dock.
Still somewhat limited looking forward, and aft is a bit better, but still can’t see much of the side or edge of the boat, just back towards the swim step.
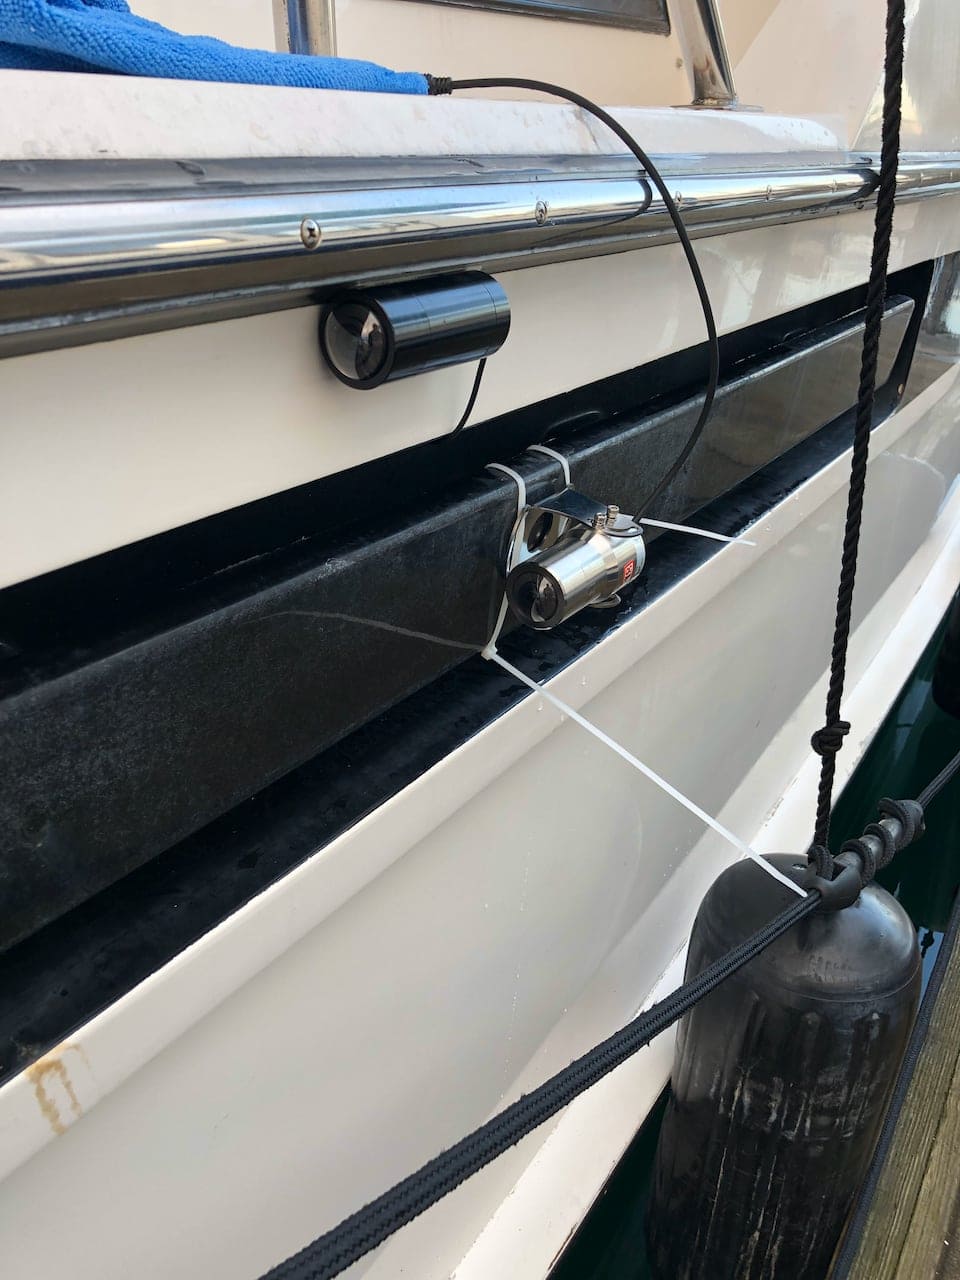
I tried moving one further down, right on the engine intake, and used a super secure zip tie mounting system. It did give me a slightly better view, but still not enough of the edge of the dock. And this configuration was asking for a problem – check out the fender line and how it would happily get caught up in the camera and rip it off or mess it up.
I tried a few up on the edges of the flybridge, but they had the same problem I do with my eyes – I can’t see past the walkway around the edge of the boat down to the side of the boat near the dock. I looked at tons of other locations for mounting, but all of them required major surgery.
All of the cameras I tested had some sort of device or controls that allowed adjustments and fine tuning. I ended up leaving most of these alone, except for when I had to flip the image one way or another. However, there is a lot of flexibility in terms of light handling and such.
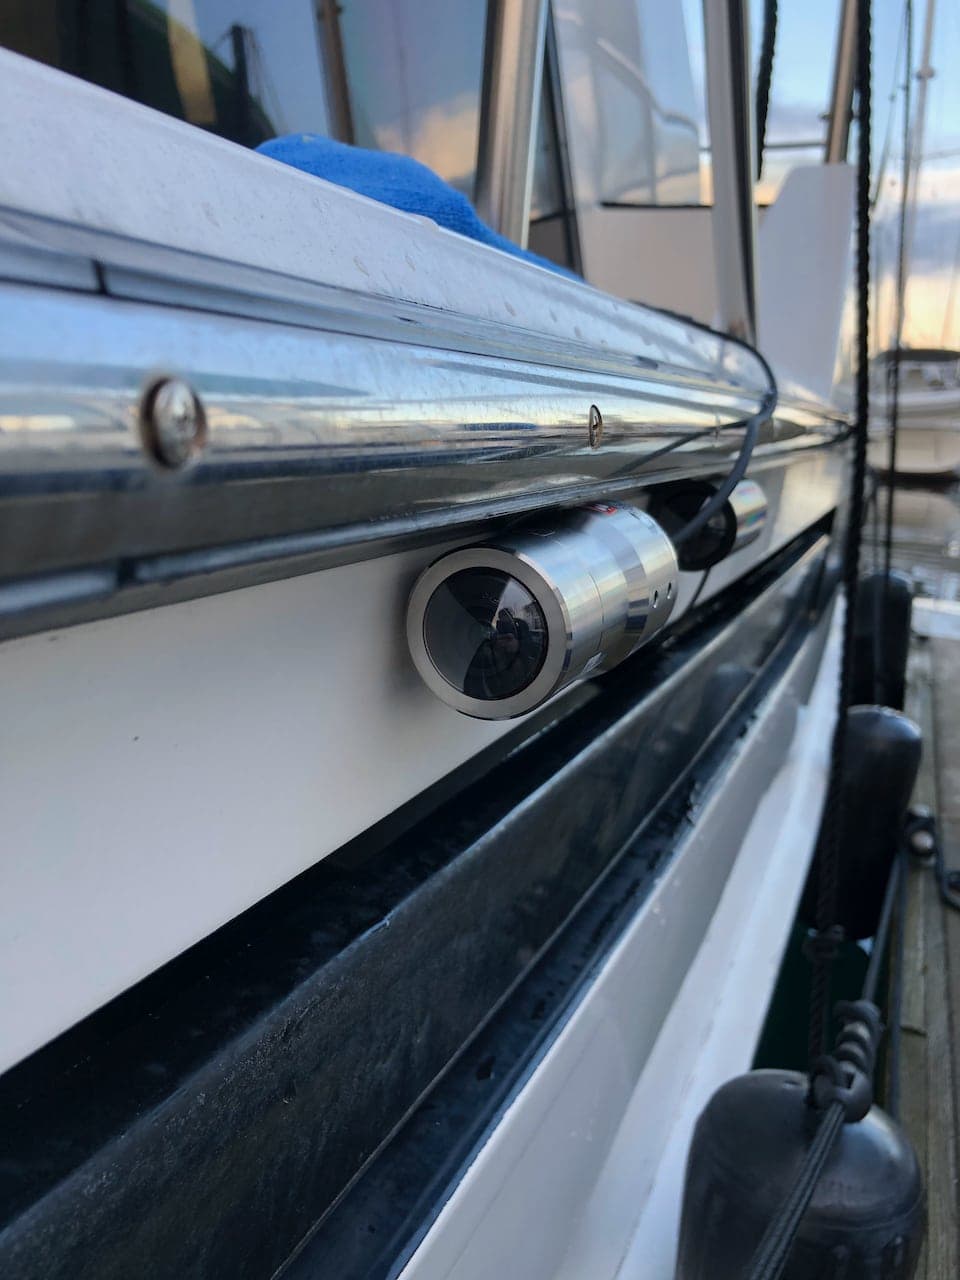
Camera Choice
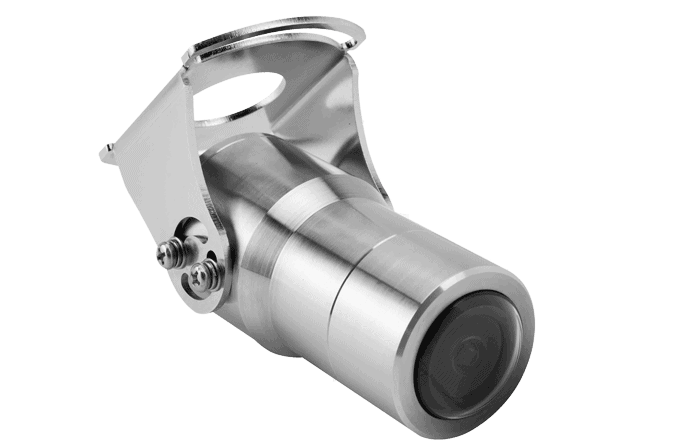
After all of the testing, I ended up choosing the Stronghold MP from Rugged Cams. It is stainless steel, has a really slick mounting bracket that is very adjustable, yet secure, a wide 170 degree viewing angle, and very good low light performance. There are versions that have infrared for night vision, a white light version, and even explosion proof models! All of those add cost, and while infrared might be nice, I can’t see it working well in the dark while docking.
Just like most of the rest of the cameras I tested, it came with a controller so you can customize the image, flip it, etc. I didn’t have to do much to the default image, and left the auto settings in place, which have worked in both bright reflective sun/water and darker situations as well.
Installation
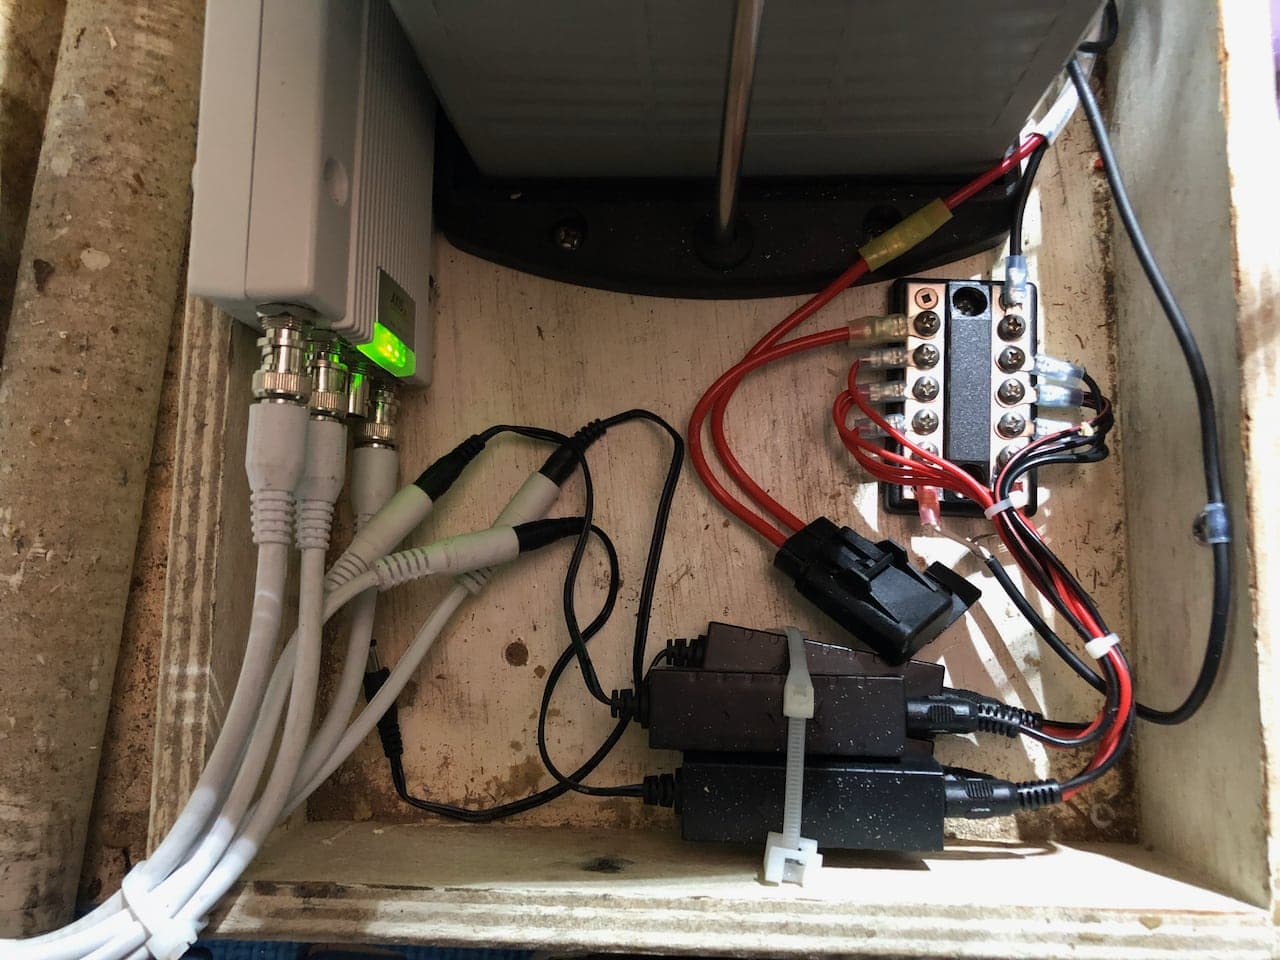
I installed the AXIS camera server in a tiny battery box (not shown – this was mid install) in the engine room near the generator start battery. Ethernet runs from this to my Furuno network, power from a dedicated circuit with a local fuse.
The analog camera cables I purchased from Rugged Cams as well, and highly recommend them. They are made of RG-59 coaxial cable for the video side and 18 gauge/2 conductor power wire for camera power. It’s essentially a single molded cable which makes it easier for pulling and running the cabling.
For the cabling, I covered all connectors with electrical tape to seal out any water intrusion. The camera has a couple foot lead on the end of it, which makes it easy to connect the camera to the longer cable and get it well inside the boat through the engine vent, up away from any water.
I paired this with some stable 12v DC power supplies that get power off a dedicated circuit for the AXIS and cameras from my main house battery bank, and output a constant 12v DC to the cameras. Based on their specs, I probably could have wired them into the battery bank directly without a voltage stabilizer, but I was being a bit more careful and wanted some longevity out of the cameras.
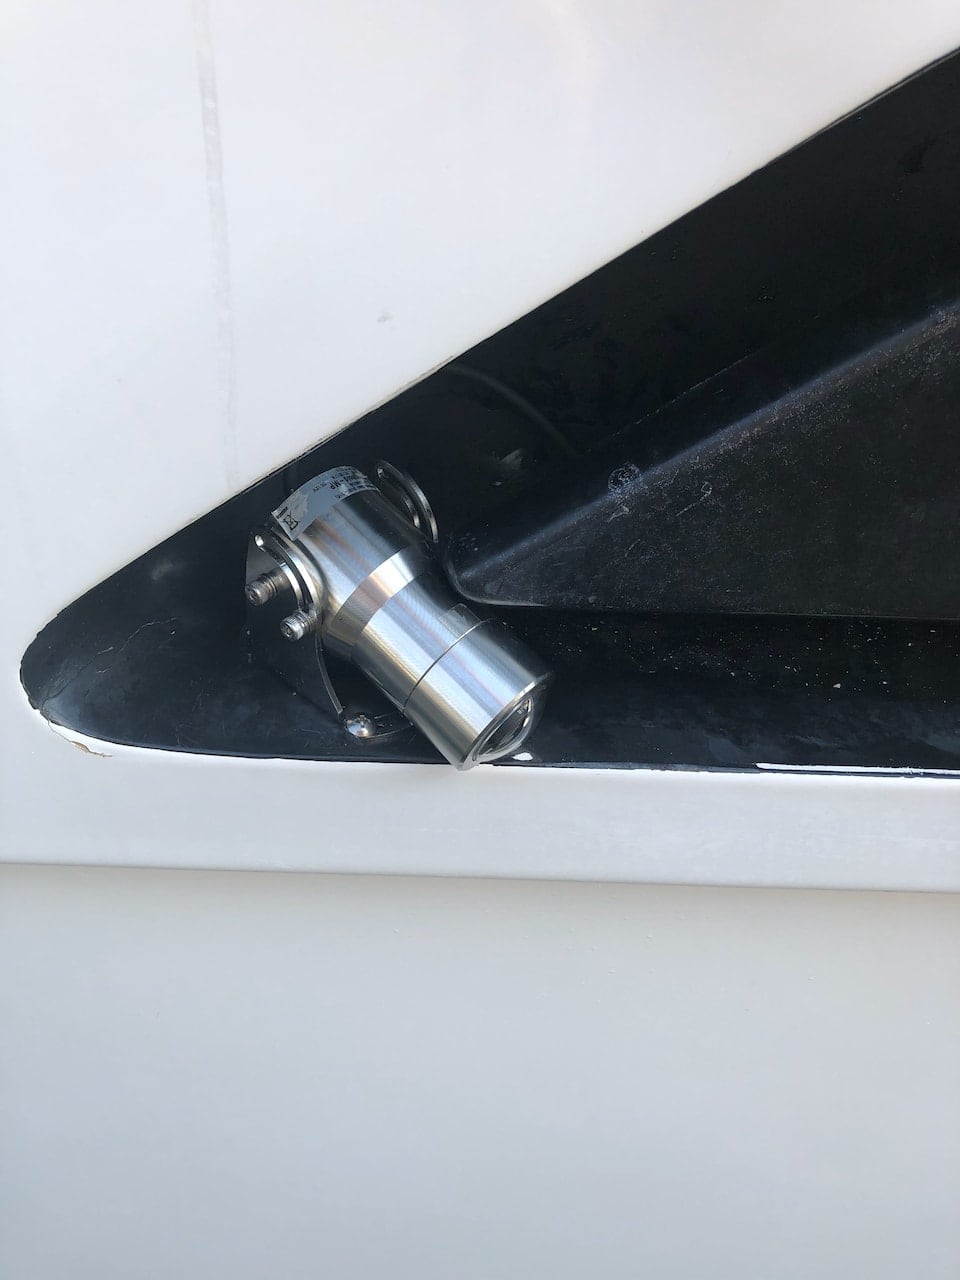
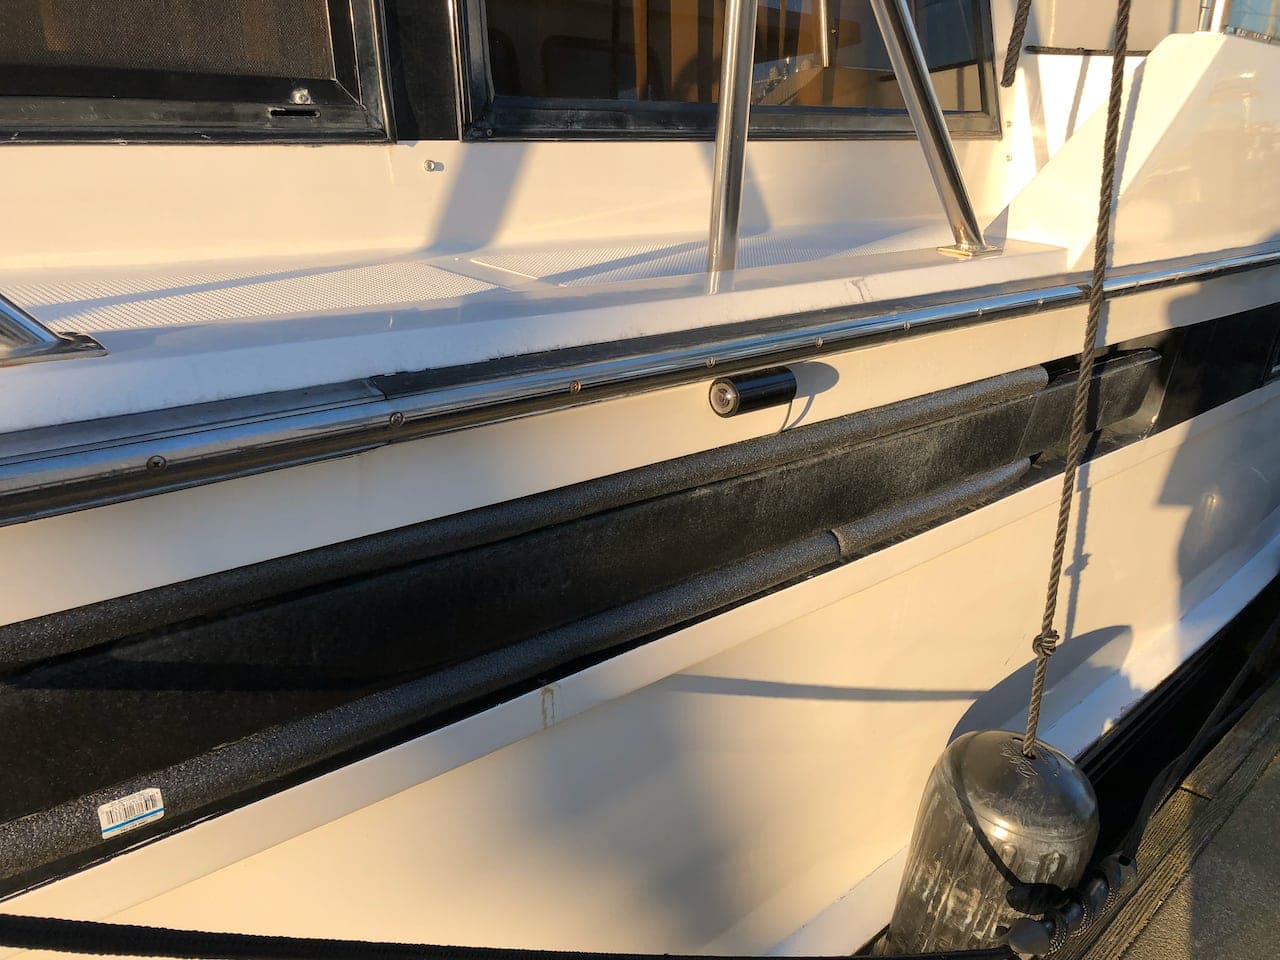
I ended up mounting the camera inside the engine air intake front corner at a funky angle.
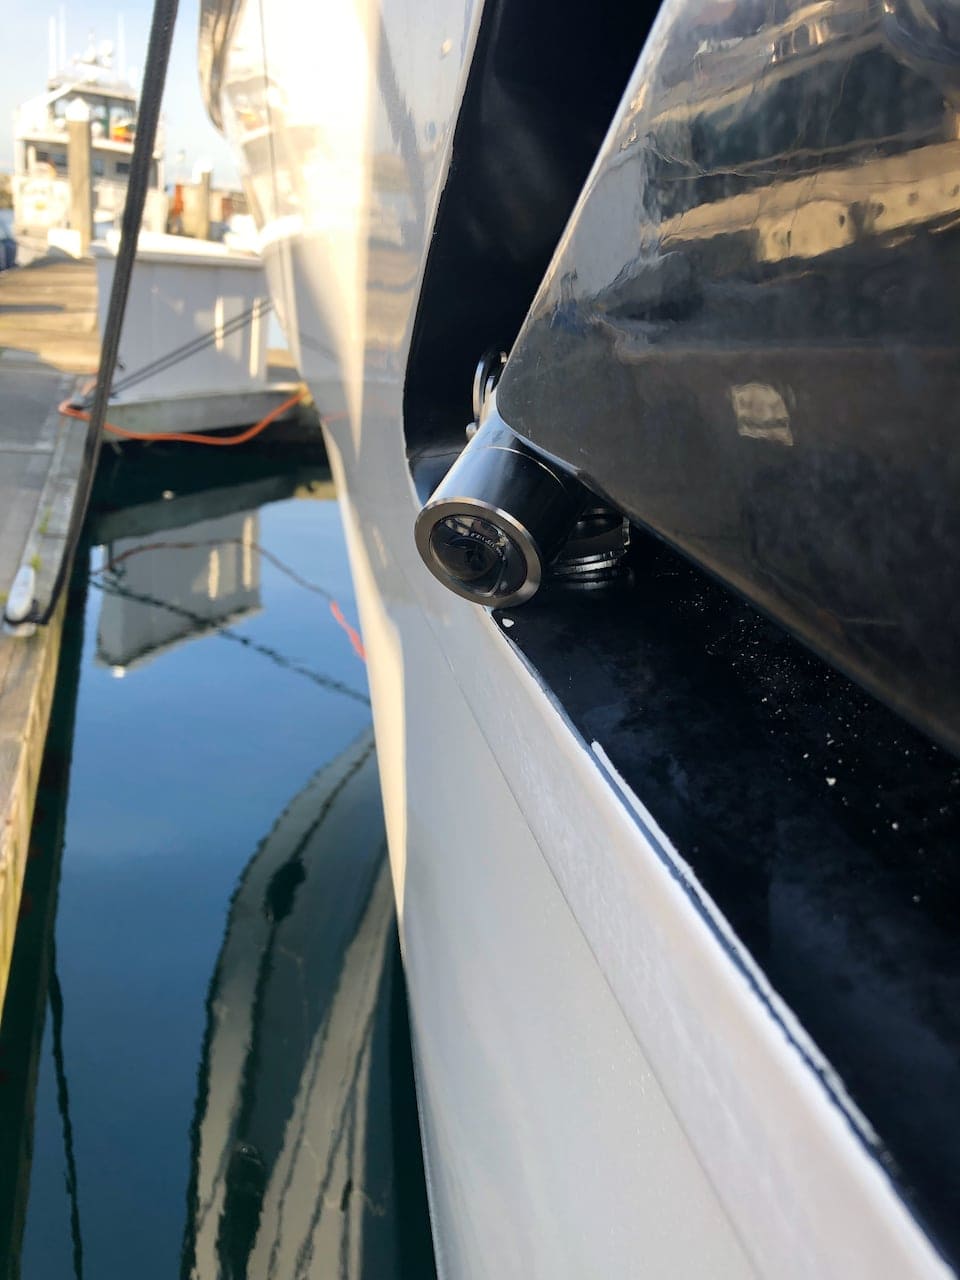
Here’s another view of the port camera tucked into the engine intake. A little bit of the camera peeks out so it has clearer view of things. I’ve never had a fender or line get caught on it, which was part of the reason I stuck it here.
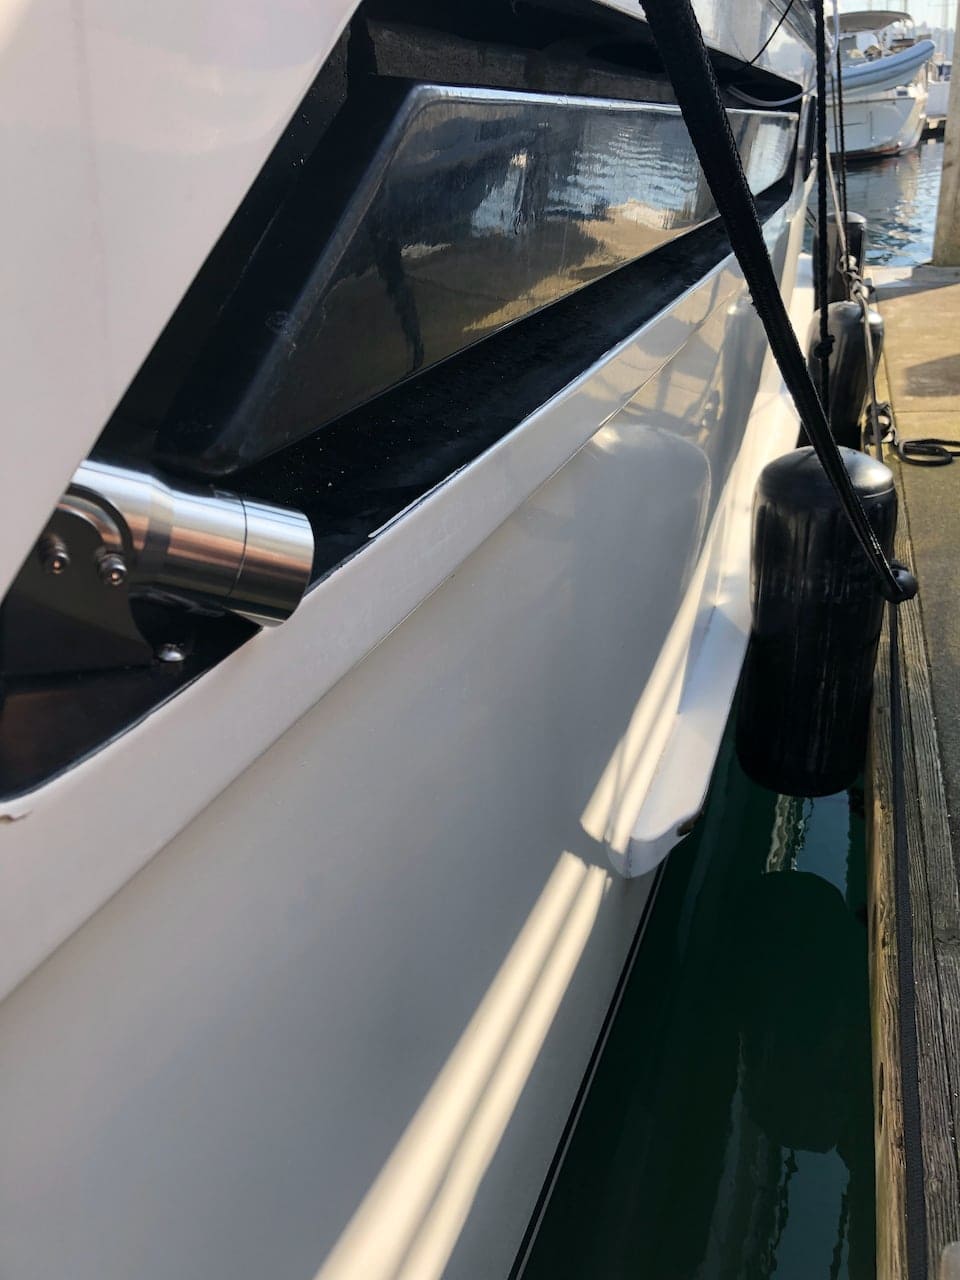
Final view of the mounting location. I was able to run the cables up the inner wall of the engine room and out the intake vent – no new holes required! You can see how it is looking down and back towards the stern.
Results
I currently have 3 cameras in place, with a 4th being installed here in a month or so now that I’ve found a route for the cable. I’ve had the 3 working for over a year with no failures or issues.
I ended up installing one camera on the port side for docking, and two in the engine room to monitor things. Since I never dock on the starboard side due to my SeaWise davit, and also because I could not find an appropriate route for cabling for a starboard camera, I deferred installing it until this winter. The starboard cam may face forward so I can see as I am entering a slip and see distance between me and a neighbor – I’ll have to do some additional testing before I decide.
Since I almost always dock while driving from the flybridge, and I have excellent visibility aft, and even from the salon driving station, it is easy to see aft, I don’t think I’ll need a stern camera ever.
Port Docking
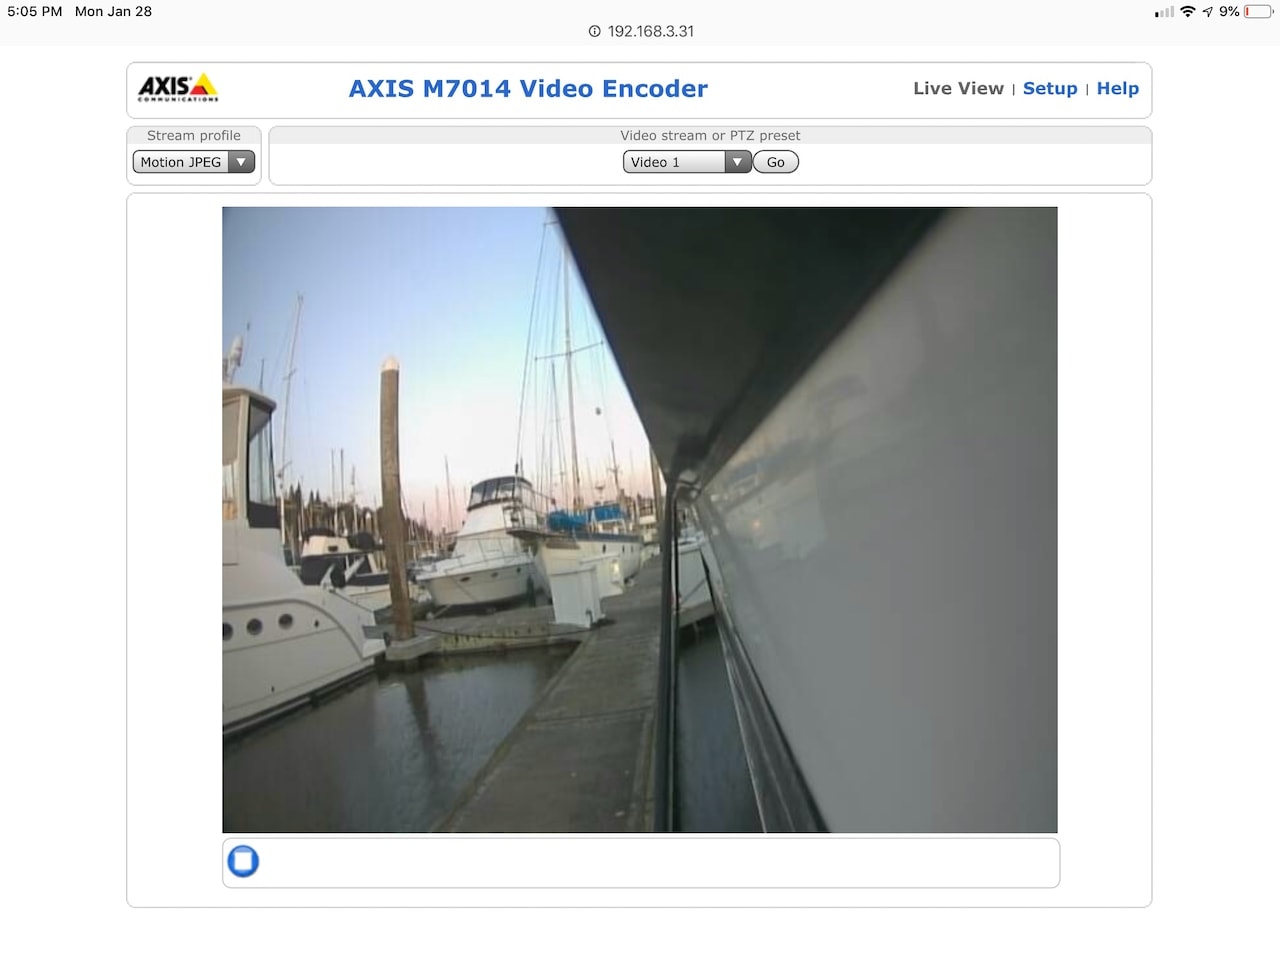
The most important (and most used) camera is the Port Docking camera. This camera is perfect, and gives me a fantastic view of the corner of the dock before I am fully in the slip, anyone stepping off the swim step, and how close I am as well. I tried a lot of other angles, but I really like this one.
I can see the corner or edge of the dock when the boat is about 1/2 way in, and I can see my rub rail down near the water to know how close I am. It has made docking in tricky tight situations very easy.
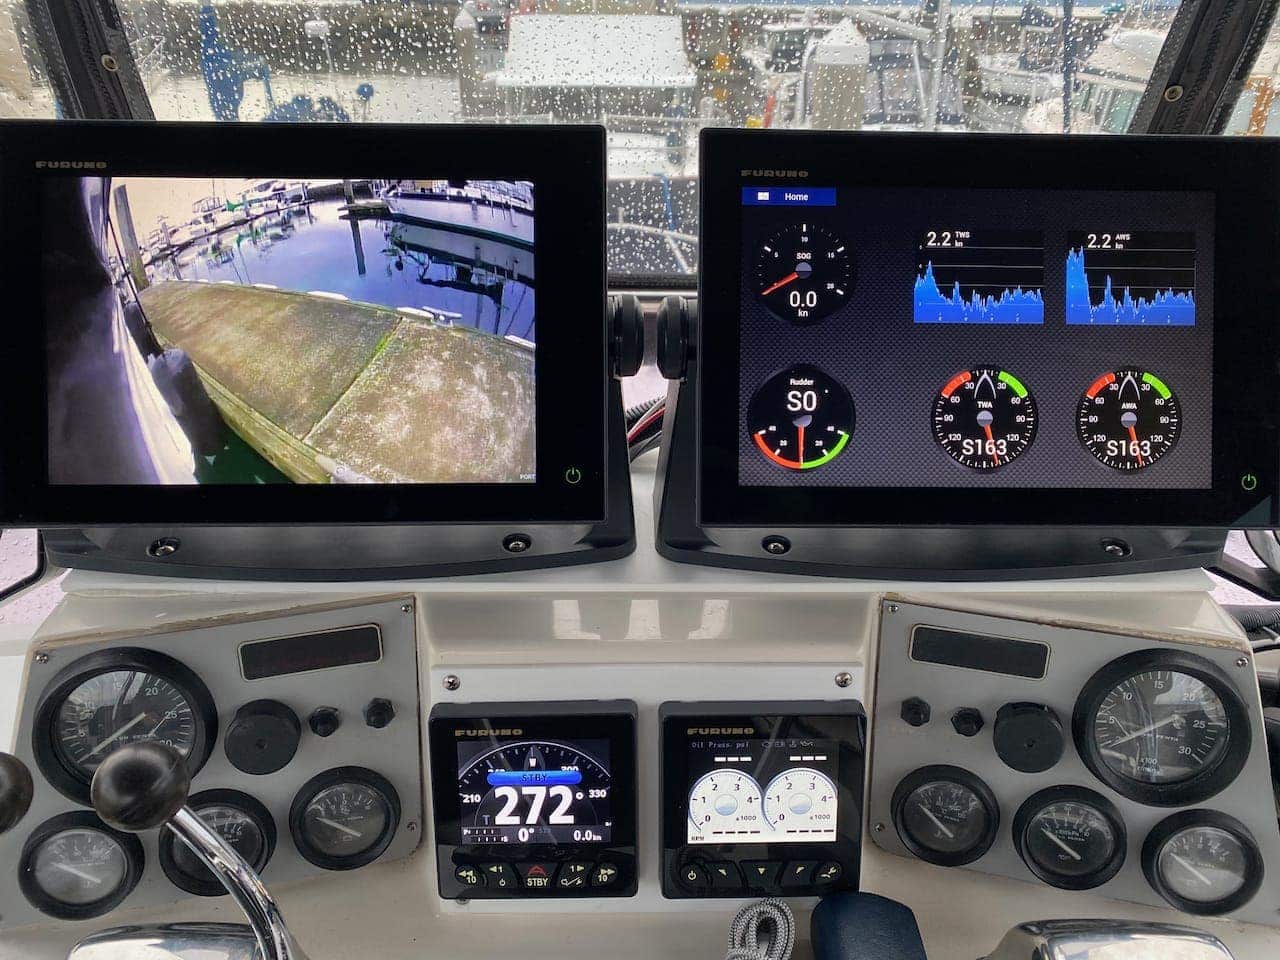
In addition to the camera, I use a very focused setup when I am docking. When I’m docking, I only need to see the camera, and my docking dashboard (on the right above) that indicates speed over ground, apparent and true wind direction/speed, and rudder indicator. Nothing else matters – radar, charts, etc. – and as a result I am focused and have everything clearly in front of me.
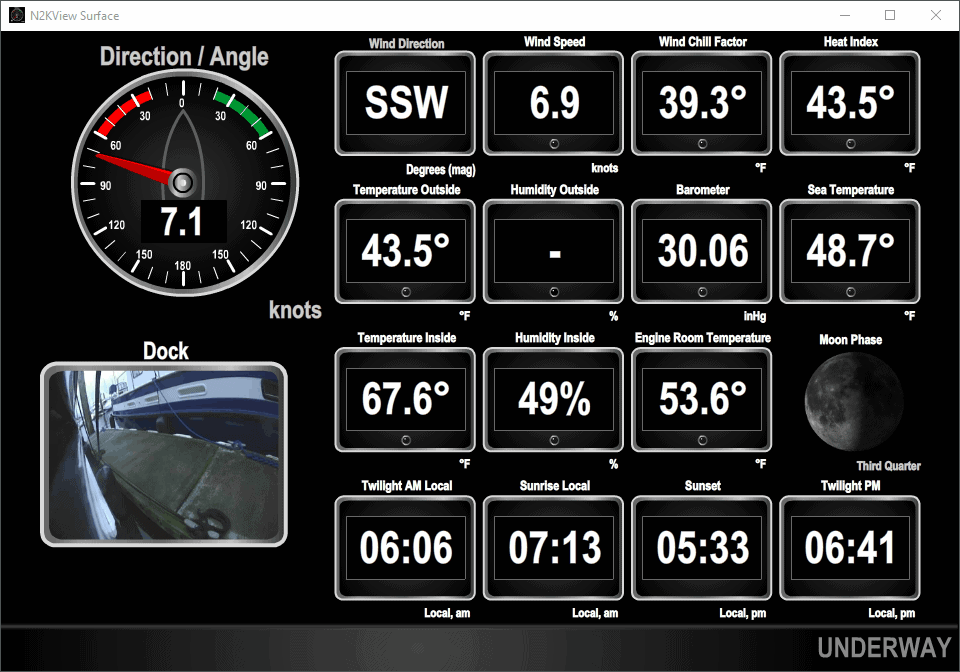
I also use this camera as an early warning system for anyone visiting the boat when I’m aboard. I have it up usually in TimeZero or Maretron N2KView so I can see if someone is approaching down the dock.
Engine Room Cameras
The engine room cameras were something I wanted to have given my Boat exploration, a shock and a fire story from a while ago.
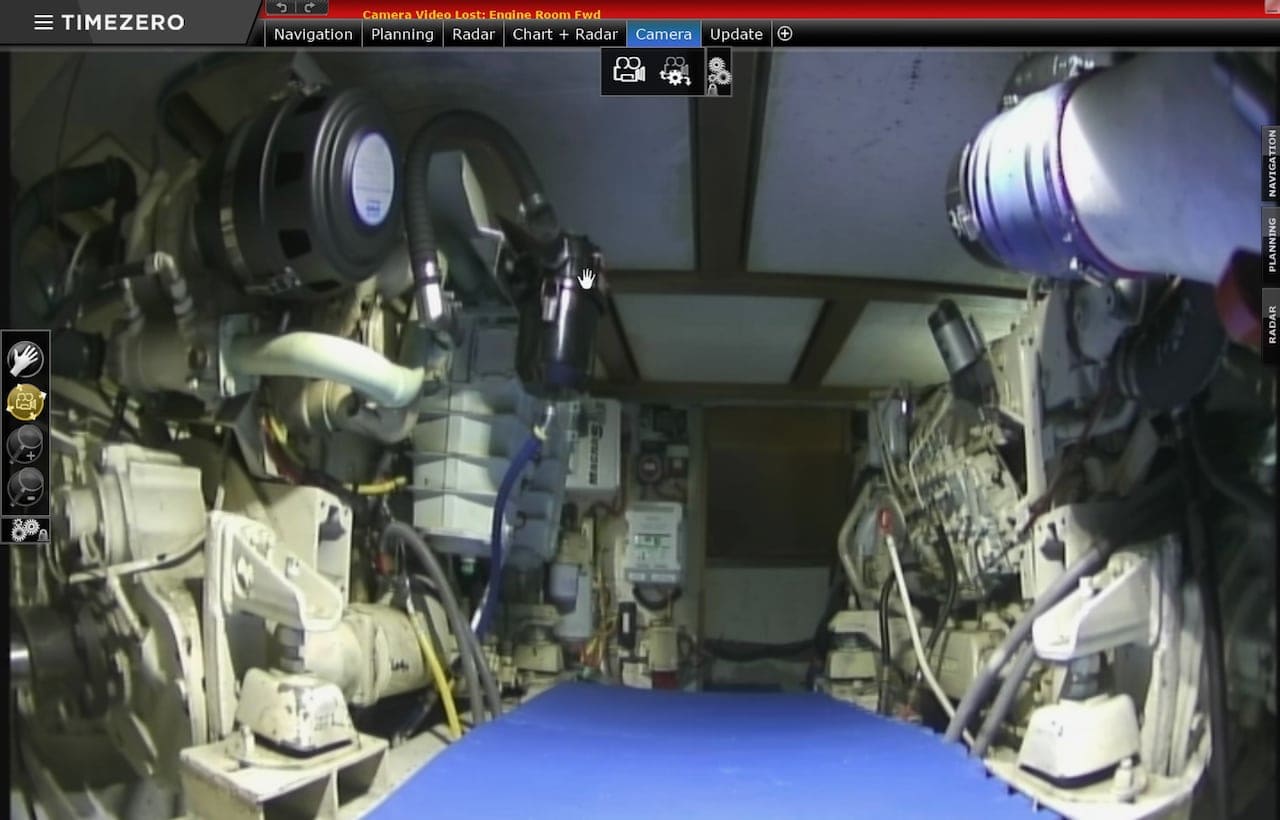
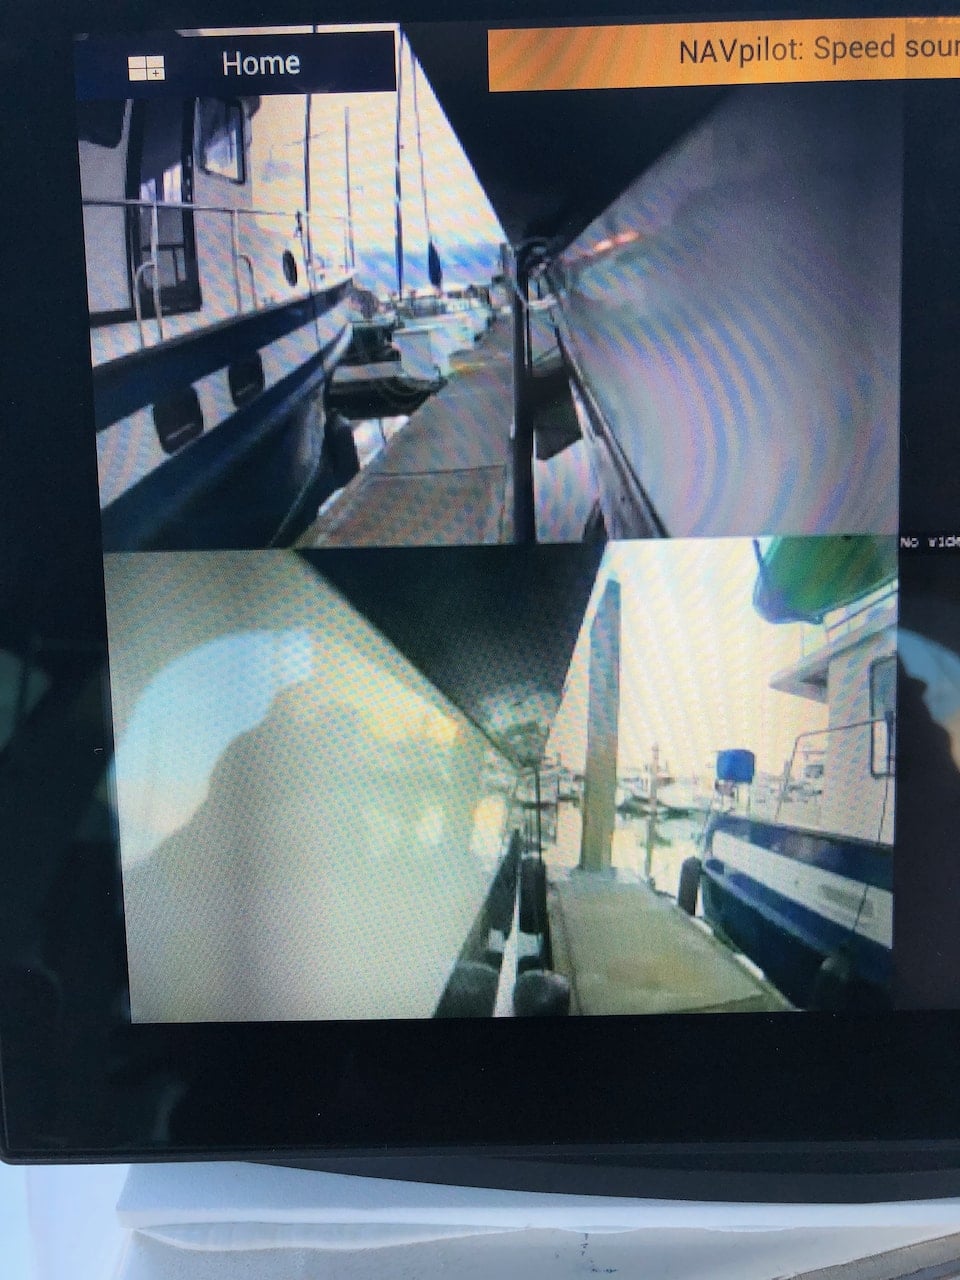
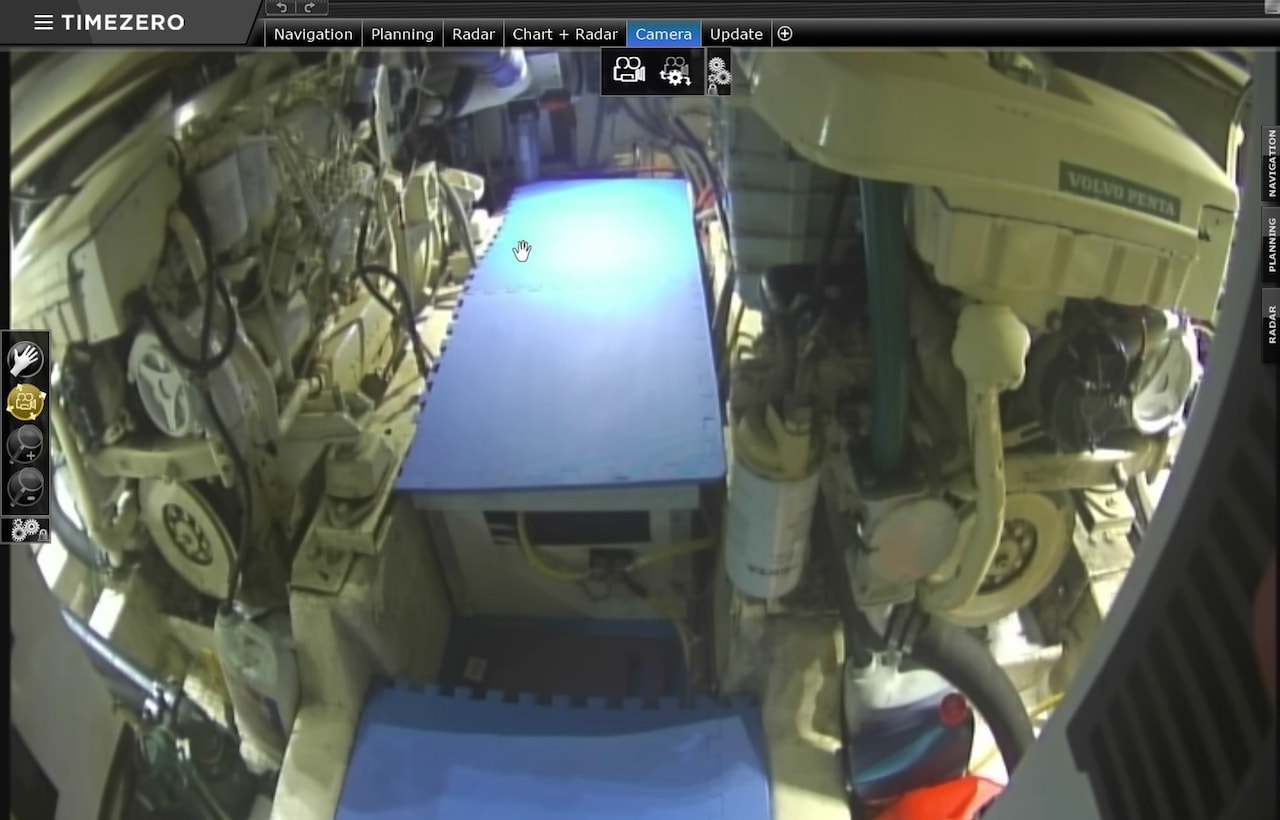
Most of the time I use these views up on the flybridge on one of the TZT2 MFDs when I’m underway. I can flip up a screen to see both views just in case I hear something odd or to check on Bert, Ernie or Oscar (our engines and generator).
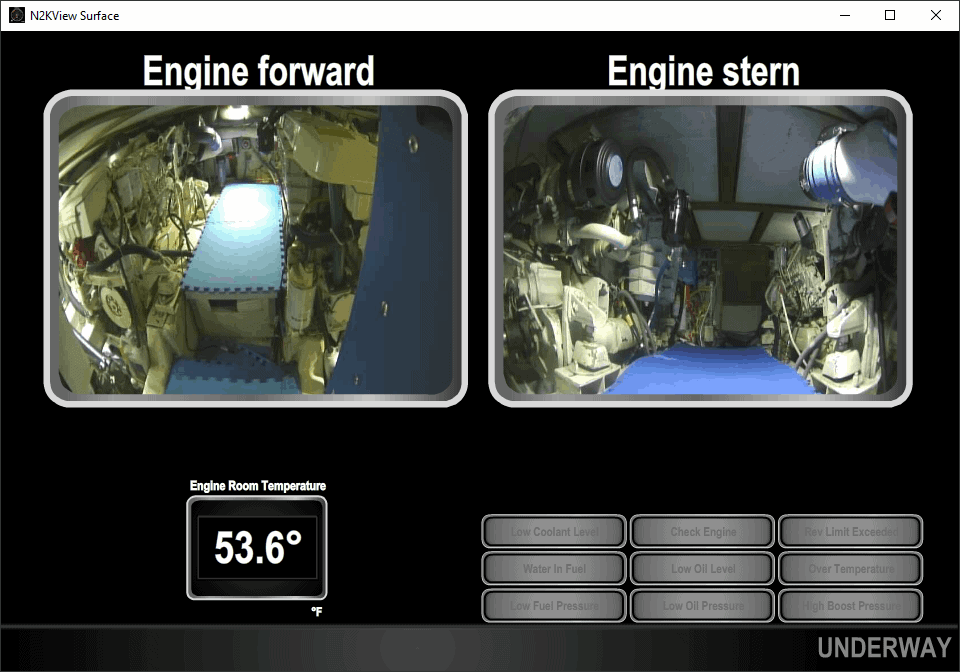
From the lower helm, I can use Maretron N2KView on the PC monitor to see both cams, engine room temp, and various alarms.
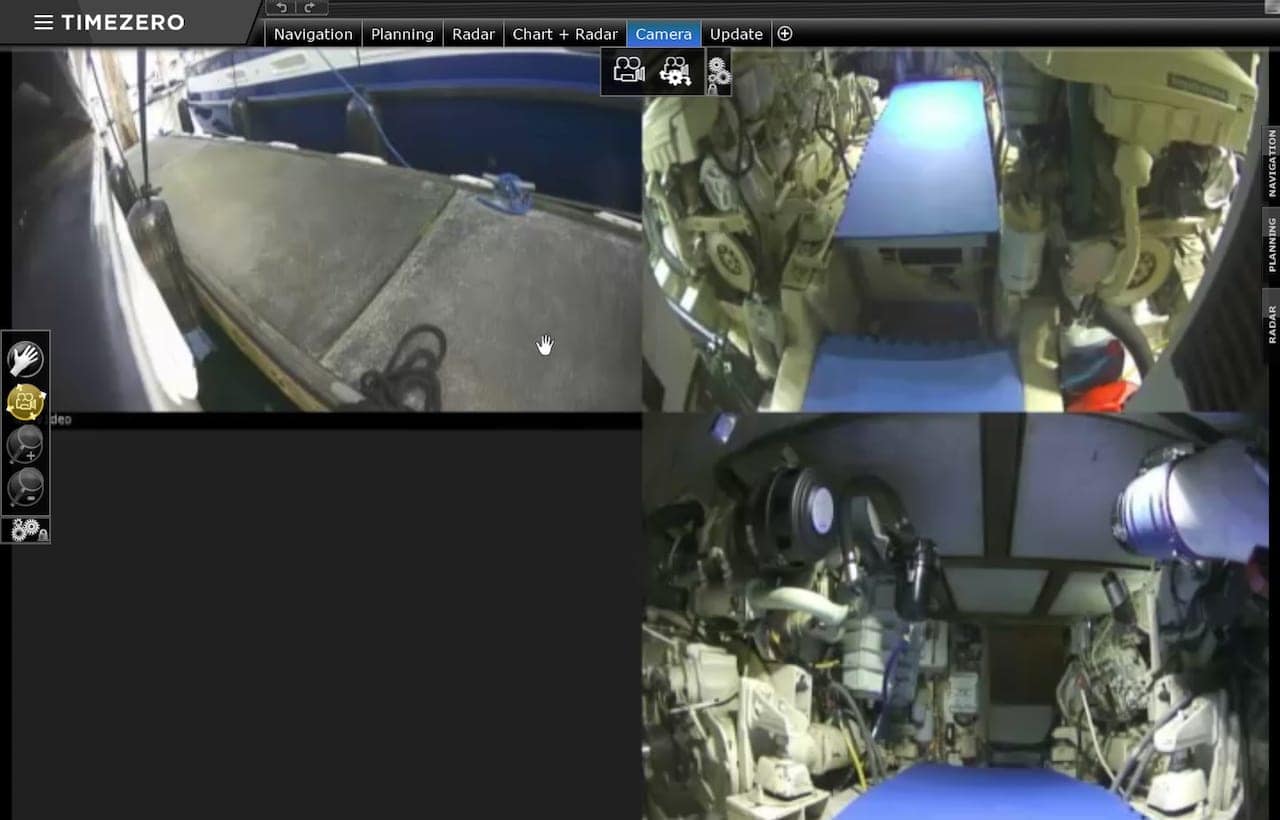
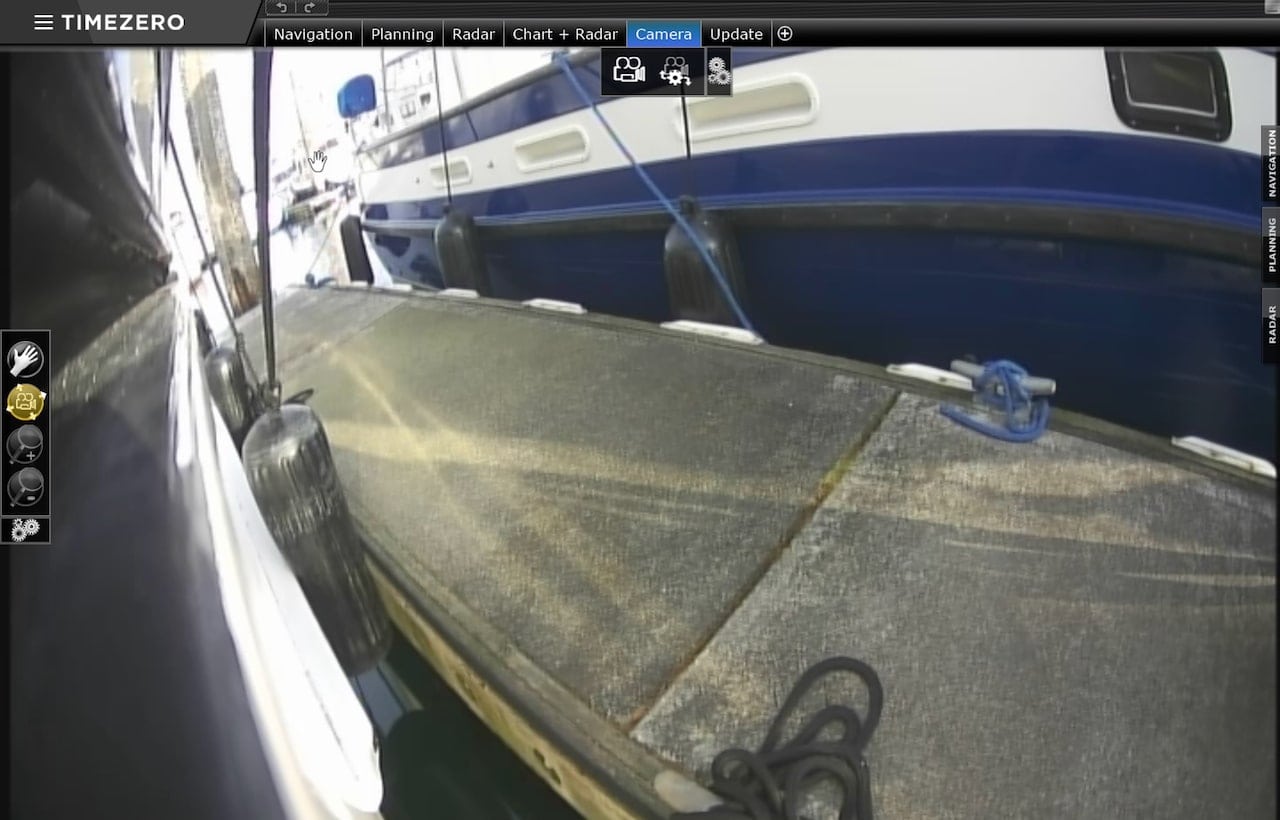
With the quad AXIS server, I can configure a number of different layouts including a quad view, which is sometimes useful both on the PC as shown here in TimeZero, in Coastal Explorer, or on the MFDs so I can see the dock and engine rooms all at once.
Recommendations
- Define your requirements / use case – think about where you want to use your camera from, reliability, and the most important features. I’ve seen many neat WiFi camera systems that require an iPad or iPhone to use, which can be limiting if the iPad is out of battery, shuts down in the sun, etc.
- Security vs. Docking – security cameras and docking cameras can’t always be the same. Sometimes you can use them for the same purpose, but there are a lot of newer solutions like Arlo and Blink that do a better job at security, and can run off of batteries and mount just about anywhere.
- Limits – Check your MFD or PC / software to make sure you aren’t limited to certain brands or quantities.
- Analog – don’t discount analog just because it is older technology. It is not as expensive, works extremely well, and offers other benefits.
- Test Locations – test potential locations before hard wiring things in. Don’t just have someone hold it up – test it for a week or longer. Use 3M tape or zip ties to temporarily hold the camera in place, and use it before you drill holes.
Archived Comments
These are read only comments from the old system. Scroll down to participate in SeaBits Discussions, our new interactive forum attached to each article.
Kevin
February 17, 2020 at 2:40 am
This article has enough content to qualify for hiding behind a paywall, so thanks for not doing that! Many people will find it useful and informative. As for the docking discussion, I used to try and stop near my finger pier, and than reverse just enough to jump off and horse my Jeanneau 36.2 into her slip. Which is a dumb idea, but the still waters of Everett marina north made it possible. Now in Bremerton, I overshoot my slip by a bunch, and start reversing until headway occurs, then just glide in a graceful arc for a stern in starboard tie. But only at slack water!
Steven Webster
November 3, 2020 at 10:07 pm
Steve, another great article. Curious how the stainless Stronghold cameras have held up in the salt water envorinment.
Phil
May 10, 2021 at 7:42 am
Where in the world did you find those 12v regulators? I’m having a hell of a time finding them for my camera setup. Rugged cams have them but they are $17 per and $60 shipping. I’ll go that route if I have to but would rather find something local (Seattle Tacoma) or order through Amazon.
Thanks
- Steve Mitchell
July 17, 2021 at 12:18 pm
The ones that Rugged provided didn’t last very long, and were definitely expensive. I decided to wire the cameras directly into 12V and have been using them that way since March 2021. So far, so good, but if I am concerned, I’m going to use one of the Victron Orion DC-DC converters: https://www.victronenergy.com/dc-dc-converters/orion-tr-dc-dc-converters-isolated