The MikroTik Groove is a fantastic product to use as a marine WiFi booster. However, it is not the simplest device to configure. This guide covers setting up and configuring the Groove for initial use, and some additional recommendations.
Other articles I’ve written that cover more details on configuration and usage:
- Modular, cheaper boat internet solution via Netgear and MikroTik
- Grace’s redundant Internet setup
- Marina WiFi is hard
Usage
There are a couple of different ways you can use the MikroTik Groove, the most common being an outdoor “booster” to grab remote WiFi signals and pipe them to a device on board your boat belowdecks. This device is usually a router that can use the Groove as an Internet source, and then shares it out on your boat with your own personalized WiFi network.
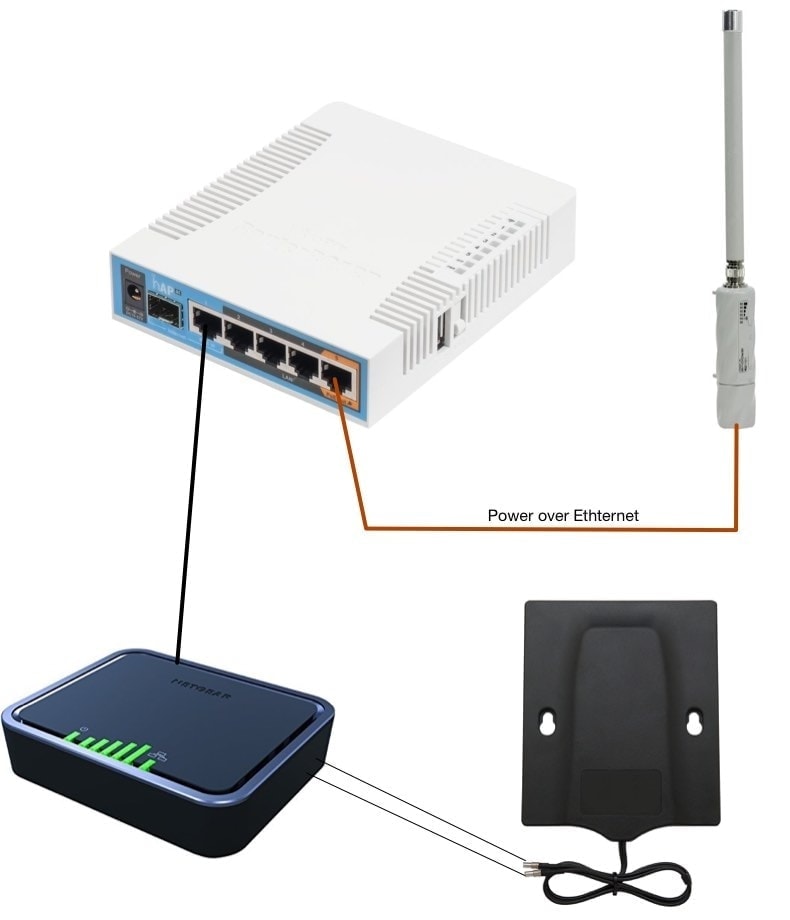
Sometimes folks use the Groove to connect directly to a laptop instead of an internal router, but this limits other people on board from being able to take advantage of the Groove.
The Groove will not function as both a remote WiFi grabbing device, and a WiFi router where it broadcasts a local network – this is a common question I get. The Groove can either be a client and grab a remote signal, or it can be a server or access point, and serve as your local WiFi network. I wouldn’t recommend the Groove for the latter, but instead the MikroTik hAP AC – check out my article on Modular, cheaper boat internet solution via Netgear and MikroTik for more details.
Why do I need one?
Short answer: read Marina WiFi is hard.
If you visit a marina, and you expect to connect to their WiFi network, you need some sort of external antenna or booster. Some Peplink products allow you to use a feature called WiFi as WAN which may work, but most of the time having an external, dedicated antenna or device is required for a stable connection.
Expecting all of your devices inside your boat to work with a wireless access point that has a billion other people nearby, with boats, metal masts, and other interference is one of the biggest misconceptions in marine WiFi. You need some way of amplifying the signal.
Getting Started
Connecting your Computer
There are two ways to configure a MikroTik device – via a web browser, or via Winbox. I prefer using the browser as it works from any operating system, even an iPad, while Winbox is made for Windows. You can run Winbox on Mac or Linux if you want to go through the headache of setting up Wine, which I don’t care to do. If you prefer Winbox, these instructions may not match all steps in that interface.
To get started with connecting, you will need to power the Groove via a PoE adapter – usually the one that it came with. Follow the instructions on what port goes where. You should end up with an Ethernet port on your computer connected to the PoE adapter, and the adapter connected to the Groove. When power is applied, you should hear the Groove beep very soon after applying it, and then 10-30 seconds later, another beep sequence to indicate it has booted.
If the Groove is working and running well, your PC should be assigned a DHCP network address in the 192.168.88.xx range. Use your operating system control panel to check that you are getting address.
Additionally, you can test connectivity by opening a Terminal in Mac, or a Command Prompt in Windows and pinging the Groove’s default IP address:
ping 192.168.88.1
PING 192.168.88.1 (192.168.88.1): 56 data bytes
64 bytes from 192.168.88.1: icmp_seq=0 ttl=62 time=33.826 ms
64 bytes from 192.168.88.1: icmp_seq=1 ttl=62 time=30.486 ms
64 bytes from 192.168.88.1: icmp_seq=2 ttl=62 time=42.349 ms
64 bytes from 192.168.88.1: icmp_seq=3 ttl=62 time=45.525 ms

--- 192.168.88.1 ping statistics ---
4 packets transmitted, 4 packets received, 0.0% packet loss
round-trip min/avg/max/stddev = 30.486/38.047/45.525/6.112 ms
If you get responses, then it’s up and running and ready to be configured.
If not, you may need to Factory Reset the device. See below on how to do that.
If it is up and running, connect with a browser to http://192.168.88.1/ and you should see the initial Quick Set page.
Basics of the MikroTik Interface
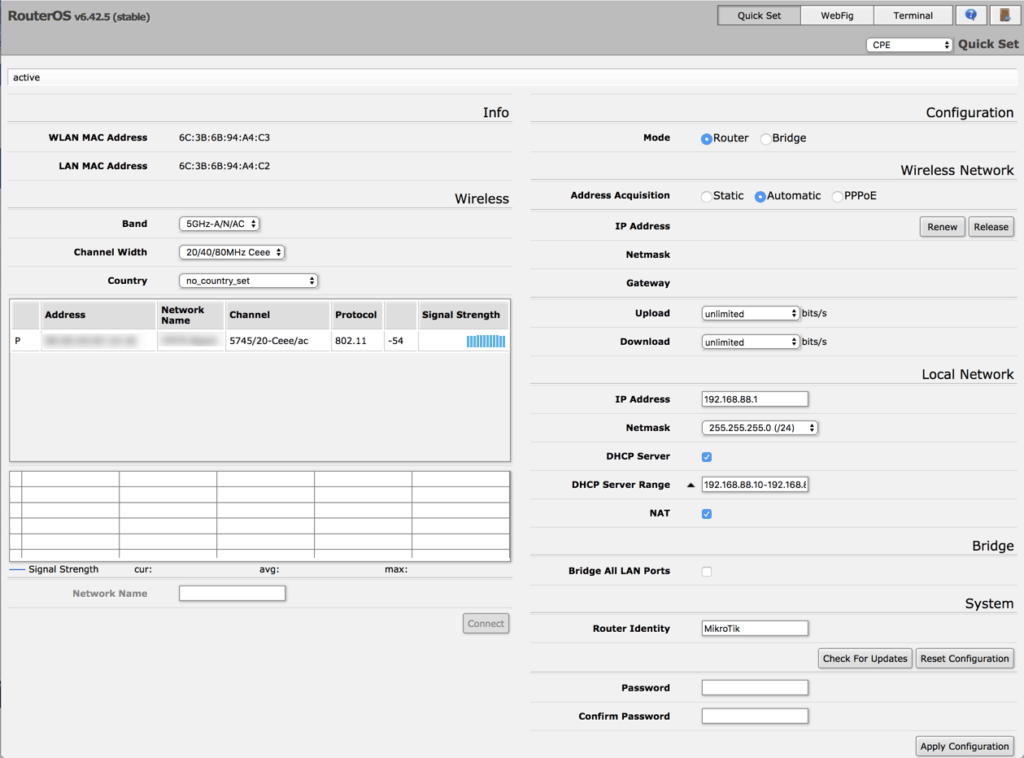
If the device is running v6.40.x or newer, you will be taken to a simplified Quick Set page. Older firmware will take you to the Quick Set page, but with a big menu on the left hand side.
On the left hand area of the page, you will find MAC addresses, some basic settings for WiFi, and a list of nearby networks (once we configure things). The right hand side has the pieces we need to configure first, including the Quick Set choice, router/bridge mode, and addressing.
Lights
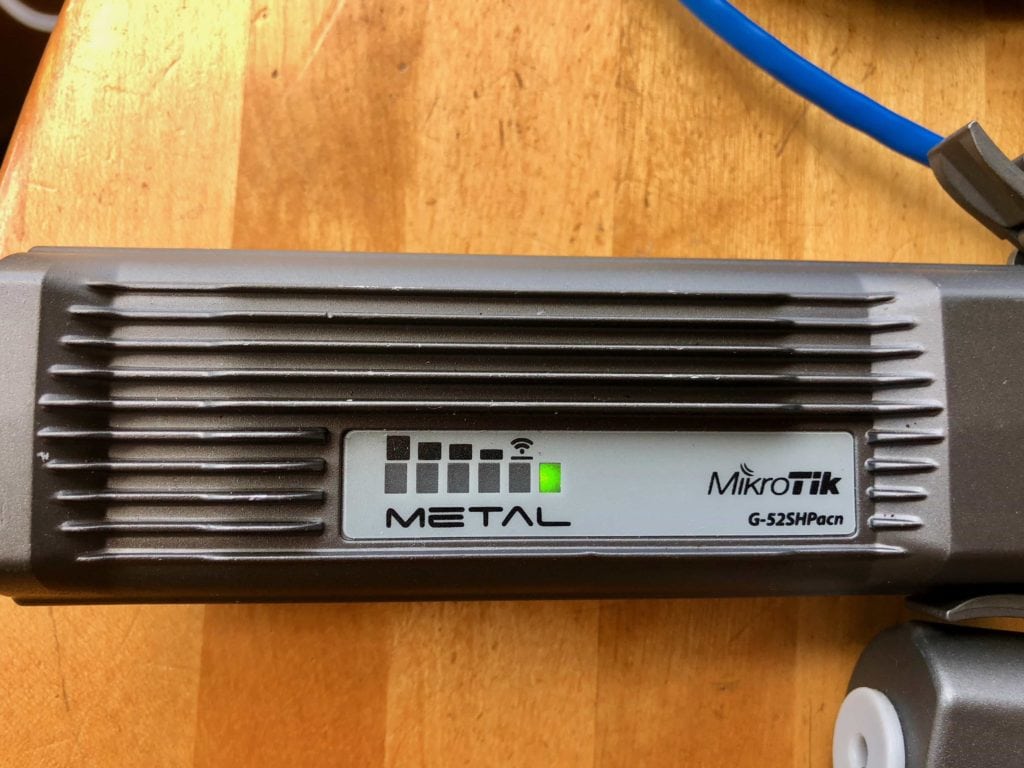
Groove LED showing Ethernet connection active, but no WiFi network connected
There are 6 LEDs on the side of the Groove. The first one will blink in various forms on boot up, and if you are doing a factory reset. Once the Groove has fully booted, that first (lowest) light should be on to indicate your Ethernet connection is up and working. It should blink to indicate network traffic.
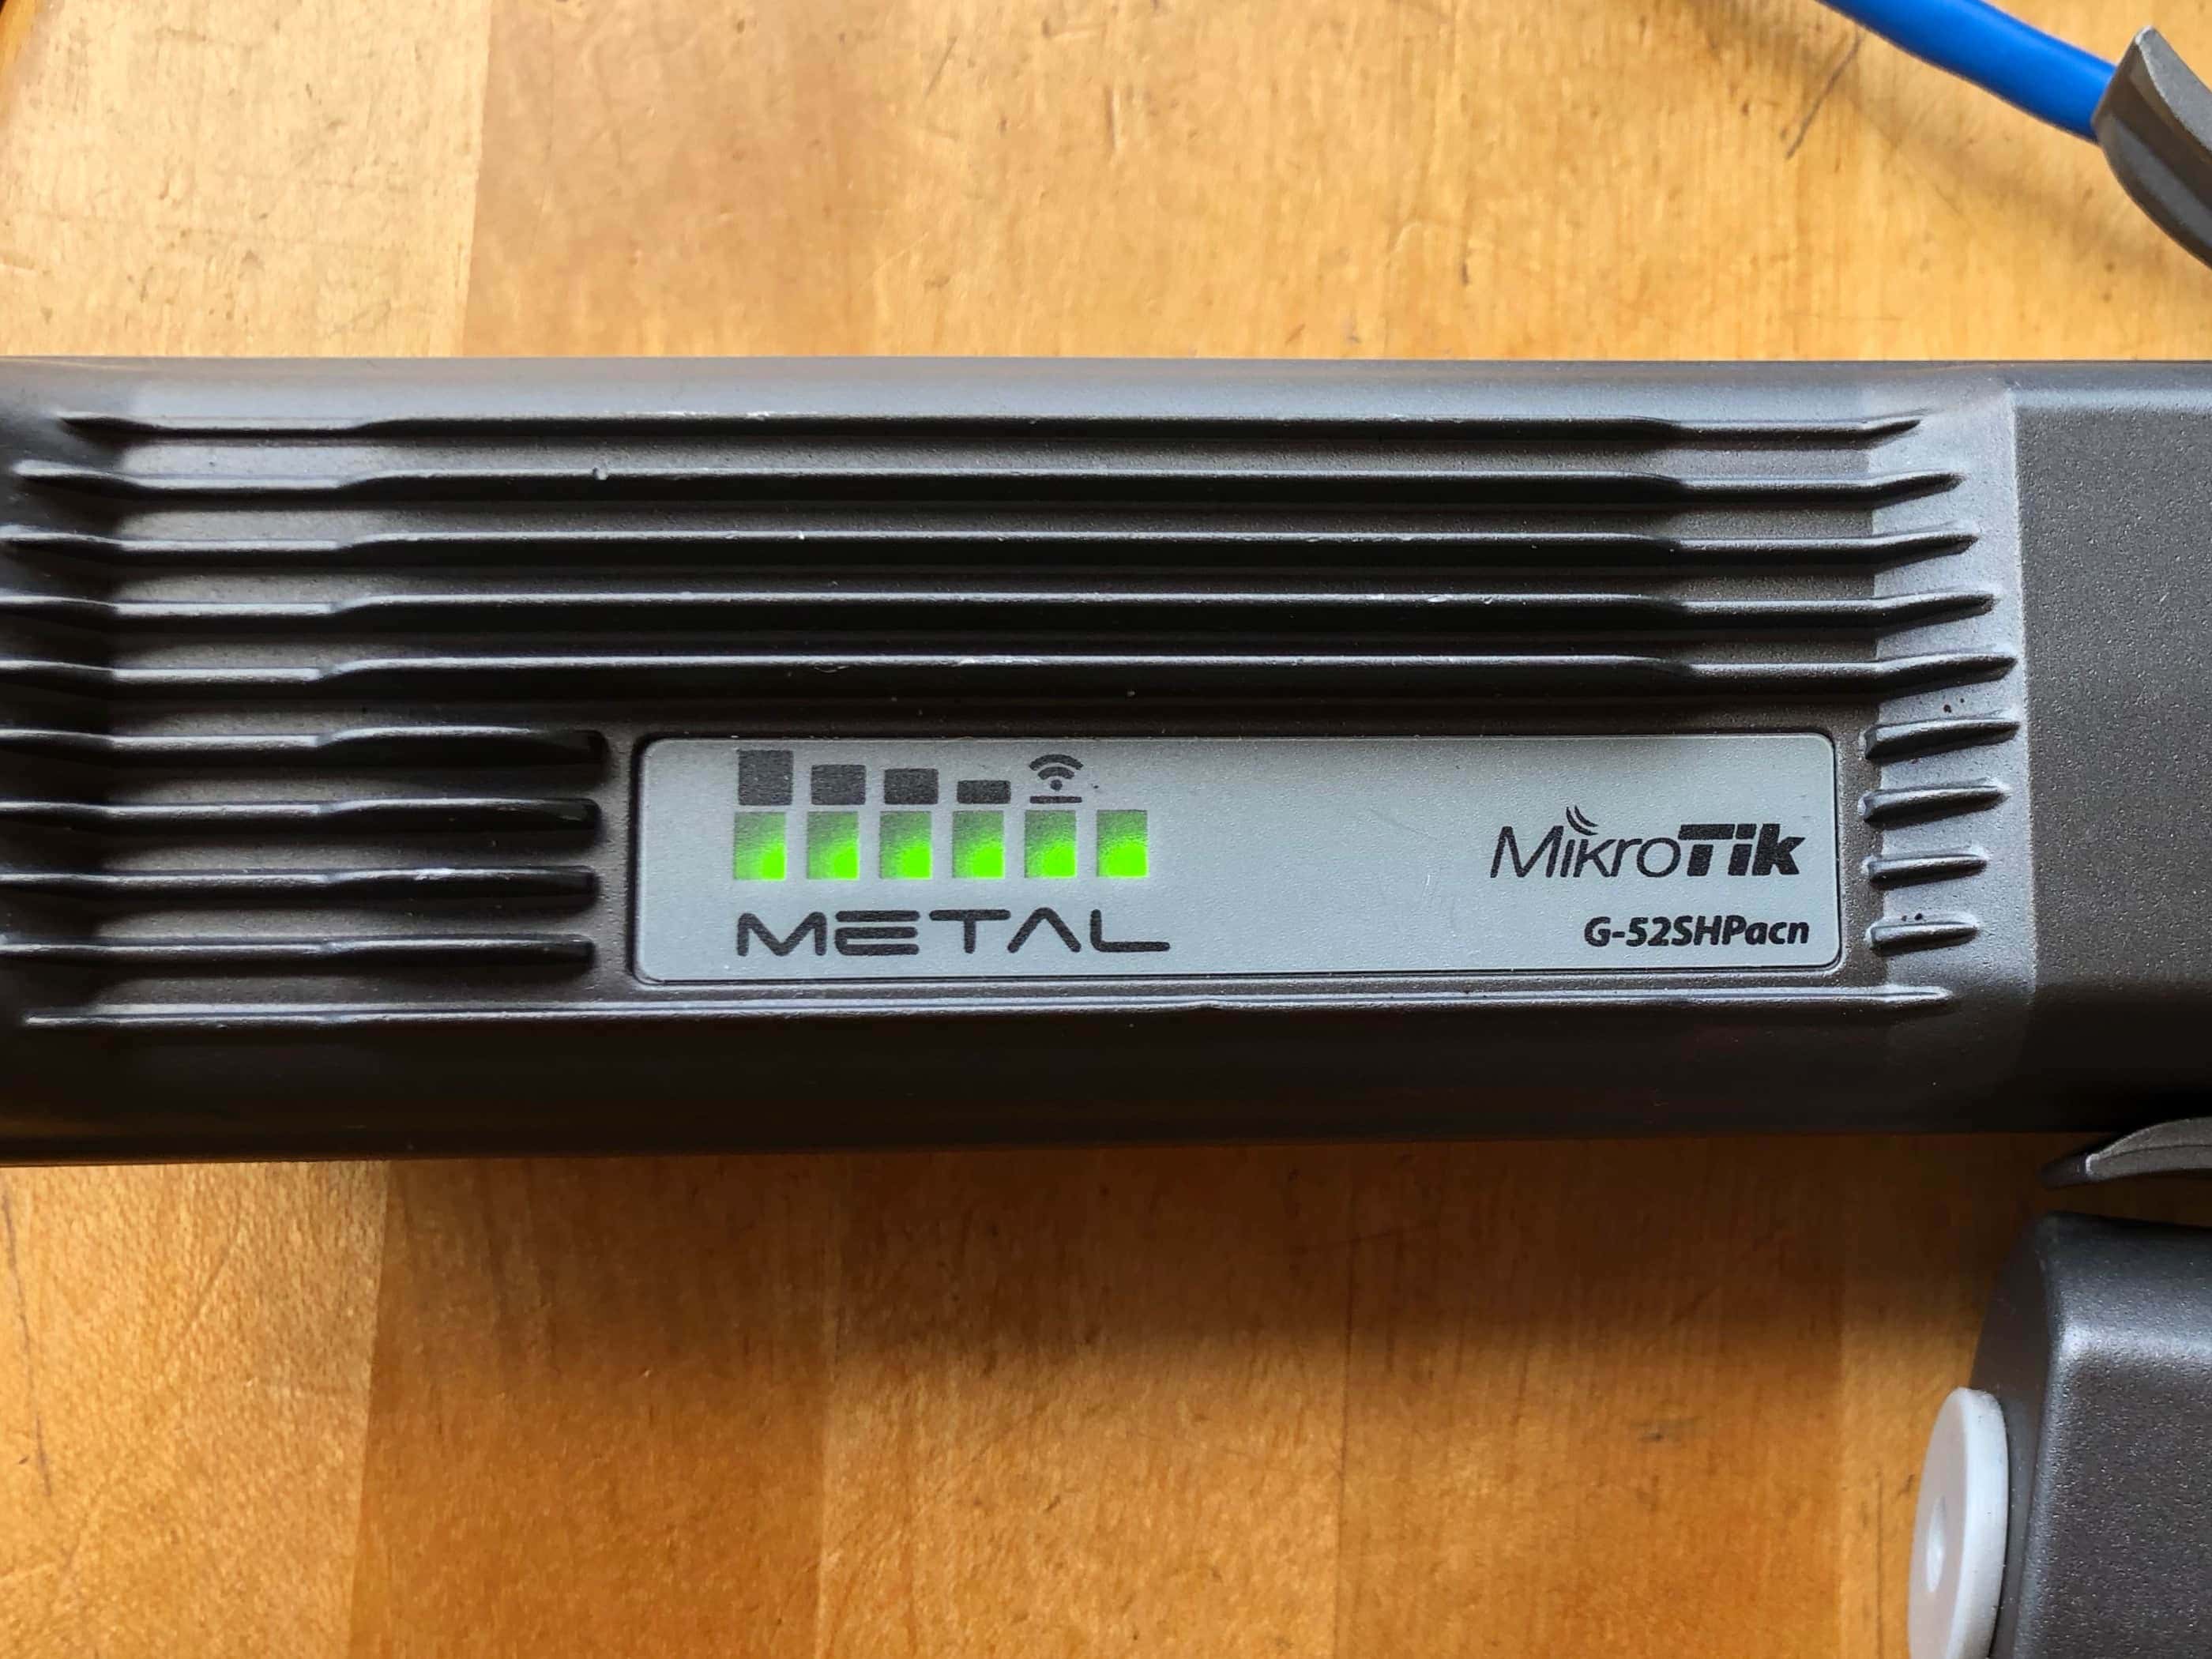
The next LED up shows when you are connected to a WiFi access point, and the final 4 LEDs show the signal level of that remote WiFi network.
Factory Reset
If you get to a point where you can’t get back into the Groove, you may need to perform a factory reset. I have done this many times while experimenting with features or configuration, and have lost network connectivity to the device.
- Power off the Groove
- Using a small pointed object, press and hold the reset button on the bottom of the device near the Ethernet port
- While still holding the button, plug the power back in
- Wait until the bottom LED blinks, then release the reset button
Your Groove is now back to factory defaults and you can start over!
Initial Configuration
Step 1 – Router Mode
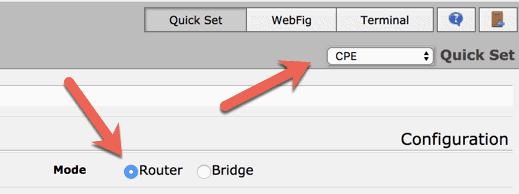
Many new Grooves are already setup in Router mode. You can tell yours is already setup this way if the Quick Set is set to “CPE”, and the Mode is “Router”.
If not, using the pull down near “Quick Set” choose CPE. It may want to reboot – make sure you do that before changing anything else.
If your Mode is not set to Router, choose that and press Apply Configuration at the bottom of the screen. It also may want you to reboot here, which I recommend.
Once you have the device in CPE + Router mode, you’ve done the most risky part of getting things setup. I have seen many situations where changing to other settings under Quick Set have rendered the Groove unreachable, and have had to reset it to factory defaults.
Some people have asked about Bridge vs Router mode, and why you would want another NAT in the process. NATs are not that “expensive” network-wise, and I find it easier to determine where traffic is coming/going to with clearly defined network addresses. Bridges are known to forward anything they receive, and in a WiFi situation, I don’t want crappy broadcasted traffic forwarded through the MikroTik down to my router.
Step 2 – Optional Settings
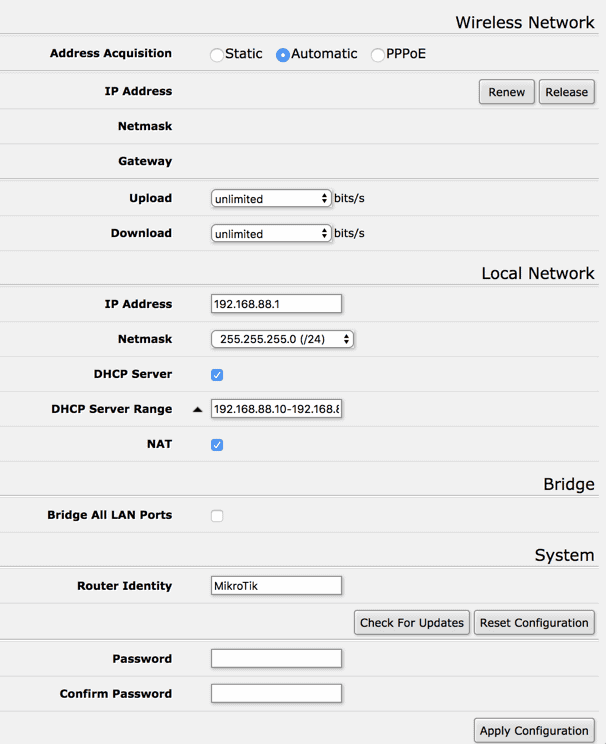
At this point, you can proceed to connecting to your first WiFi network – the basics are setup, and the rest of the defaults should work with a standard router connected to the Groove. If you want to, you can also change the Groove’s name, IP addressing, and the like.
I generally do not recommend changing the network settings as the defaults work well, and unless they conflict with other devices on your network, add more risk in changing. Plus, because you can get into situations where you have to Factory Reset, using the default IP address that MikroTik assigns saves you from having to change your networking just to reconfigure things.
I do recommend giving your router a name under Router Identity, and setting a password for the admin interface so that others can’t change the configuration.
Everything else I recommend leaving at the defaults unless you know what you’re doing.
Connecting to a new WiFi network
When you have arrived at a new marina and are ready to connect to a new WiFi network, there are a couple of choices to get you going:
The Quick Way
In newer firmware versions, it is very simple to connect to a new WiFi network. If you don’t have the new firmware, you might have to do the Manual Way, and then do a Software Upgrade.
To get started, login and make sure you’re on the Quick Set screen.
Once there, you should see a Wireless section on the left hand of the screen. By default the MikroTik should start showing you available WiFi networks, but it may be blank if the band is set wrong.
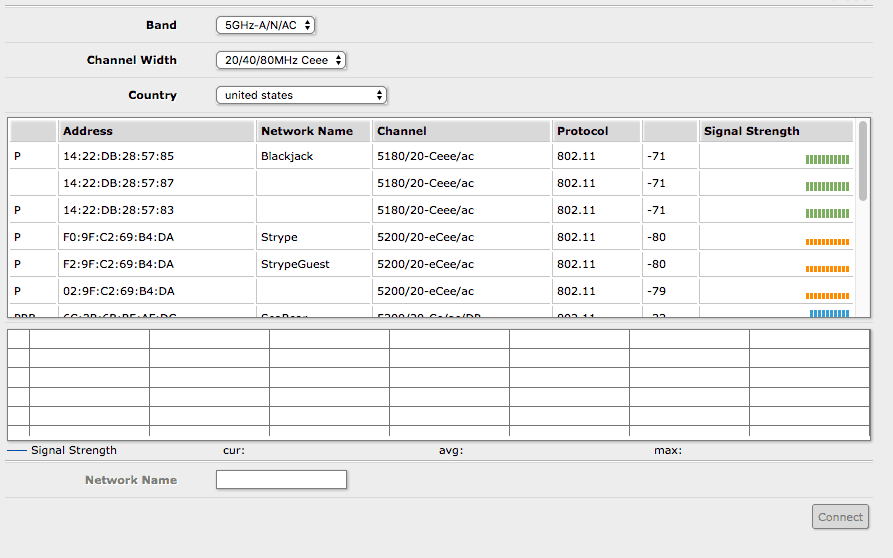
The Groove shows the available networks based on the Band, Channel Width, and Country that is selected. Here’s the best steps I’ve found:
- Country – choose the appropriate country
- Channel Width – set this to 20MHz which is the least restrictive/lowest common denominator
- Band – depending on whether you’re going for 5Ghz or 2.4Ghz, use the most inclusive list for each: 5Ghz-A/N/AC or 2Ghz-B/G/N
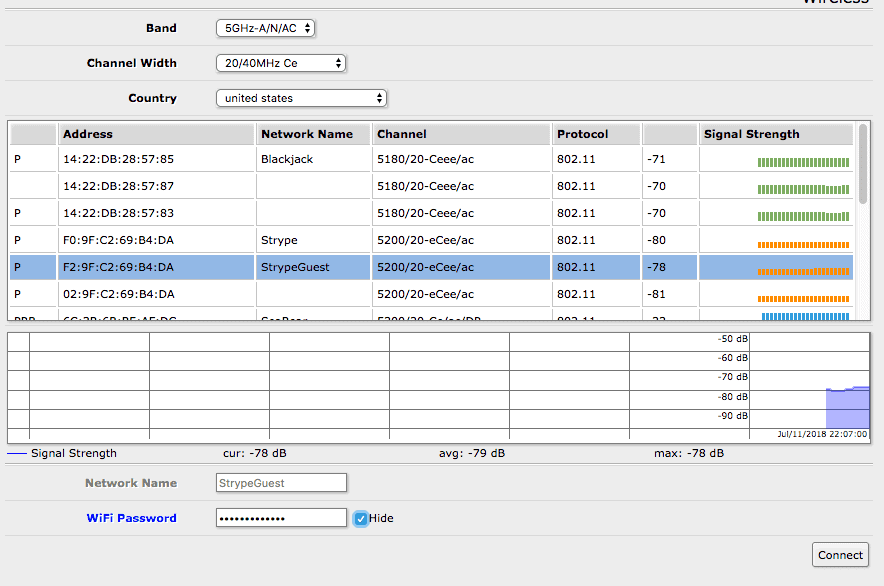
Once you find the network you want to join, click on it in the list, provide the password (if there is one), and click the Connect button. If everything is set correctly, you should connect very shortly.
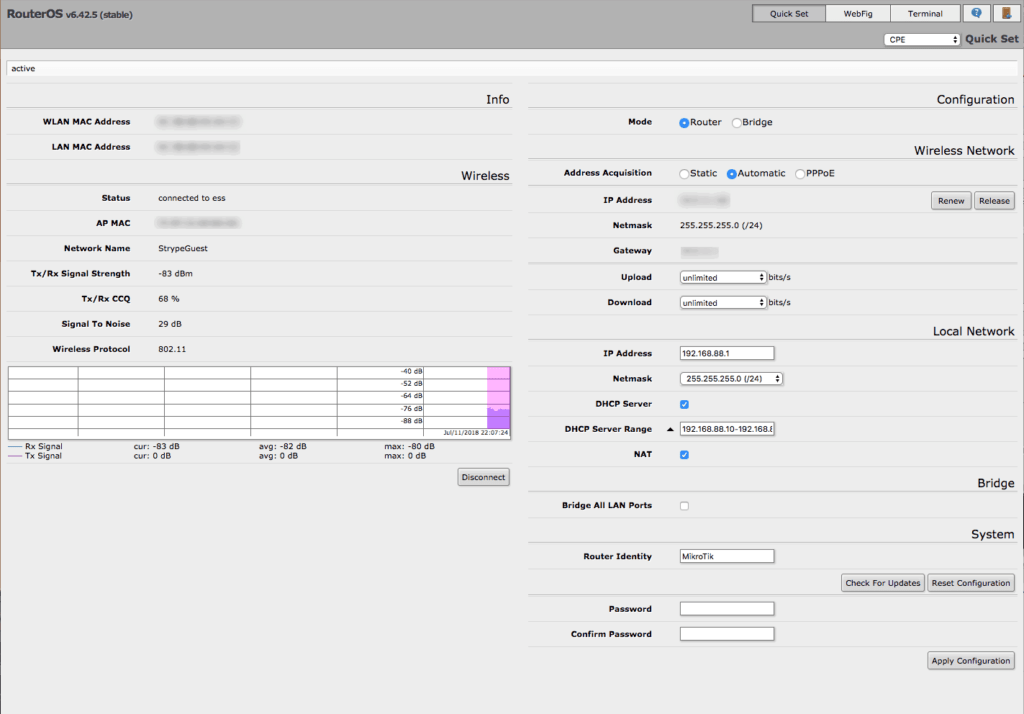
You’ll know if you’ve joined successfully when the Status text says “connected to ess”. You should also have an IP address in the right hand side under Wireless Network.
If you do not have both of these, then there is something else wrong and you may need to look at a manual configuration, or the WiFi network you’re trying to join is too weak or overloaded (which is common).
Using a particular access point
While you are now connected and should have Internet access, some versions of RouterOS record the exact access point MAC address, band and channel width and locks the connection to those properties. If you are at a location where there are multiple access points (APs) providing the same WiFi signal, you may wish to override that so that the Groove searches for and uses the most powerful access point if something changes.
Often, when boats move up and down with the tides, and as environmental conditions change (another boat leaving, etc.) the AP you chose originally may not be the best one for you now.
In other situations, “pinning” your Groove to a particular AP may be desirable as you know it is the highest transmitting on 5Ghz, and you don’t want the Groove hunting around for another.
You may need to experiment to get the best results, and I have seen the above be completely wrong with some of the newer firmware versions – they configure it generically and connect to any AP with that WiFi name.
To override what has been set above, simply follow Step 4 below in The Manual Way to remove the AP MAC address and change the band and channel width to more inclusive values.
The Manual Way
If you have an older version of firmware, you may not be able to use the steps above. Also, if you prefer to tweak the radio or security settings, you might use these steps as well.
Step 1 – Security
If the WiFi network you’re connecting to requires a password (or security key), as most of them do, then you’ll need to create a security profile. To do this:
- Click on Wireless in the navigation pane.
- Click on the Security Profiles tab.
- Click Add New.
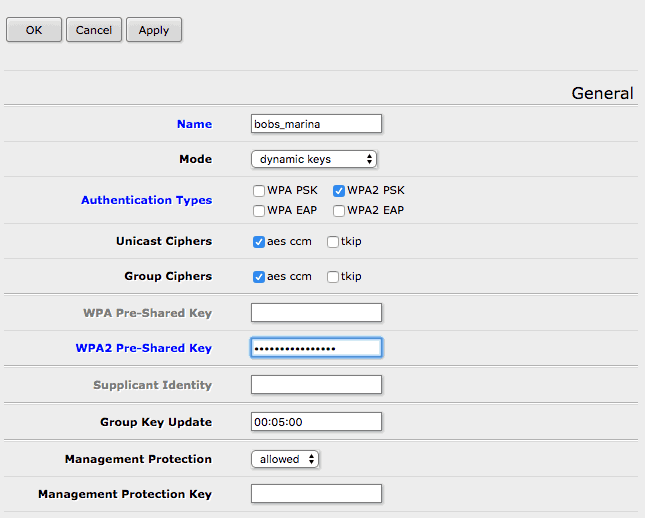
Most modern WiFi systems use WPA2 security, and in particular WPA2 PSK. Make sure that is selected only.
Leave the default Unicast and Group Ciphers set to AES – those are most commonly used as well.
Under WPA2 Pre-Shared Key, enter the password or passphrase for the WiFi network you’re trying to connect to. Leave everything else at the defaults.
Click Apply, and you have a Security Profile you can associate with the WiFi adapter for the network in question.
Step 2 – Scan
I always use the built in scanner regardless of what the marina has told me. I start by scanning with the radio set to 5Ghz, and then try 2.4Ghz if things don’t work out.
- Click on Wireless in the left navigation pane
- Click on the WiFi adapter, “wlan1”
- Change the band to 5Ghz – I set it to the most compatible of 5Ghz-A/N/AC
- Change Channel Width to 20Mhz
- Change the security profile to the one you setup in step 1
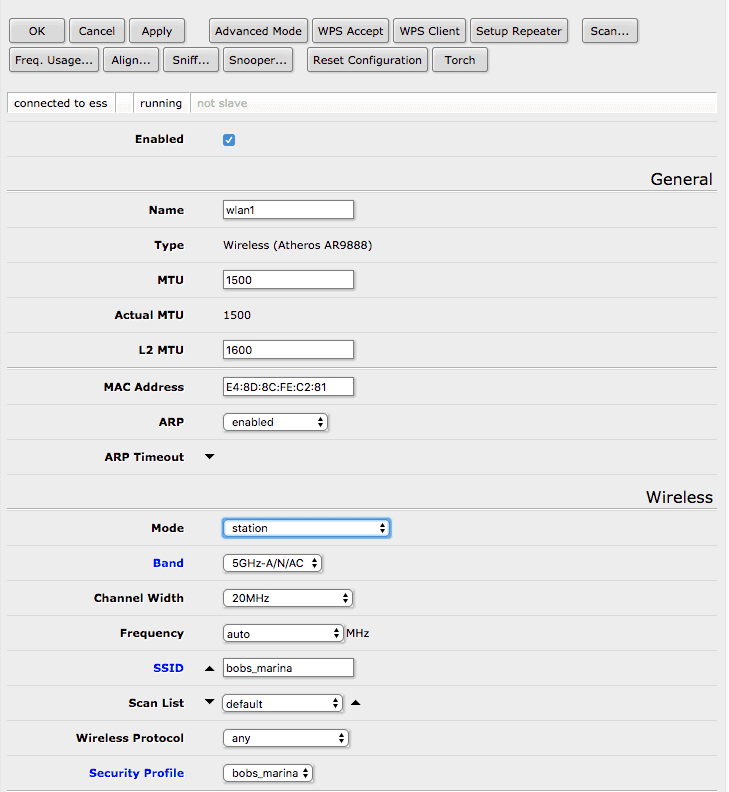
Now we need to scan for available networks
- Click on Scan to start the scan on 5Ghz
- If nothing shows up matching what the marina provided, they may only have 2.4Ghz. If so, go back to step 2 and choose 2Ghz frequencies.
Step 3 – Connect
Once I find a signal I like, I click Connect and let it auto-fill the WiFi adapter settings. You can tweak them afterwards.
Step 4 – Adjust
Once things are pre-populated from the above step, I go in and adjust a couple of things.
- Remove specific MAC address of AP chosen
- Adjust band to entire spectrum
- Adjust frequency to auto
Keep in mind that I do this because I know my boat will float a bit, and move around with the tides, and the one station we identified in our scan might not be the best a few hours later. If you have issues after changing these, your Groove might be hunting around and changing the remote AP too many times, and you can go back and re-run a scan to “pin” it to a particular access point.
You can also force the system to use a particular access point – see above under “Using a particular access point”
Software Upgrade
Once you are connected to a WiFi network, you need to upgrade the software to the newest release. I highly recommend doing this before relying on the Groove. Many bugs have been fixed in the more recent versions, as well as some major vulnerabilities that you don’t want hanging around.
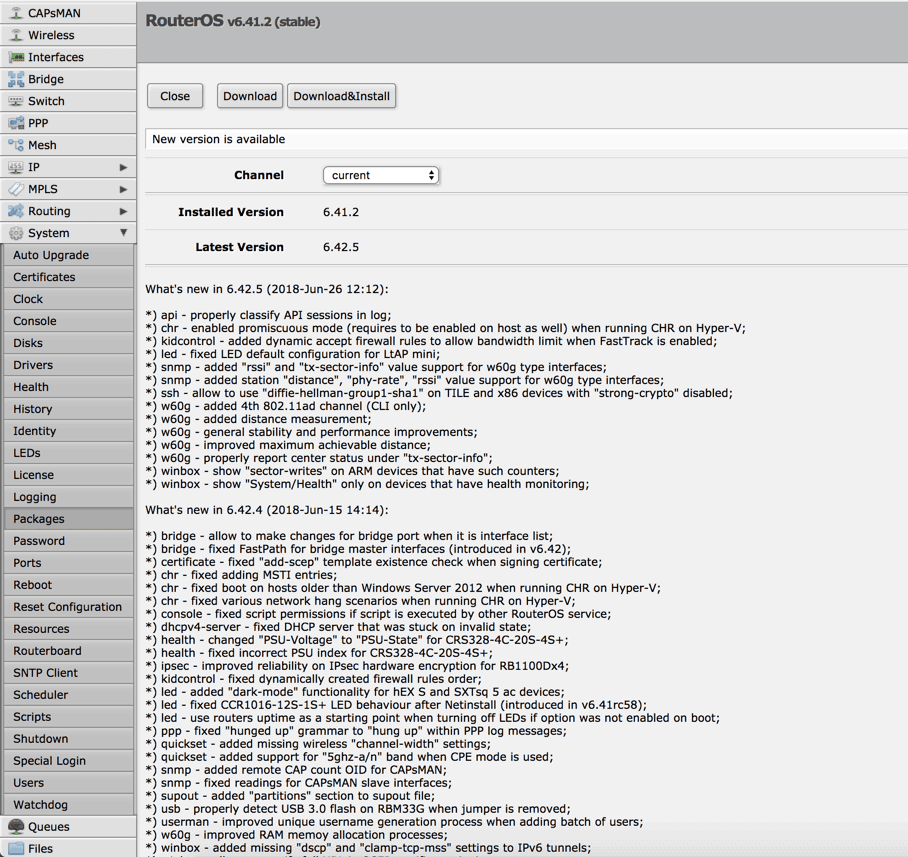
To upgrade:
- Login to your Groove
- Click on WebFig to get into advanced configuration
- Expand System in the left hand menu, and choose Packages
- Click “Check For Updates” (requires active connection to the Internet)
- You’ll see a screen similar to the above if there is a new release available
- Click “Download&Install” and wait a couple of minutes while things are downloaded and installed
- The Groove will reboot and should come up with the new version.
I also recommend checking for new updates every week to ensure you’re on the latest and most secure and stable release.
Security
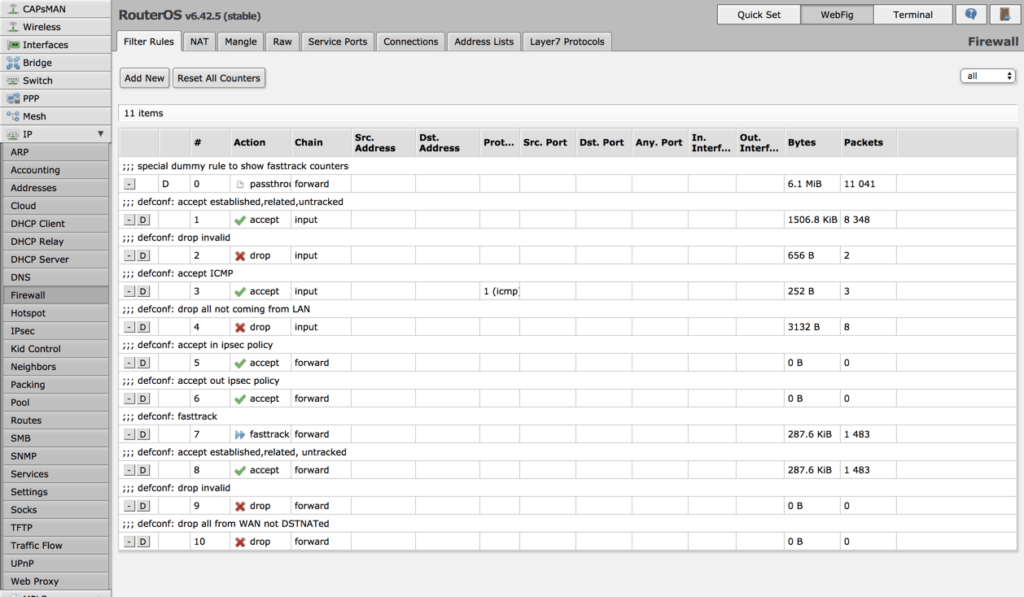
By default the Groove has a firewall in place with some good rules to prevent anyone on the WiFi networks you connect to from accessing anything on it or elsewhere behind it. Unless you have needs to open ports for shared services or the like, I wouldn’t change much here.
In addition, if you are using an on-board router that the Groove is connected to, it also should have a firewall protecting your internal network as well.
I also highly recommend that you read Securing your Router for more information on additional steps you can take, and set an admin password and switch to SSL!
Conclusion
This is a very basic set of steps to get a MikroTik Groove up and running as a wireless “booster” for a marine application. You could also use this on an RV or in any other situation where you need to snag a remote WiFi signal and then amplify it within your house/boat/RV/yurt, etc.
However, by no means is this all-inclusive. There are tons of other features in the MikroTik RouterOS software, and you can end up with some pretty amazing and complex configurations. This guide is meant to help you get connected quickly. Hopefully it has, and you’re using it in your network to read this right now!
You can help support my site by buying a Groove through one of the Amazon affiliate links below.
Make sure you check out my other articles around similar topics:
- Modular, cheaper boat internet solution via Netgear and MikroTik
- Marina WiFi is hard
- Redundant internet setup
Archived Comments
These are read only comments from the old system. Scroll down to participate in SeaBits Discussions, our new interactive forum attached to each article.
J Schwartz
January 16, 2018 at 8:12 pm
Steve, I have a similar setup on my boat for internet access, but am having trouble with the Groove. It will connect in CPE mode to some wireless networks, but it fails to connect to others. It appears to be a configuration issue on my part but I’m at a loss to identify it. Would be interested in your configuration article—I’m essentially using the CPE quickset mode.
David Geller
May 29, 2018 at 2:09 am
Great article. Super useful.
Would you be interested in collaborating on an easier-to-configure interface for the Mikrotik Groove? There’s a node.js module for controlling it. You seem adept at many Mikrotik things and I can easily build the progressive web app part. I suspect most people want to be able to simply pick an AP from a list and just start using it.
Also – I built a combined AP + Groove unit that can run off 12v. Could I bring one over for you to try out? It was designed to be portable and easily stowed during cruising without the need for any external antenna mounting.
- Steve Mitchell
May 29, 2018 at 9:37 pm
Hi David,
Thanks for the kind words. Always interested in new ideas and testing!
Aquabelle
May 29, 2018 at 10:47 pm
Steve: given how many of your growing band of followers are outside the US, it is worth noting that the MikroTik Groove AC is available in two models. The ‘locked’ version is intended for use within the US only. For all other countries, the ‘unlocked’ version should be ordered.
- Steve Mitchell
May 29, 2018 at 9:39 pm
Aquabelle: thanks for that note, that is a great change to make. I will do that now.
Joe Chin
September 3, 2018 at 11:27 pm
We used the Groove extensively while cruising. Our son’s correspondence school was mostly online and the Groove worked in a pinch. Getting internet onboard was never easy. You either paid for a 4G hotspot plan at their rates (Italy 20GB was 10€, 2GB was $20 for BTC) or work with wifi. Wifi wasn’t always reliable but it was free.
Franz Kerekes
September 9, 2018 at 2:25 am
I lose connectivity with the groove as soon as I select CPE from the quickset menu. Have to factory reset to get it back, but I am stuck. Thoughts?
Erin
October 6, 2018 at 3:15 pm
This article was a huge help. Our Groove 52 ac came set at 5Ghz and we couldn’t get connected to any ap’s (I could see them in the list but couldn’t get connected) . I changed to 2Ghz and was able to connect. My question is, what’s the difference between the two? How will I know if I need to change? We’re in a marina now and headed to the Bahamas… should I typically leave it set at 2Ghz? Thanks!
Labatt s/v/ Pelican
July 12, 2019 at 4:58 pm
Any thoughts on cutting the power wire for the power adapter that comes with the Groove PoE and hardwiring it directly into the boat DC @ 12v? The Groove says it can be powered via 10v-30v and the power adapter says it’s converting AC to 24v DC.. but before I cut it I wanted to see if anyone else had since I can’t get a replacement easily where I am.
Carl G
February 25, 2020 at 3:57 pm
Fantastic write up and excellent follow up here. Thanks for this and I will add my recent learning as well as ask a question.
My US-Locked device, purchased here in Feb 2020, was impossible to connect with via wifi the broadcast SSID or via computer with direct Ethernet connection. I didn’t have Windows PC available to run Winbox but found that after Reset, the Groove looks for a DHCP server on the Ethernet port. This required simply plugging into an available router to get an assignment and then a quick scan of the address space and I was in to work out the configuration. Once configured, the Ethernet cable was installed on the WAN port of My PepWave router and I was in business. Every Reset since (there have been many as I’ve explored the Webfig settings only to hang the Groove) has required the same process. I had no luck finding the Groove default to 192.168.88.x , 51.x, etc. – It seems to me that you either use Quick Set or Webfig – not both. Several settings tweaked in Webfig seem to create a conflict with QuickSet and results in hanging the Groove.
I have the Groove working well as a CPE in Router mode, feeding the WAN port on my PepWave router. Consequently I have a double NAT situation and a noticeable degrade in throughput. As others have noted, the double NAT situation often causes trouble with captive or referred portals. e.g. BBX will often fail to resolve a login page through a double NAT setup. Ideally, I’d like to run the GROOVE CPE in BRIDGE mode to eliminate these issues allowing my PepWave to directly manage the WAN IP acquisition (I don’t care about traffic pinging the router). I am able to survey and secure a remote AP, flip the Groove to BRIDGE, then open the Router Page and set the WAN IP to DHCP – bingo all works good, no more double NAT, throughput is perky, etc. The challenge is getting back into the Groove to do a new survey without having to put it through a full RESET, switching cables, etc. Once in BRIDGE Mode, Winbox doesn’t find the Groove despite my setting the PepWave Routers WAN IP and Bridge IP to static addresses. When using my previous (3) short lived Ubiquity Bullets, I was able to create an IP alias in the Bullet that allowed me to access it by simply switching the WAN IP of the router to a static address. An extra step but much much easier than the alternatives. I am wondering if there is a way to do the same in the Groove – define an IP alias (address) which can be accessed outside the WAN domain allowing a path back to the Groove configuration screen for new wireless surveys and connections.
Carl G
May 19, 2020 at 10:49 pm
Steve – in your article you mention the notion of “pinning” the Groove CPE connection to a particular AP and a technique to open the same up to all reachable APs sharing the same SSID. My experience with this has been mixed – I have used QuickSet UI to select a targeted AP and had the MAC stick when same name SSIDs are present. But I have also seen cases where I select a specific AP-MAC and the connection undesirably hops to a different MAC with the same SSID. I dug into the Webfig but for the life of me I am not able to find where one would pin or open the MAC for the target AP. I don’t see such a field listed in Webfig nor do I see it shown in any of the screen shots in your article. The only editable MAC field I can find is in the General Section which seems to pertain to the MAC of the MikroTiK acting as the CPE. Will you provide a few more specifics to Step 4 in this article? I would really like to solve this.
Jim Holm
May 21, 2020 at 5:08 pm
Is there a better antenna component to the Groove that might boost signal for my sailboat. Is the one that comes with it adequate in the marine setting. Thanks. Jim
joe delorenzo
June 25, 2020 at 3:14 am
Hello Steve
thanks for the great info I purchased the groove from your link last year I finally got around to trying to set up.
I cannot get any lights to light when i plug the ethernet cable and the power supply the green led on the adapter goes out, if i unplug the ethernet cable the light comes on.
I tried the reset procedure as you mentioned and I cannot get any LEDS to blink or turn on
Is this unit dead on arrival Hopefully I am doing something wrong
I hope to hear from you thanks
Chris H
July 2, 2020 at 1:56 pm
Thanks for writing this great post. Based on your advice, I bought a Groove for my boat. I have it up and running per your instructions here. My home marina has a ton of APs of different names that all share the same password. Periodically, the AP I am connected with will slow down and I have to switch to a different AP. Less frequently, an AP will go offline. The question I have is whether the Groove can be setup to switch between a small group of APs if for example the Signal to Noise or some other metric drops below a specific value or the connected AP drops offline? Is there a way to set that up on the Groove? Basically find the strongest signal from the list of configured APs and connect to that one? I am not well versed in the networking acronyms and networking is definitely not my super power. Any guidance is appreciated!
Eric Munsing
July 27, 2020 at 3:53 pm
A few notes for getting things set up with a recent Groove A model and a Mac:
– The default settings did not allow me to connect via wifi or through wifi via a router; the Groove A would always put me on a different subnet than its internal
– Accordingly, using Winbox or Winbox4Mac and connecting directly to the Groove via an Ethernet cord and MAC address search was *NECESSARY*. I found Winbox4Mac to be stable and invaluable.
– After connecting with Winbox4Mac I was given the option of removing the factory Access Point setting. **Remove the Access Point Settings**. Without resetting these you will not be able to switch to CPE mode.
– After these settings have been removed you should also be able to connect to the Groove Webfig at 192.168.88.1 in your browser.
– The new, reset settings will not have the necessary configurations to fully function as a CPE (particularly DHCP client, DHCP server, Firewall filtering, NAT masquerading). I used the config file from a Mikrotik SXT2 to set the Groove up appropriately. The firewall settings were the trickiest for me to debug, as there are many sub-panels of config options.
This process will need to be repeated after each factory reset, but will “stick” after a normal reboot or power-off.
Hardware:
– Macbook Pro running Mac OS 10.15 Catalina
– Ethernet-to-Thunderbolt adapter
– Groove A 52 ac (GA-52HPacn)
- Barbara Flanigan
May 23, 2021 at 9:46 pm
Can you elaborate on how to do this? I tried out the older model b/g/n last week and liked it, so I wanted to upgrade to the AC model but when I just unpacked mine (GrooveGA-52HPacn – with the “A”) I ran into something similar to you. It came with a WISP profile and script set up and I have no idea how to get it configured for CPE. The QuickSet menu looks nothing like this guide or the old 52HPn that I played with. I am not sure if the author here is indeed using a GrooveGA-52HPacn (with the A) or if he is using the RBGrooveG-52HPacn (without the “A”). It’s really unclear what one is buying online because no matter what these vendors put in the description, it seems they all show photos with the case labeled GrooveGA-52HPacn and while there may or may not be different models of them and they may be configured differently, at least the photos online all say GrooveGA-52HPacn. Thanks for your help … - Steve Mitchell
July 17, 2021 at 12:08 pm
It would be interesting to know where you purchased your units from. I’ve heard of folks getting odd versions of units from non-standard sellers on Amazon. I’m wondering if they’re selling non-US versions, or some other derivative.
Matt
July 27, 2020 at 4:27 pm
Hey Steve,
I came across your article while researching for a similar setup, except onshore with a caravan. Your article is really helpful and similar to what I want to do, but one thing I haven’t been able to find a lot of information on is lightning and the risk it poses to the Groove being exposed outside. Is this something you have run into any issues with? This is the one part of the setup that I just can’t figure out – I don’t want to risk damaging other devices on the network.
Scott
August 16, 2020 at 9:51 pm
Hi Steve,
Great article! We have gone through a few extenders on our boat. First we used a Ubiquiti Bullet M2HP that worked for 2 years until the antenna connector snapped off. It’s not sold anymore so I tried to replace it with an Alfa Tube 2HP mounted at the masthead.
This seemed to work until I realized that the Alfa was “non-isolated” which caused serious problems with our boat’s isolated ground system. Do you know if the MikroTik Groove (or Metal) is isolated or non-isolated?
Specifically, is the metal antenna connector isolated or is it connected to either the positive or negative power lead? We mount it using a stainless bracket that is screwed to the mast and goes between the antenna and AP/CPE body, so it’s imperative that the AP/CPE is isolated. Thanks!
Joel Bean
November 5, 2020 at 2:31 pm
Hi Steve,
You mentioned your configuration where you connect the Metal to the WAN port of your router. But you don’t tell us how to finish the configuration. Once you setup the Metal (or Groove) using Winbox on a laptop, what do you do next? Do you just plug it into the router and it works? If so, how do you then log into a hotspot that the Metal/Groove has found? Do you connect to it directly and select SSID and enter password, at which point the traffic will pass to the router? Or, can you connect to the Metal/Groove’s wifi signal through the router interface somehow. Please finish your description about how to setup and use the Metal/Groove as a WAN device for the Peplink router.
And what about the Metal/Groove connecting to a wifi hotspot that redirects to a login page, like hotels, marinas, rv parks, etc.? How do you handle these?
Thank you.
Warren John Hammond
January 31, 2021 at 4:00 pm
Hi Steve,
Would you know how to install a level 4 license for the groove g-52hpacn.
purchase my groove g-52 from a person on ebay last year and talked with mikrotik and they gave me a level 4 software license key to install as it did not come with a license and they only gave me a bit of help and a free license so I can use it as a repeater for wifi but that’s all. I have tried several times to install the license but was never successful in installing the software key or how to get to the right area to install it.
Do you have any information on doing this part of an install.
Warren
- Steve Mitchell
January 31, 2021 at 10:42 pm
Hi Warren,
I don’t know how to do this off the top of my head – I used to use a lot more MikroTik large router products and had to activate licenses, and I seem to remember it being pretty easy but that could have changed. The Groove by default should come with a Level 3 license – are you sure it’s completely unlicensed? - Warren John Hammond
February 1, 2021 at 8:55 am
I was told by the seller that I had to buy a license but I contacted mikrotik and they provided me with a level 4 license for free but was not to helpful in how to install or I just did not understand. I did have a bullet m2 which I found from what I can remember to be a lot easier to install and use.
I did try to use the winbox and found it confusing and getting to technical.
I am going to fallow your install and see if this will work for me.
Like I said I have had this unit for almost a year and tried several time to get it working but no luck and lots of frustration.
Thanks again for getting back to me.
Warren - Steve Mitchell
February 1, 2021 at 11:43 pm
I found this article on MikroTik’s site about licensing, and I think it covers how to deal with activating new ones: https://wiki.mikrotik.com/wiki/Manual:License
Hopefully that will help. Good luck!
Barbara Flanigan
May 5, 2021 at 7:34 am
So what is this license business? I have now two days invested in discovering this device, finally finding how to use the software as a client appliance (thanks to you, by the way) and now there is some license that is needed to be purchased and even if it is free it sounds like a potential hassle. What gives in this area of licensing and I wonder why after reading about this device for 2 days now that I didn’t see anything about a license being required up until the end here? We’ve witnessed every piece of major software turning from own to rent and I never dreamed our hardware would fall into the same trap since we already are renting it from a planned obsolescence perspective.
I won’t plan to partake in any “rolling” paid licensing scheme and will stick to the Alfa tube 2H and forego 5G if necessary (I bet the company stock is soaring downward as a result of this statement LOL). But this aside, is this the device the only choice in the waterproof, small-profile wireless-client category that “does” 5Ghz?
Thanks for all your invested time here, it’s a great find!
Barbara Flanigan
May 5, 2021 at 7:56 am
Can anyone comment on the POE aspect of these devices? The potential problem with POE seems the acronym is never an exact definition of how any device is wired since there are several ways of implementing POE. There is the POE which the Tube2H and some Ubiuquiti devices use which accept the simple POE injectors which use 4 of the wires for straight DC that are not in use by the ethernet signal and the other 4 wires handle the standard 10bT ethernet wiring. Then there are more modern versions of POE that send the DC component down all the wires and the ethernet component “rides on top” of the DC in the wires and in this case full duplex 100bT or all 8 wires of the cable also have ethernet signal. The latter requires more complex injectors because the ethernet signal rides on top of the DC wiring and the full set of 8 wires have the potential for transmitting signal. Also with the Alphas, I know you can just inject the house battery wiring of 12V with no transformers, wall-pucks or anything else required, but if these devices are the more advanced POE which typically have the 48V requirement and a wall puck with 120Vac plug on the end, how are people using their ambient 12v house wiring to power them without running an inverter? Thanks.
- Steve Mitchell
May 5, 2021 at 9:55 am
Hi Barbara,
MikroTik and other vendors publish the specification of PoE that their devices support. These use an older version of PoE which actually is better for a boat, as it has a much wider voltage acceptance range. I have wired many of these directly into house battery banks using the provided splitter, and taking the DC barrel connector/wiring, adding an in-line fuse, and connecting that to a DC power block/source on board. DC house battery voltage usually varies from 11v-14v, or higher for 24v systems, and works fine with the MikroTik.
Barbara Flanigan
May 5, 2021 at 10:05 am
Thank you and thanks for your guide! Somehow the previous comment vanished instead of logged when I clicked to post. I wanted to ask about licensing fees. I see these for sale and I never saw anything about a licensing fee, but I don’t really want to pay any licensing fees, especially ongoing fees. I only want the device to pick up remote wifi as you have described here and I only am considering this device since it from my research is the only small profile outdoor multi-purpose device that serves as a wifi client and provides 5ghz pickup. Do you know of any other similar device with 5Ghz support, especially if a licensing fee is required?
Also another question I have is when you set it up as per the directions you have so graciously provided, is the 192.168.88.1 your gateway and DNC server that the PC or in-house WAN port is connecting to or does the DNS server of the distant wifi serve as the DNS server? Thank you.
- Steve Mitchell
May 9, 2021 at 9:40 am
MikroTik products have different license levels, perhaps that is what you’re referring to? They have various different products that have different licenses depending on the features and functionality you’re using. I’ve never had to pay for an upgrade license or a yearly license to continue using any MikroTik product. I’ve only ever had to upgrade licenses when I’ve bought one that had a lower license, and wanted to enable features, but that was for a different product line entirely than the Groove.
If you have the MikroTik setup with the defaults, the 192.168.88.1 address is the DNS server, router, etc.
Barbara Flanigan
May 5, 2021 at 10:27 am
Hate to keep bothering you but I notice there is a model Groove-52HPn with similar specs for $30 less. Do you know what the repercussions of the lesser expensive unit would be? Thanks again.
- Steve Mitchell
May 9, 2021 at 9:41 am
No idea. I would need to have a link or more details on what the cheaper one is. Beware off vendors selling things on Amazon and other places, though. I’ve seen MikroTik products for sale for cheaper and folks have said they are open box or used devices.
Barbara Flanigan
May 10, 2021 at 8:10 am
The link for the cheaper one is here. After careful examination, the “c” architecture is missing from the a/b/g/n options on this cheaper model. https://www.amazon.com/Mikrotik-RouterBOARD-Groove-52HPn-Atheros-802-11a/dp/B00HX3KNH2
Not sure when “c” will become the mainstream or if. Thanks!
- Steve Mitchell
May 12, 2021 at 11:34 pm
That is a lower performing version of the unit with less band / WiFi coverage. I’ve only used the fuller featured one.
Gary
May 22, 2021 at 4:06 pm
Thanks for you guide! This works well as long as the Marina’s network is not on the network range (192.168.88.x). I really had a hard time figuring out why my MikroTik seemed to freeze. I had to create a new Pool (10.0.0.1/24) for eth1 and delete the default one. I guess the Marina was also using a MikroTik!
- Steve Mitchell
July 15, 2021 at 10:59 am
Hah! That’s a good point. It should still work since it is a routed configuration, but I could see some things that would get confused. Good catch!
Barbara Flanigan
May 24, 2021 at 8:07 am
Hi, one more question – I first ordered some used older models of the 52Hpn and with those I received the QuickSet CPE as the default when I made the latest firmware upgrade. I decided to order a new GroveGA-52HPacn like you have linked to and I received one which came with the QuickSet set to Ethernet (cannot be changed to CPE) and it had a WISP script showing when I tried to use the configuration reset panel. Are there more than one version of these and do I need to send back the WISP model for a CPE model or is there such a thing? Thank you.

