The engine is a critical piece of every boat, and monitoring it is very important to health and longevity, as well as your safety while on the water. It’s surprising how few boats leverage the ability to have this information on a NMEA 2000 network to provide total visibility and improve that monitoring.
Many engines built after 2005 have some sort of digital interface built into them that you can tap into to see tons of great information. An example is J1939 which you can use Maretron’s J2K100 or Yacht Devices Engine Gateway to convert and place on your NMEA 2000 network. Older engines may support J1708 and Yacht Devices has a gateway for that too.
My Volvo engine on Jammy, which was new in 2008, had an optional NMEA 2000 adapter that you could purchase for $800 that would plug directly into the engine harness, and then into the NMEA 2000 network. Unfortunately a bunch of the data that I really wanted, like exhaust temperature and fuel flow, were not available even with the adapter. The other concerning thing was alarms – the adapter passed the data along for various things like coolant temp and oil pressure, but did not use any of the NMEA 2000 PGNs for alarms associated with those. Perhaps that was changed in a future version, but that was a big oversight in my opinion.
Generators are also a great target for an engine monitor. Many of them have basic control panels exposed outside of the engine space where they live, and are not necessarily near your driving station. Using an engine monitor could bring the data from that generator to your driving station, and sound louder alarms to let you know something might be awry.
A few companies have built gateways that can help with engines that may not have modern digital interfaces. The three I have used are the NoLand RS-11, AlbaCombi, and the Actisense EMU-1. Most of my experience has been with the NoLand RS-11 and Actisense EMU-1.
I’ve setup and configured a number of NoLand RS-11’s on other boats, and helped keep them calibrated and updated for the first few months afterwards. I’ve personally owned the Actisense EMU-1 and run it on two boats for almost a year, as well as installed and configured even more on other folks boats.
The Challenge
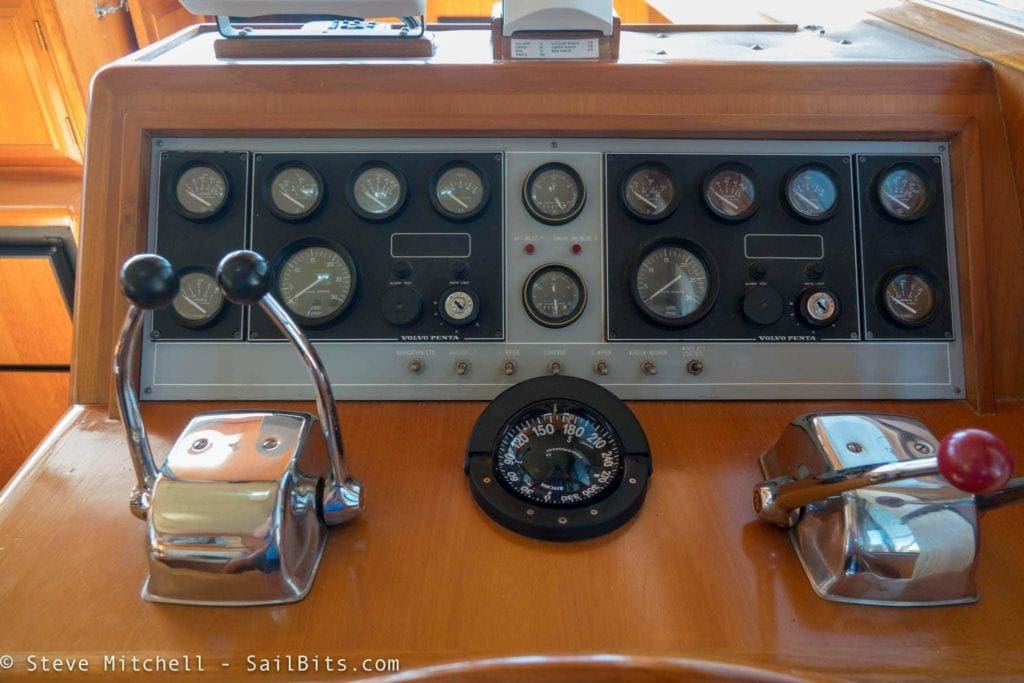
Volvo Penta engine gauges on Rendezvous
When I bought Rendezvous, I knew right away I wanted engine monitoring in place beyond the gauges provided. The salon helm station had gauges and indicator lights for just about everything, which was perfect, but I had no reason to trust them, and I would not be driving from this location, but instead from the flybridge most of the time.
Available at this location is RPM, engine hours, battery voltage, oil pressure, water temperature, turbo pressure, transmission pressure, an alarm horn, and four alarm/dummy lights for low oil pressure, high water temp, low battery charge, and the preheater being engaged (which didn’t light up as I covered in my recent article about the preheater melty mess). That is a lot of good info, but are they all accurate? Do all the alarm lights work (no) and will the alarm horn go off when they are on?
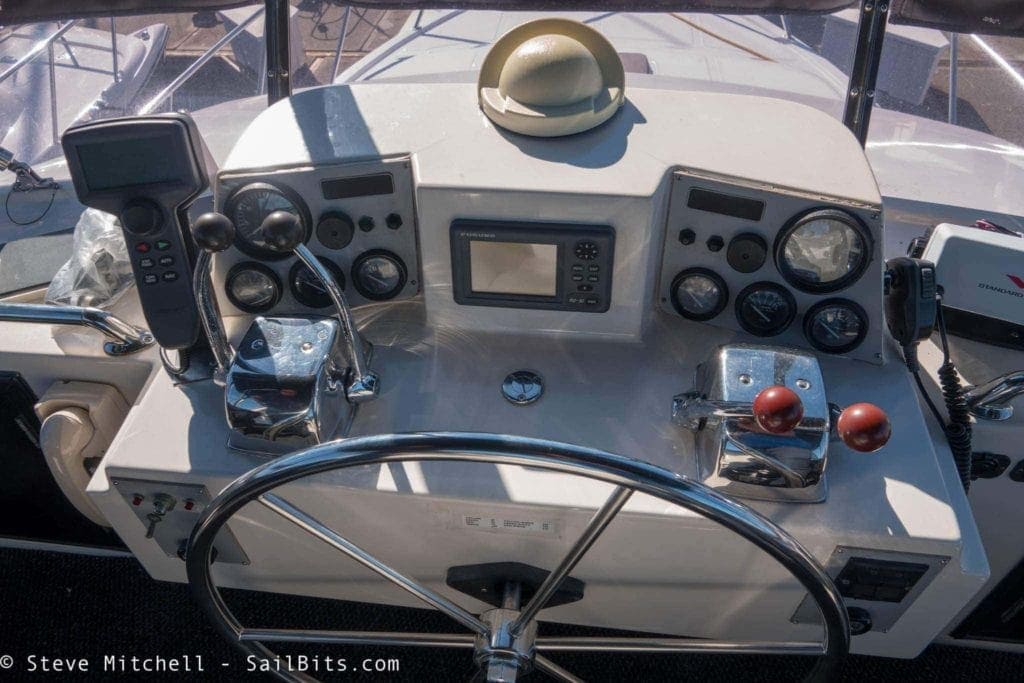
Flybridge station
At the flybridge station, there are a simplified version of the same gauges, with turbo pressure and transmission pressure missing. There are also a similar set of alarm/dummy lights and alarm horn, but I have been unable to determine whether they work reliably as well. In addition, the gauges are somewhat obscured by the control levers for the engine, particularly the gear shifts, which when engaged in forward, block most of the gauges for the port engine, and the throttles block the RPM gauge for the starboard – slightly annoying, and in the case of the temp gauge for the port engine, not safe.
The Goals
With this project, I was trying to achieve several things:
Alarms
First and foremost, I wanted to have accurate, loud and networked alarms for anything critical around the engines. The current alarms are all dummy lights and a horn at each station, but I don’t know if they work reliably.
An engine monitor can tap into existing alarm wiring and provide an extra level of redundancy when there is a true alarm. Having it connected and configured correctly allows all of the devices on the network that support engine data to start screaming when there is an issue.
Accuracy
I have no reason to trust the gauges that came with the boat, although they appeared to be in good order. I ran the boat for about 10 hours observing both upper and lower stations at various times, and paid very close attention to the deviations between locations as well as general data.
Using an engine monitor will allow me to get the raw electrical signal from the senders on the engine and interpret them directly, not with a gauge that could be old or not working as well.
Visibility
If you’ve read any of my other articles, you know I am big on networking everything possible. The same goes for engine data – I want it on every instrument and device that I have across the boat. Right now, that means I can see engine data on my chart plotters, my Maretron DSM display, my Surface Pro PC, on SignalK’s Instrument Panel, and via WilhelmSK on my iPhone and iPad.
Choosing an Engine Monitor
Since I had the chance to work with the top three gateways out there, that helped when it was time to choose what I wanted to put on my own boat.
I like the AlbaCombi because of the built-in web interface, which makes it easy to configure, and simple to see the gauges via a smart phone or PC. But it requires a lot of manual configuration and trial and error for the types of inputs that you’re supplying. It does have some extra inputs the other devices don’t have for things like temperature and the like, but I would prefer to have that elsewhere anyhow.
The NoLand RS-11 is the cheapest of the three by quite a bit, which is important if you are on a budget. It requires Windows software and a provided USB cable to configure, but still requires a lot of manual trial and error to get the sensors setup correctly. There is a learning mode which can help, but in my experience, this is not 100% reliable.
The Actisense EMU-1 is the most costly of the three, not only requiring you have the unit itself, but also an Actisense gateway to configure it. But, compared to the other two, configuring the types of gauges and inputs is far simpler and more reliable to setup. The unit itself appears to be a higher quality overall, not just in configuration. This is one of those cases where you get what you pay for – an easier setup experience and higher quality product.
I chose to put the Actisense EMU-1 on my previous boat, Grace, and ran it there for a whole season. When I sold her, I took it with me, and moved it to Rendezvous.
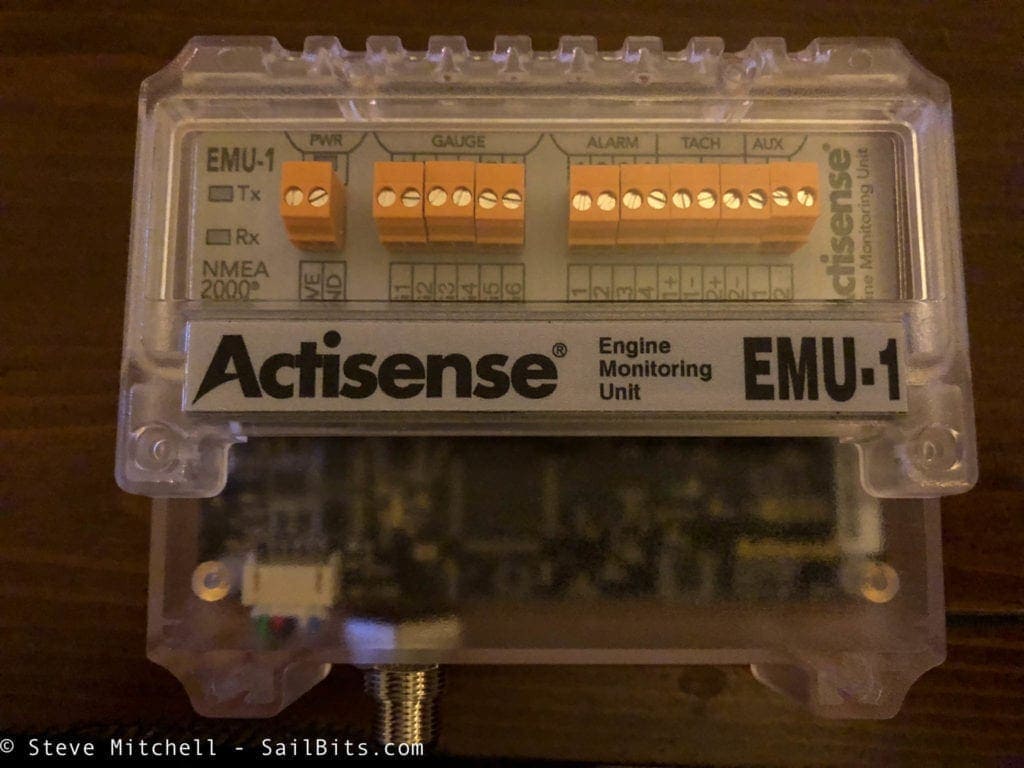
The EMU-1 has a NMEA 2000 connection on the bottom, a transparent case that allows you to see lots of blinky lights and circuit boards, and a cover that provides protection and strain relief for the various wires that will be heading into the terminals.
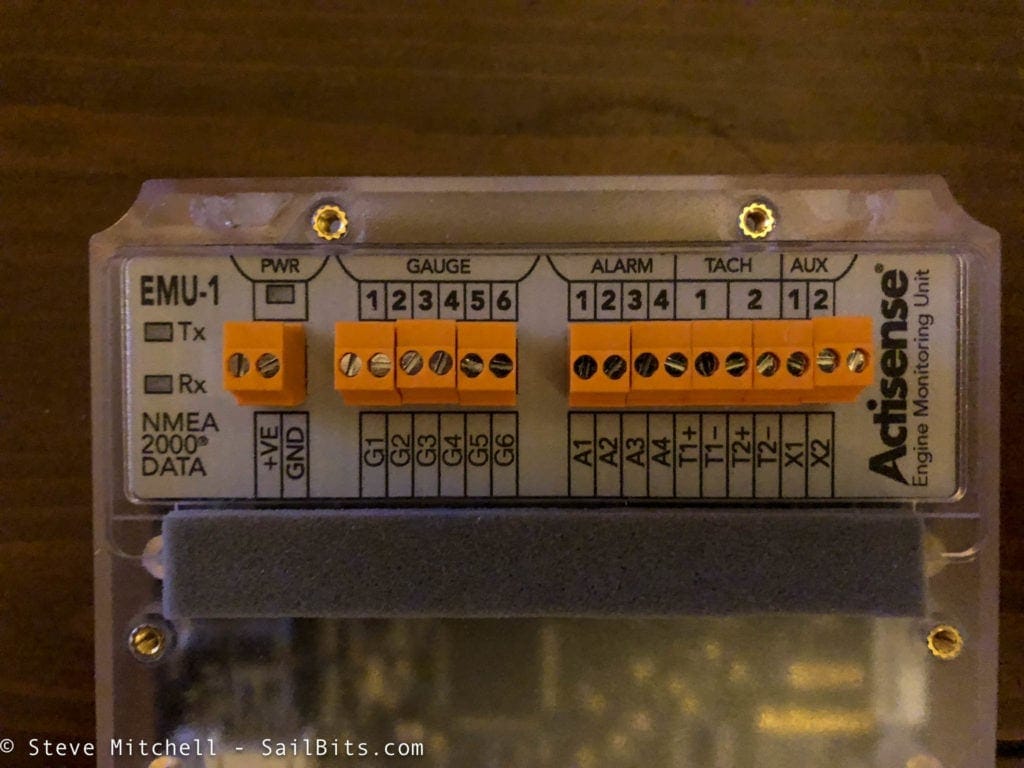
The EMU-1 has a bunch of connections available, summarized below:
PWR – power provided ideally by the ignition for your engine, so the device is only on when the engine is on.
GAUGE – there are 6 different connections here, allowing you to digitize 6 separate gauges, which is quite a bit!
ALARM – there are four alarm points, one wire each, and usually voltage high/low related.
TACH – as you might guess, this is for the tachometers for your engine(s). There are two available here, consisting of 4 wires total (2 for each tach sender)
AUX – these are not used right now.
Planning the Installation
Installing the EMU-1 does require a bit of planning, mainly around where you are going to site the monitor itself, and how it will get the data from the existing engine senders and gauges.
What is a sender?
A sender is the device or sensor that is in a particular place on your engine that is generating an electrical signal based on what it is monitoring. A good example is a temperature sender, which generally sits somewhere in your cooling loop and monitors the temperature of the water passing by. That is translated into an electrical signal which flows up to the gauge at your helm.
I prefer installing engine monitors near the back of the gauges at a helm station, if at all possible. This allows you to connect to the wiring very easily, and has the device in a relatively decent location temperature wise.
In some situations, siting the EMU-1 near the engine or in the engine room may be suitable as well. If you do not have gauges at all, which is common on older boats if things have been redone or removed, then placing them near the senders in the engine room is also an option. Just make sure it is dry and does not get too hot.
You also may need to verify that your senders / gauges will work with the EMU-1. There is a list of supported ones at the Actisense FAQ (scroll down and expand “What gauges are compatible with the EMU-1”), but there is also a beta firmware version available that allows you to manually create your own gauges and program them from there.
Mine are all Volvo / VDO gauges, so I should be good!
Getting the data in…
One of the biggest things you’ll have to determine when installing any engine monitor is how you will get the sender and other data into the device – how you will connect to the senders/wires. For the EMU-1, you can either connect it directly to the sender, disconnecting your existing gauges, or tap into the existing wire and allow the gauges and the EMU-1 to co-exist.
Some gauges and setups may not work with this, but most in my experience will be just fine. This is an important thing to plan, however – if you can’t interrupt or tap off the existing wires easily, you may have to think of another way to install things. Check your shop or maintenance manual to make sure there won’t be an issue with your wiring/gauges.
It also can be scary to cut a wire that is coming from your engine to a gauge – I would recommend using an in-line tap connector where it can pierce the existing wire and allow you to attach a new wire without cutting the existing one completely. That way, if you decide to remove the system, or don’t need it anymore, you can tape off the wire you added without having to reconnect anything.
Input Plan
Here is my plan for what each input will be used for:
Gauges
G1 – Port Engine Temperature
G2 – Port Engine Oil Pressure
G3 – Port Engine Boost Pressure (Turbo Pressure)
G4 – Starboard Engine Temperature
G5 – Starboard Engine Oil Pressure
G6 – Starboard Engine Boost Pressure (Turbo Pressure)
Alarms
A1 – Port Engine Over Temperature
A2 – Port Engine Low Oil Pressure
A3 – Starboard Engine Over Temperature
A4 – Port Engine Low Oil Pressure
Tachometers
T1 – Port Engine RPM
T2 – Starboard Engine RPM
In all cases, the port engine will be NMEA 2000 instance 0, and the starboard engine will be instance 1. I’ve verified that each of these gauges have one input wire, that there are working dummy lights for the alarms, and that there are two sense wires for the tachometers.
I chose the three critical gauges from each engine that I thought should always be on the network. One side benefit is that turbo pressure (boost pressure) is something I cannot see while driving at the flybridge, but I should be able to see now via an MFD at that station!
I also did not choose to put transmission pressure on the network, namely because I was out of inputs, and I have never seen this vary nor matter that much for critical engine stuff.
Doing this pre-planning will ensure that the wiring will go quickly, and that your boat is actually compatible with the EMU-.1
Installation
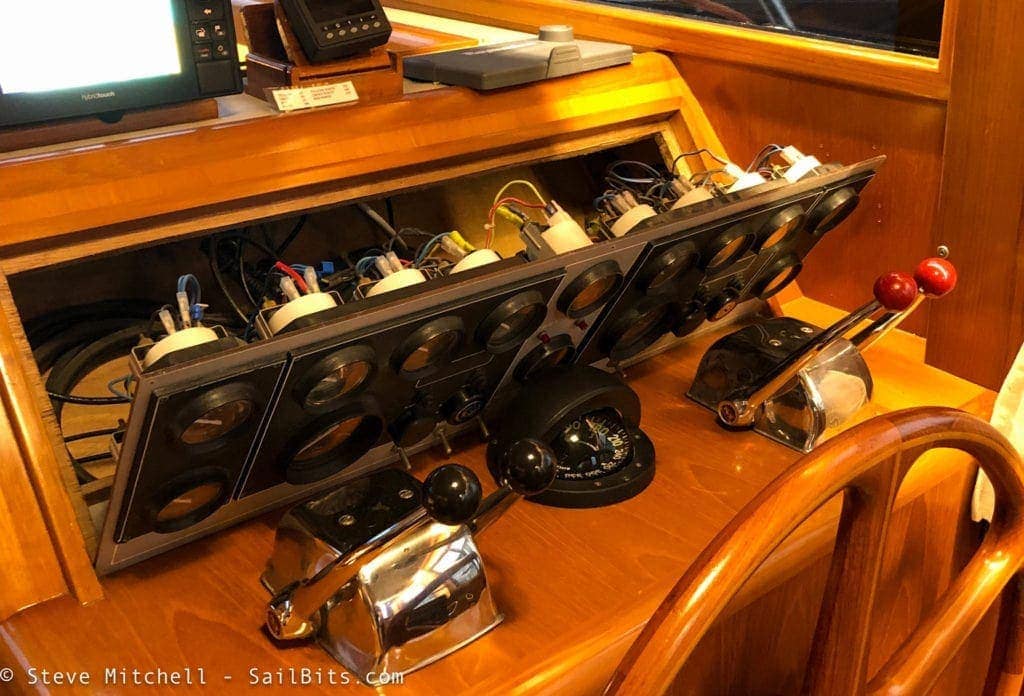
I really lucked out with Rendezvous – the whole gauge panel unscrews with 6 screws, and tips forward to rest on the plastic cover of my compass. Score!
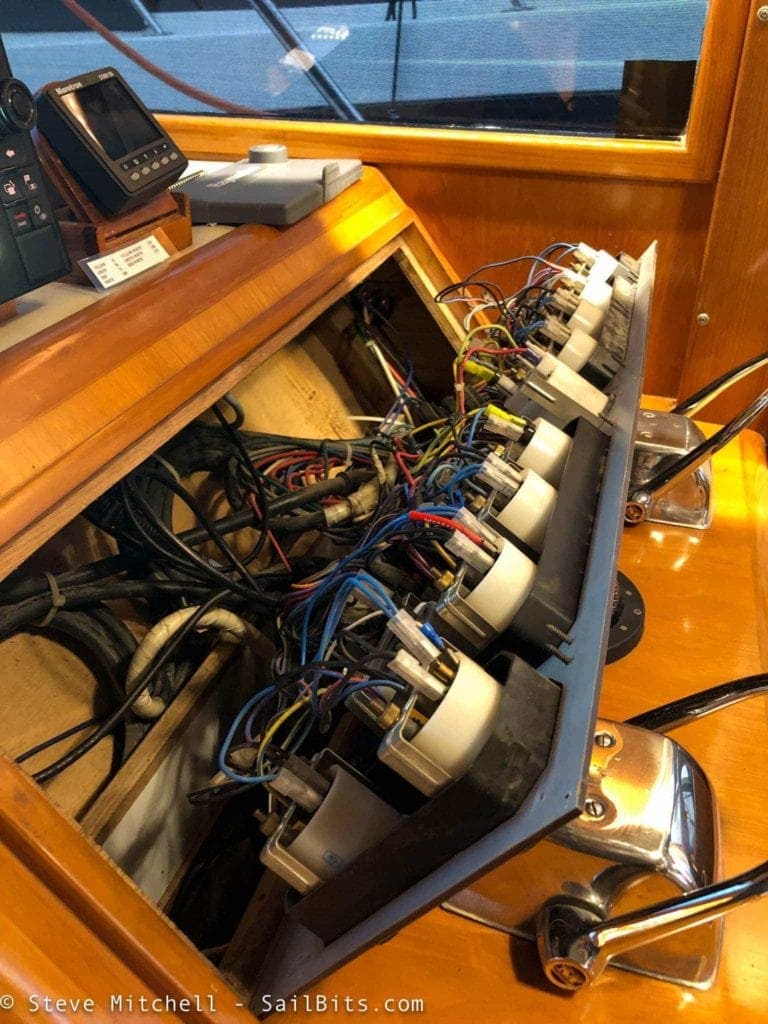
Not only does it open easily, but I can get to the backs of every single gauge quite easily, and there is space on the far right for the EMU-1….
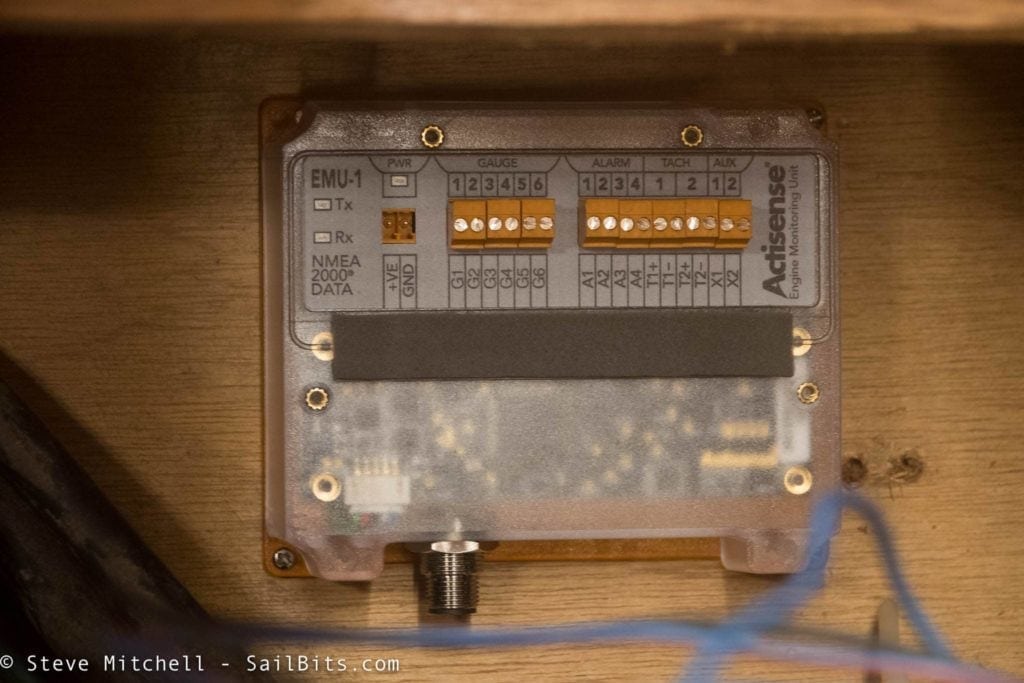
Installation of the EMU-1 itself is easy – four screws to hold it down in a secure location, here pictured on a bulkhead behind my gauge dashboard. I have a NMEA 2000 backbone nearby, and connected the EMU-1 directly with a drop cable.
Power is important to get right with the EMU-1 – it needs to be provided by the circuit that is engaged when you turn your engine on. In my case, I have two engines, so I chose the port engine (which for some reason I turn on first all the time) and tapped into the power wires from that ignition so that the EMU-1 powers on when that key is in the run position. It is also important that the ground for all of the gauges, engines, and connections are the same.
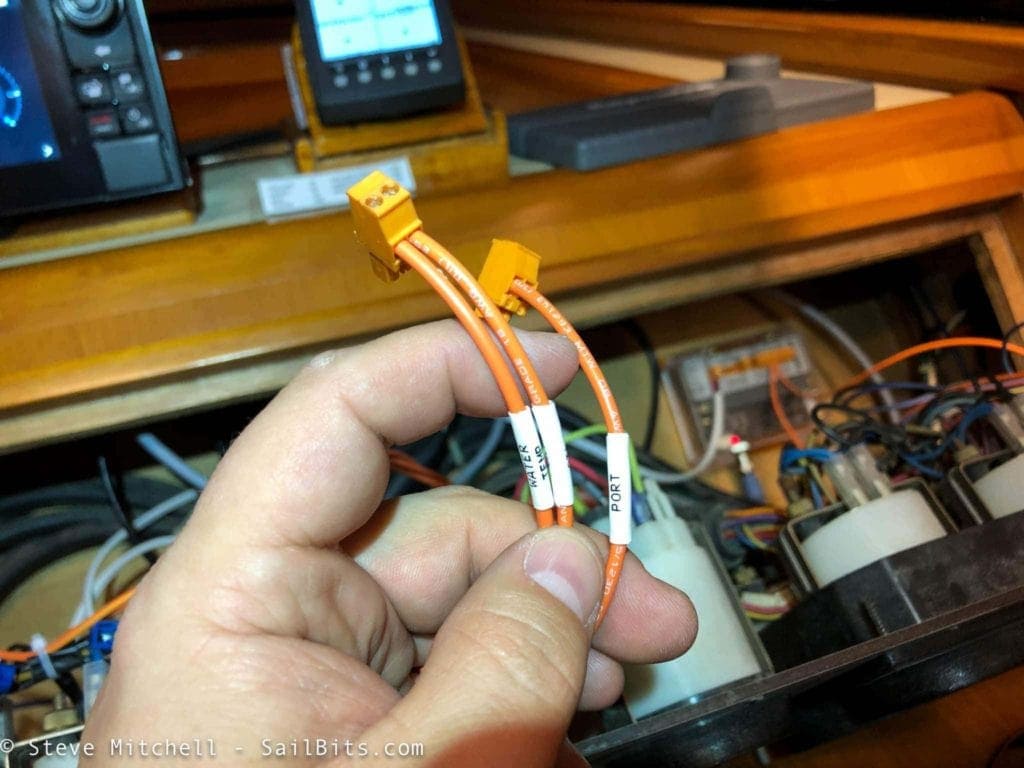
One thing I really like about the EMU-1 is the removable terminal blocks that allow for easier wiring. Even though I had a good place to mount mine, I still had to be on a stool to get to all of the wires on the backs of the gauges, and having to do that while also reaching into the EMU-1 for the other end would have been murder on my back.
Other installations I’ve done have not been as easy to get to, and the other products are quite a bit more difficult to fit all those wires into, and screw them down. Having the removable blocks allows for a lot easier install.
I chose to “tap into” the existing wires going to the backs of the gauges at this helm station. I did not cut into them, but used tap connectors and new wire to run to the EMU-1.
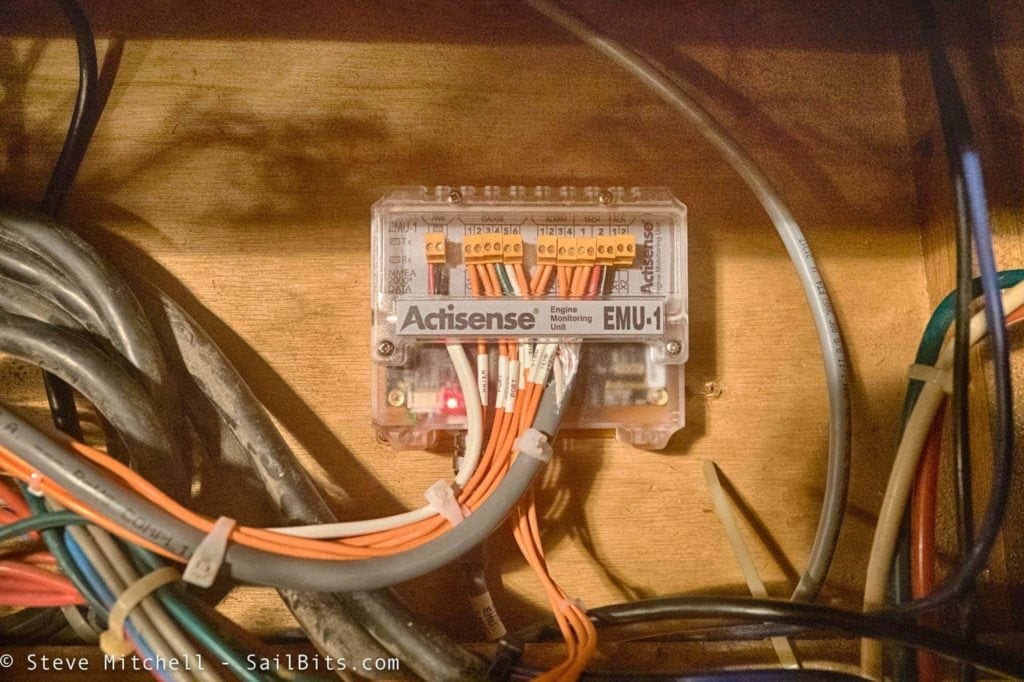
I ended up with a mix of wiring based on the location of the gauges. For the port engine, I used individual 18 AWG wire, while for a portion of the starboard engine, I was able to use a shielded 4 wire cable to save on individual runs.
Now that it is all connected, it’s time to configure the device itself and ensure the data it is putting on the NMEA 2000 network is correct!
Configuration
Configuring the EMU-1, and for that matter, any engine monitor, is the most critical and usually most time consuming part of the setup. Understanding which gauges and sender data you have is important to ensure that the data you’re putting on the NMEA 2000 network is correct. Getting the voltages and states of the alarm relays is also very important, or the alarms will be quite messed up.
Actisense provides a Windows-based program called the Actisense Toolkit that can be used to configure the EMU-1. You will also need an Actisense NGT-1 gateway to configure the EMU-1. It is a bit more expensive to have to purchase the NGT-1, but I already had one as I consider it a must-have device when you have a decent sized NMEA 2000 network. Not only can you use it with a PC to configure the EMU-1, but also as a direct link into your NMEA 2000 for navigation software like TimeZero or Coastal Explorer, or as a link to a Raspberry Pi running SignalK.
If you’re using a more modern Windows machine and running Windows 10, you may need to adjust the way that the Actisense toolkit is run to ensure drop downs and data within the program look correct. This has to do with Windows font and screen scaling. I’m using a Surface Pro, which has a resolution of 3000×2000 and uses 200% font scaling, which really plays havoc with the Toolkit. To fix this:
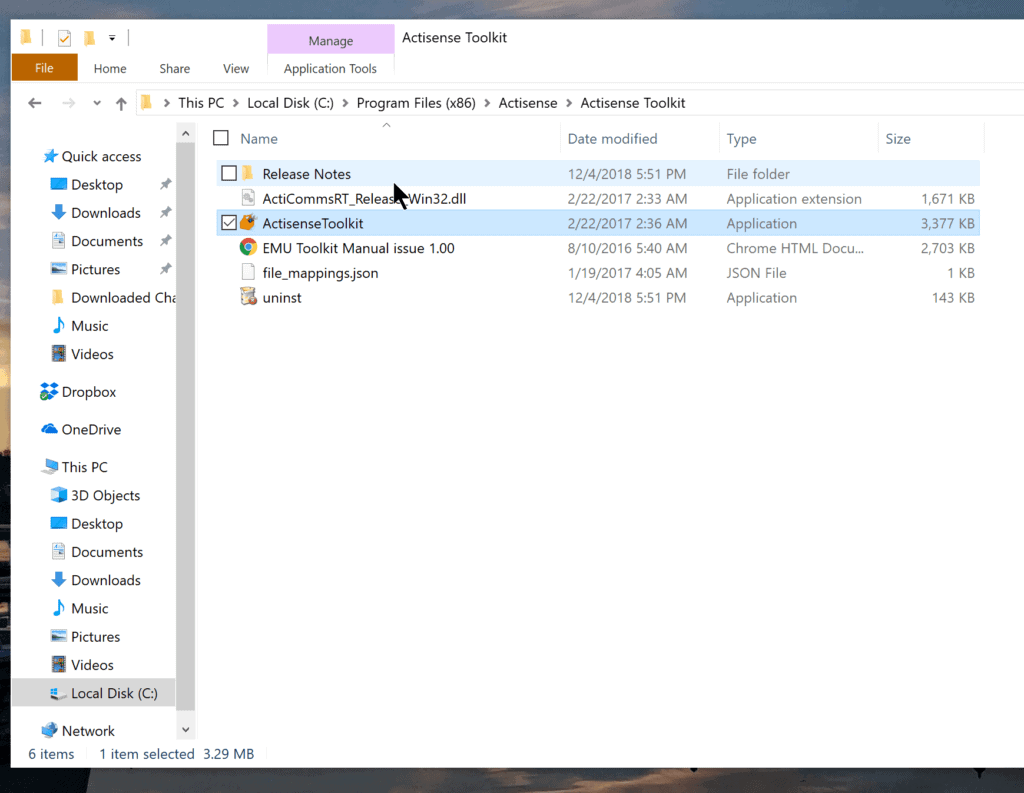
Find the Actisense Toolkit executable program, usually in C:\Program Files (x86)\Actisense\Actisense Toolkit. Right click and choose properties.
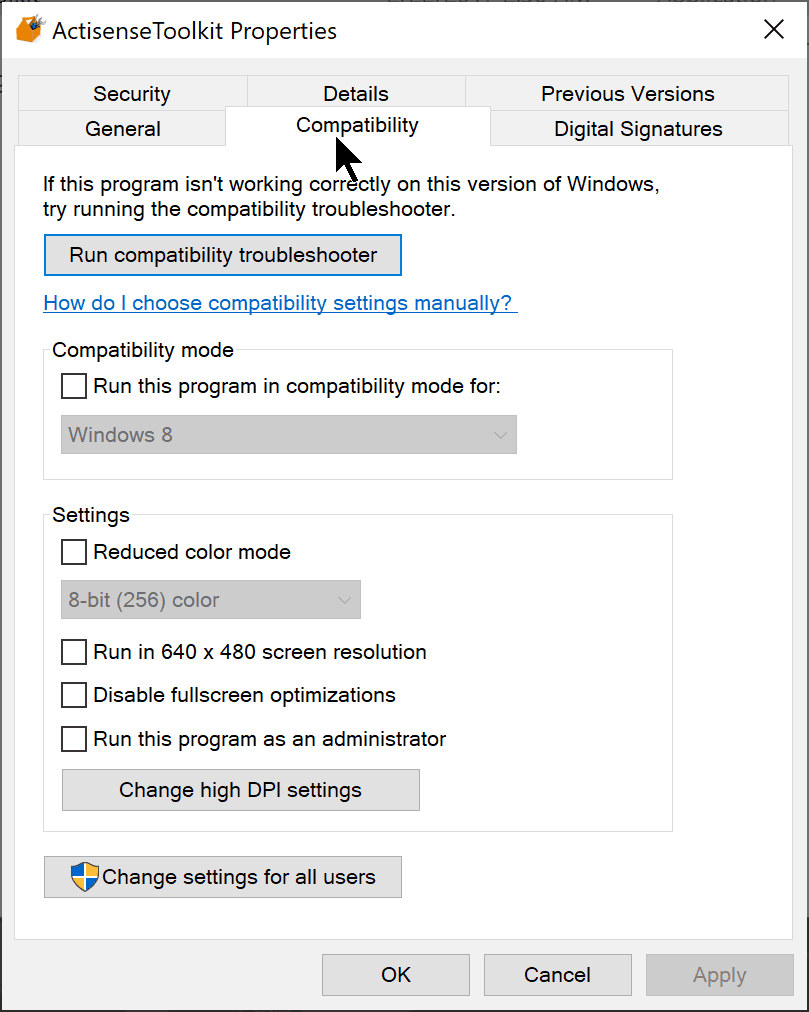
From the resulting properties dialog, go to Compatibility, and click on “Change high DPI settings”
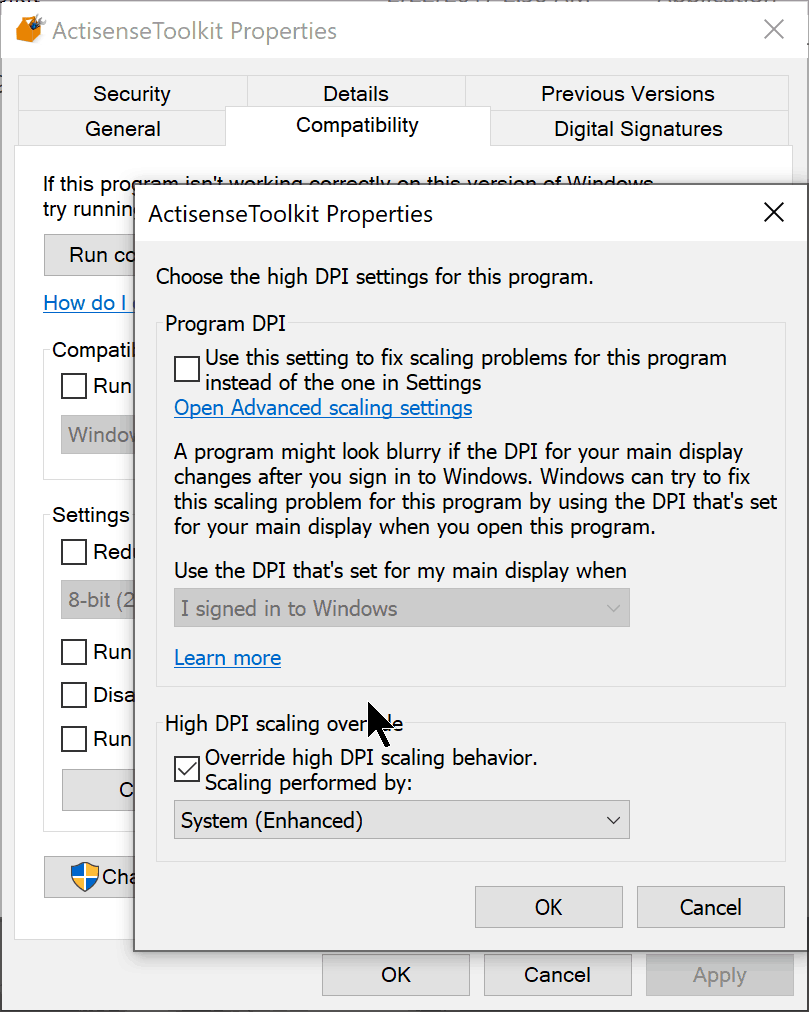
Choose the last check box on the page “Override high DPI scaling behavior” and choose “System (Enhanced)” which is the best choice I’ve found. You could try other settings if it does not work on your system.
This will allow you to see all of the fields and drop downs appropriately in the Toolkit. If you don’t do this, you may not be able to see all of the available options, or type data into the right fields to set things up.
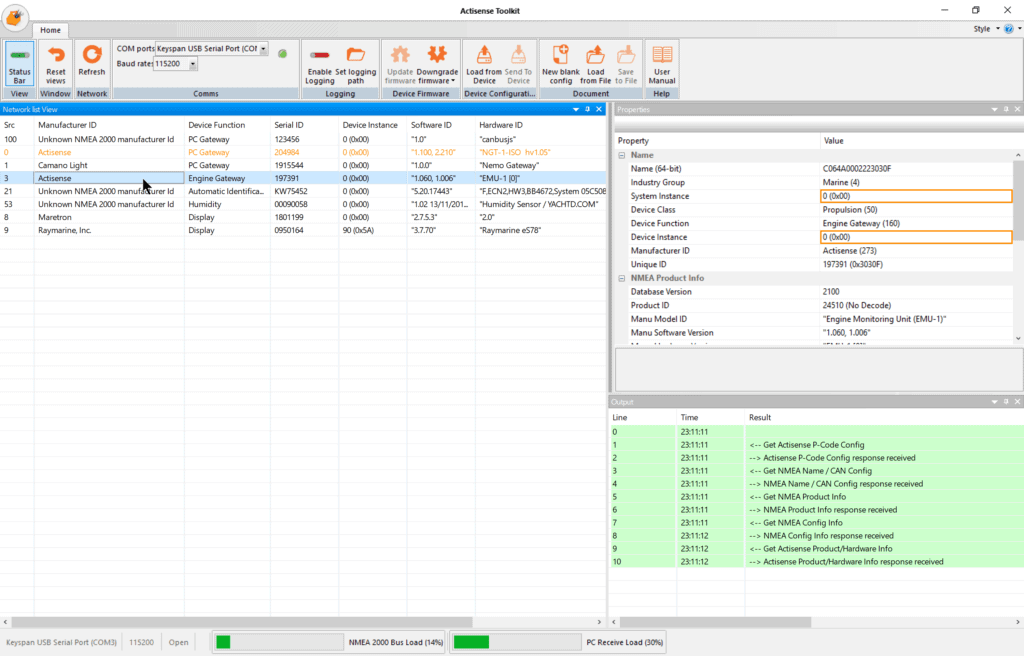
Once you launch the toolkit, you’ll need to choose the NGT-1 device you have connected to your computer to connect to your NMEA 2000 network. As soon as that is active, you’ll start to see all of the devices on your network, plus at the bottom of the screen the actual bus load and PC load. This can be useful when debugging NMEA 2000 network issues.
In addition, you can upgrade and downgrade firmware using the toolkit as well. My EMU-1 came with the most recent available firmware.
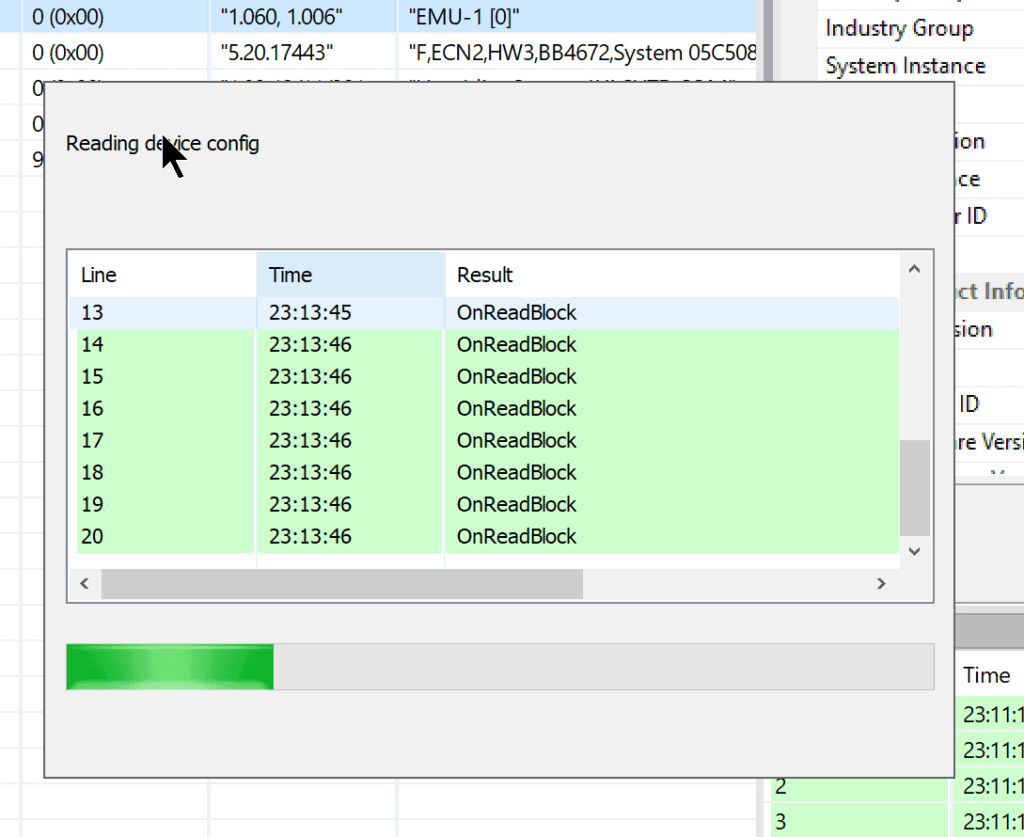
To start configuring things, you’ll need to click on the Actisense EMU-1 gateway device, and then click on “Load from Device” at the top of the toolbar. The NGT-1 will communicate with the EMU-1 and download the current running configuration.
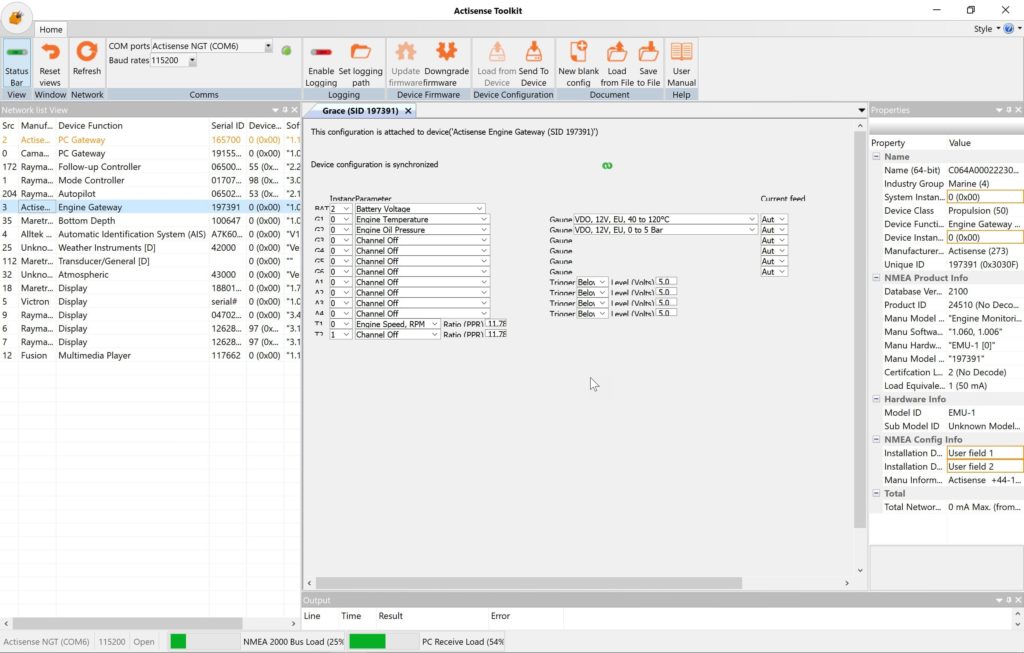
You’ll be presented with a pane in the middle of the toolkit that shows all of the inputs and settings you can adjust. The screen shot above is from when I was configuring the EMU-1 on my previous boat, Grace.
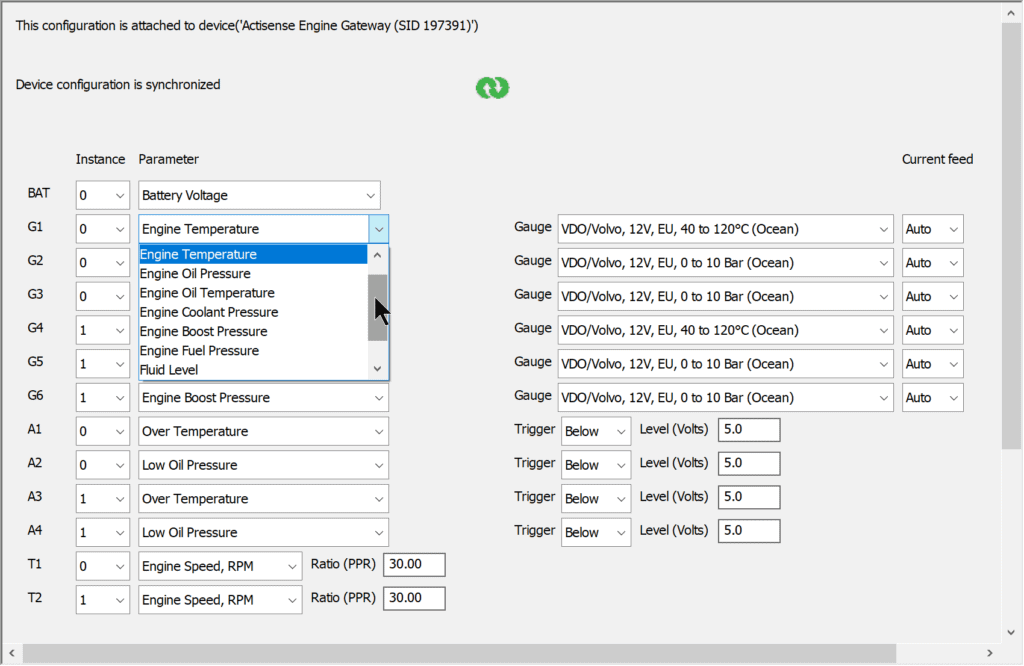
The way this tool works is pretty simple. First you choose the Instance (NMEA 2000 instance type) that you want. In single engine configurations this likely will all be instance 0. For my dual engines, I will be using 0 for port, and 1 for starboard engines.
Second is the Parameter, which you can think of as the data that is going to be put on the NMEA 2000 network. It is what the gauge is representing or displaying.
Third is the Gauge or Trigger. In the case of the Gauge, it is asking what sort of gauge is in place now, which helps the EMU-1 understand what type of sender is at the other end, and what sort of electrical pulses are coming along the wire. We will cover trigger later.
You may notice there is a Battery Voltage item at the top. This is a nice feature if you do not have a battery monitor on board already, as it takes the voltage from the power supply provided to the EMU-1 (in this case my port engine ignition) and puts that onto the NMEA 2000 network as battery instance 0. You can change that if you already have a battery monitor (and you should otherwise it will garble your data) to another instance type. I labeled this one on other instruments as “Start Battery”.
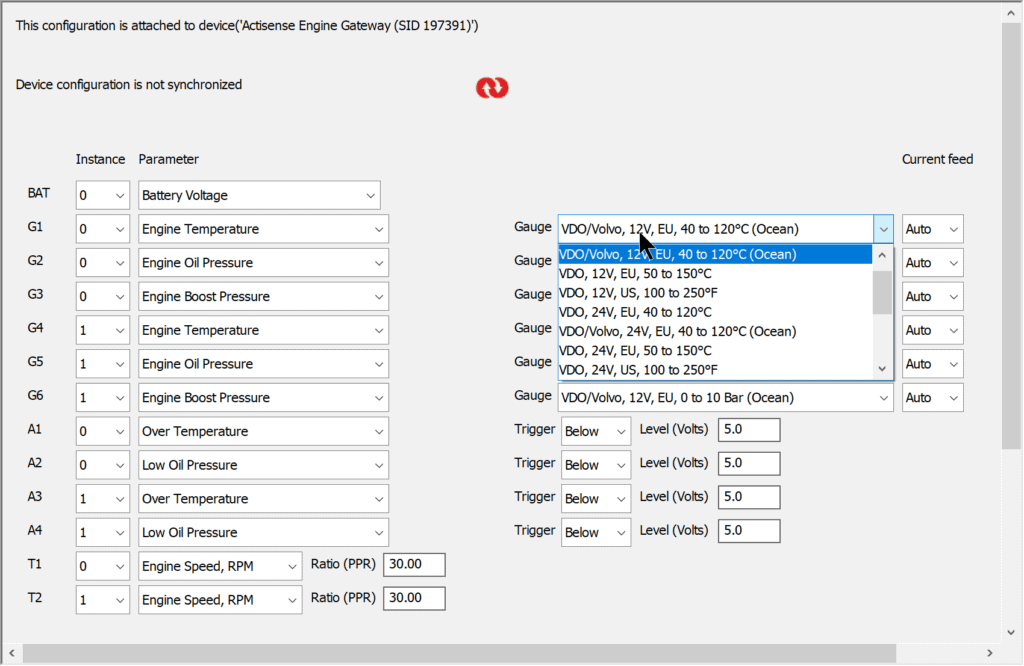
For my first gauge, G1, I am setting it up for the Port Engine (0) and for Engine Temperature. When I get to the Gauge dropdown, I am choosing the VDO/Volvo gauge.
Here is where some experimentation may be necessary. There are quite a few gauge types to choose from including 12v and 24v, plus different manufacturers. I was guessing that the VDO/Volvo EU gauges were likely correct since my boat was built in Taiwan, but had Volvo engines and the gauges were Volvo with both US and EU markings.
However, if you do not know definitively what gauges you have, you may need to do some experimentation. Here’s how I did it for a number of other boats:
- Choose a gauge type in the toolkit that you think is right
- Send the configuration to the EMU-1 (don’t forget to do this or the change won’t take)
- Wait 5-10 seconds for new data to get onto NMEA 2000 network
- Using a chart plotter, PC with SignalK or other display, examine the displayed data and compare it to your existing gauges
This was the best way to ensure that the data you’re getting is accurate and correct. Keep in mind you also may need to do this at various times while the engines are in use, as gauge values may start out looking right, but get very wrong (high/low/jumping around) as the gauge moves up the scale.
I left “Current Feed” at auto since it is the best option when tapping into existing sender lines.
There is also a beta firmware version available that allows you to manually create your own gauges and program them manually, but it is beta firmware so your mileage may vary.
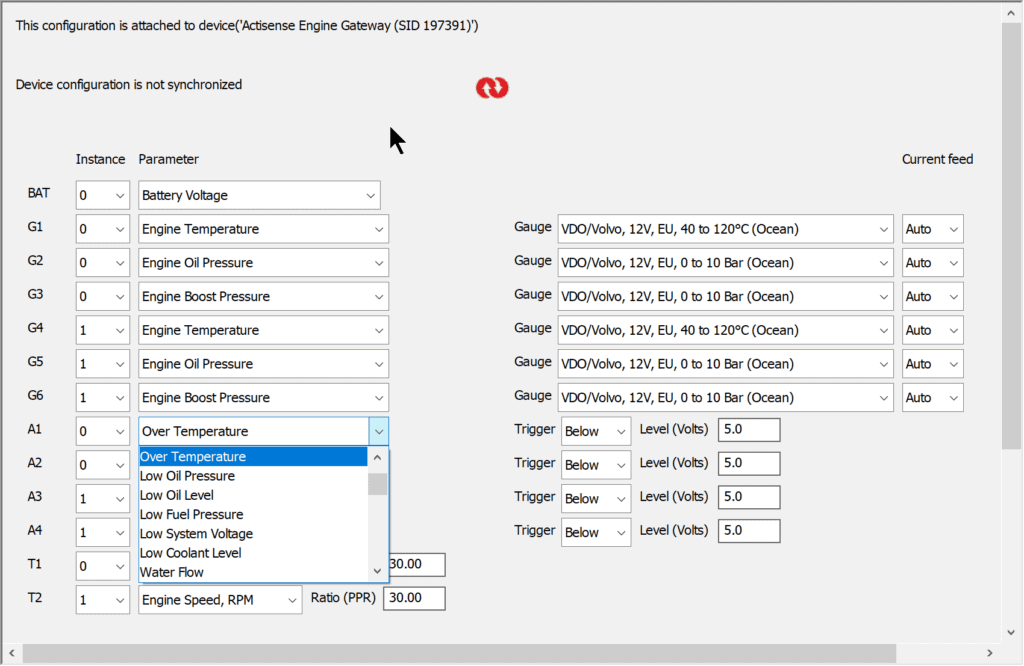
Alarm types are similar to gauges in that you have to chose the Parameter or type of alarm that you want to put on the NMEA 2000 network. In my case, A1 is supposed to be port engine (instance 0) over temperature.
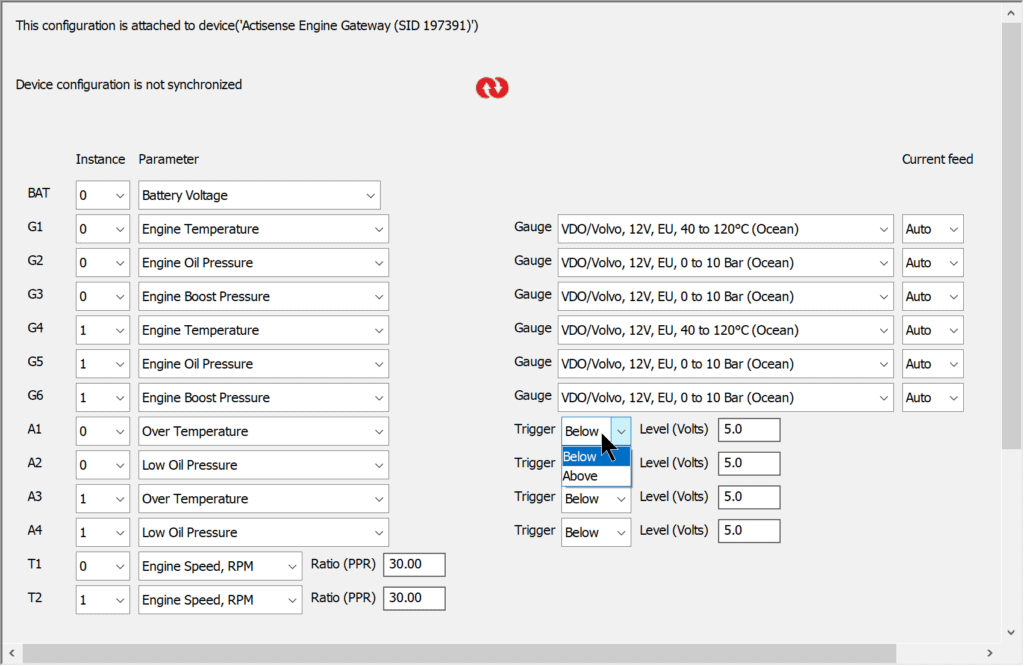
The trigger is where it may get a bit confusing. The way the EMU-1 creates an alarm on the NMEA 2000 network is by sensing the voltage of the alarm dummy light circuit. In my case, my alarm lights are always at around 12 volts (depending on the battery charge, etc.) on the negative side, which is the part I can tap into. When the light is lit up, the voltage on that side drops to below 5v. You can see above that I’m configuring the alarm to fire when below 5v is detected on that input.
While I appreciate this is a good way to trigger an alarm, I would like to see Actisense, and for that matter, chart plotter manufacturers implement something different. The NoLand RS-11 has a feature wherein you can input the low/high amount for a given monitored input. If that input goes above/below those thresholds, a NMEA 2000 alarm PGN is generated on the network (essentially what the EMU-1 is doing with the Alarm inputs) and you are aware something bad is happening.
I’ve seen some chart plotters that allow you to set thresholds, but most are now reliant on a device such as your engine, or an engine monitor, to put those PGNs on the network when there is a problem. Since the EMU-1 is that device in my case, I would love to have the ability to set those in the firmware, rather than driving them off of dummy light voltage alone. I think having both is a good idea for safety!

The final configuration item is for your tachometers, and requires a Pulses Per Revolution Ratio. In many cases, your shop or maintenance manual will have this information in it (most CAT engines do) but if it does not, you can either experiment using the same process as above (time consuming!) or see if your PPR is listed on a chart I found online. This chart has been a lifesaver when installing any engine monitor.
Most of the time, you can find one for your engine, and things will work great. If you get out on the water after installing the EMU-1 or any other engine monitor, and you see tachometer readings go from something sensible to 15,000 RPM or something insane, you have the wrong ratio. Sometimes this only happens at higher RPMs where the math gets messed up.
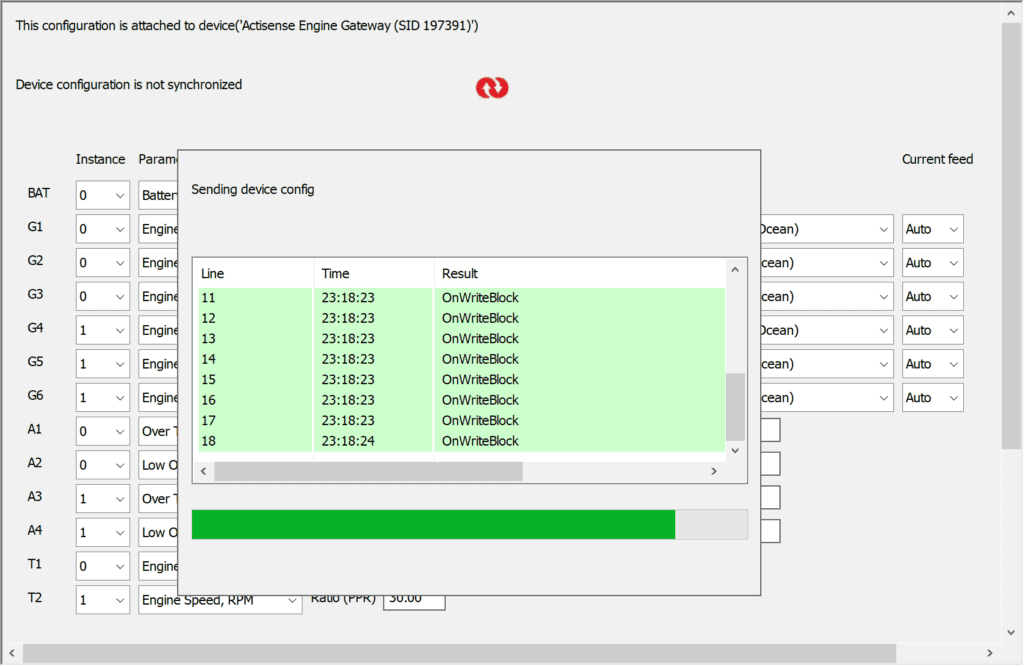
Once you are done, make sure to send the configuration to the device by choosing that option in the toolbar. You will also be prompted to save the configuration to your PC when you exit the toolkit.
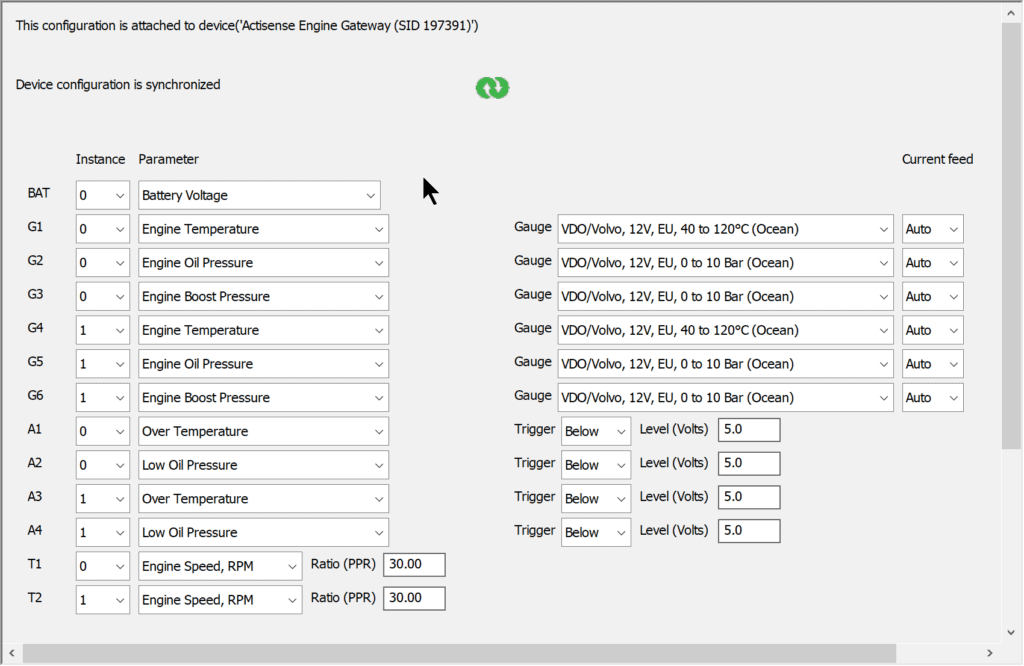
Above is my completed configuration for both engines.
Testing and Results
I’ve had the EMU-1 running on my boat now for a year, first on Grace for the entire 2018 season, and for a month or so on Rendezvous. Grace had chart plotters from Raymarine, Garmin and B&G, a Maretron display, and of course SignalK and various web and iOS apps.
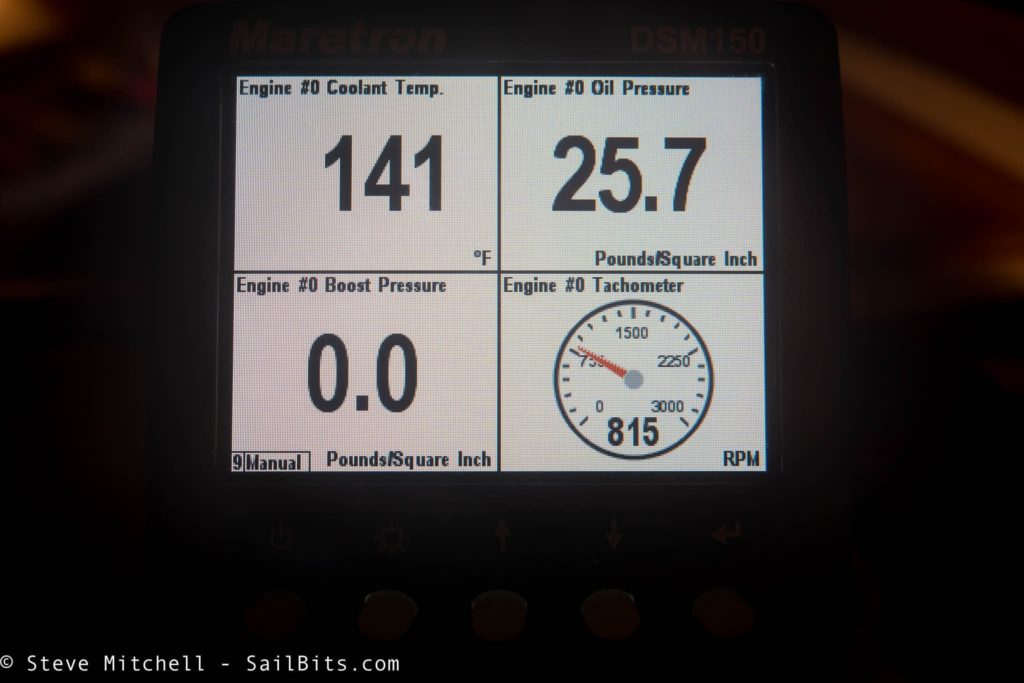
Rendezvous has a Maretron display, Raymarine es78 chart plotter, and SignalK. I’m still building out my network to include more devices, but even with these I was able to see various representations of the data the EMU-1 was putting on the network.
Above I have configured a 4 cell screen with data from the port engine including engine/coolant temperature in the upper left, oil pressure in the upper right, boost pressure in the lower left (I was at the dock so this won’t be showing anything useful) and an RPM gauge in the bottom right.
Interestingly, both the temperature and oil pressure were a bit different than what my analog gauges were showing. The coolant seemed to be higher than what the gauges were indicating. Once I got to about 150 degrees F on the Maretron/EMU-1, the gauge was probably 20 degrees behind it. Unfortunately the gauge itself has a very narrow band of points between 100-150, and then a similar space between that and 210, with additional temps beyond that. I wish it had less of the upper range so I could see it more granularly, but I don’t have to now since it is on the network!
Oil pressure was lower than the gauge was showing by quite a bit. The gauges read near 60 while this was closer to 30. I am still going to be investigating this as I use the EMU-1 longer term on Rendezvous.
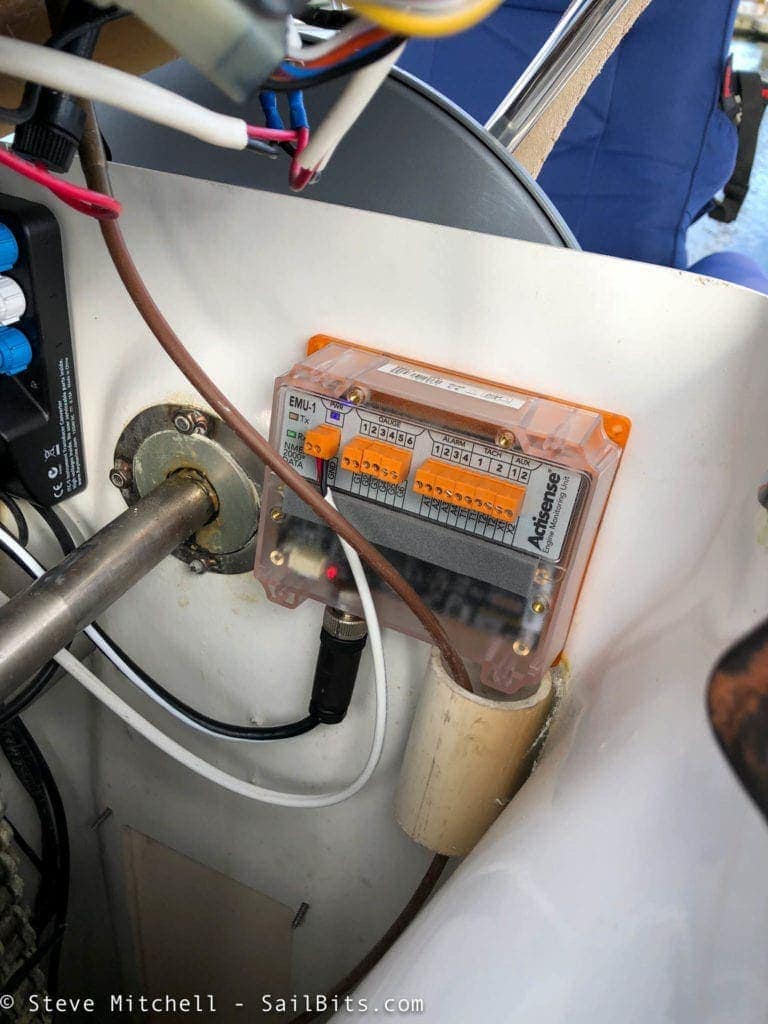
EMU-1 installed on Grace, my previous sailboat
Grace had the EMU-1 installed on her for almost a year, and I saw no anomalies once I tuned the gauge types and PPR for my tachometer. It did take a bit longer to get things working correctly because the gauges were from Yanmar and didn’t match the initial profile I thought they would work with.
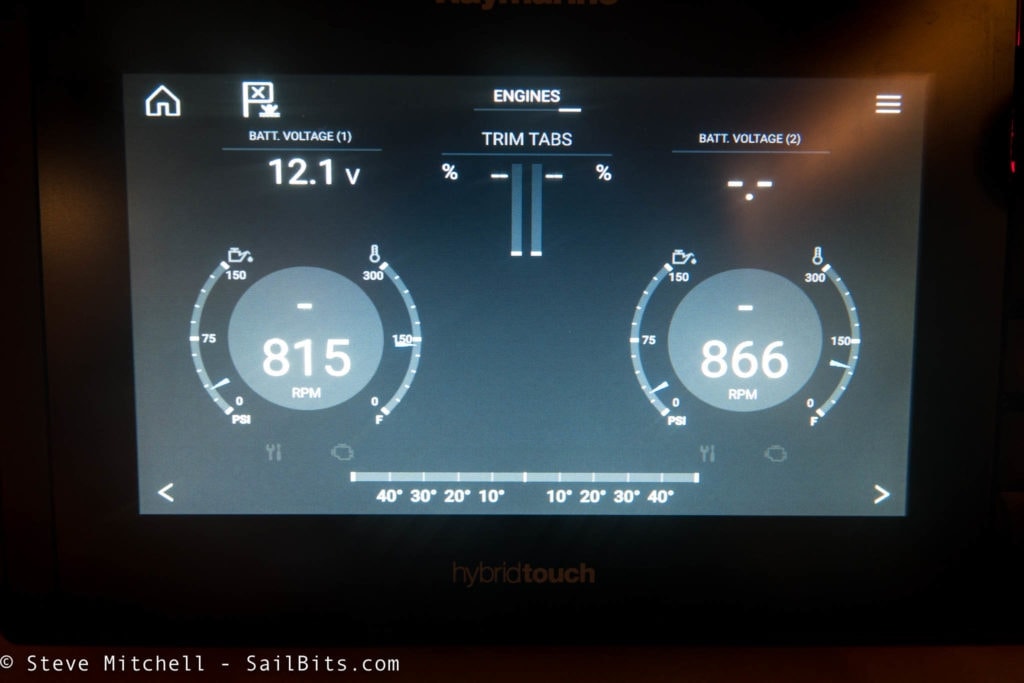
EMU-1 data on my Raymarine es78
Raymarine’s Lighthouse 3 software has a nice dual engine display in the Dashboards section. Above you can see both port and starboard engine RPMs in the middle, and around the outside edge the oil pressure on the left, coolant temp on the right. I just wish you could resize some of these, or disable some of the items you don’t have (trim tabs) on the network.
In addition to this data, when an alarm occurs, the Raymarine displays a huge red bar across the bottom of the screen and beeps, also citing the current value for whatever item is alarming. This is nice if you have both the data for the item, like coolant temperature, and the alarm configured. Not only are you alerted to the fact that something is wrong, but it pops up a big numeric value for what the temperature actually is, making troubleshooting the issue much easier.
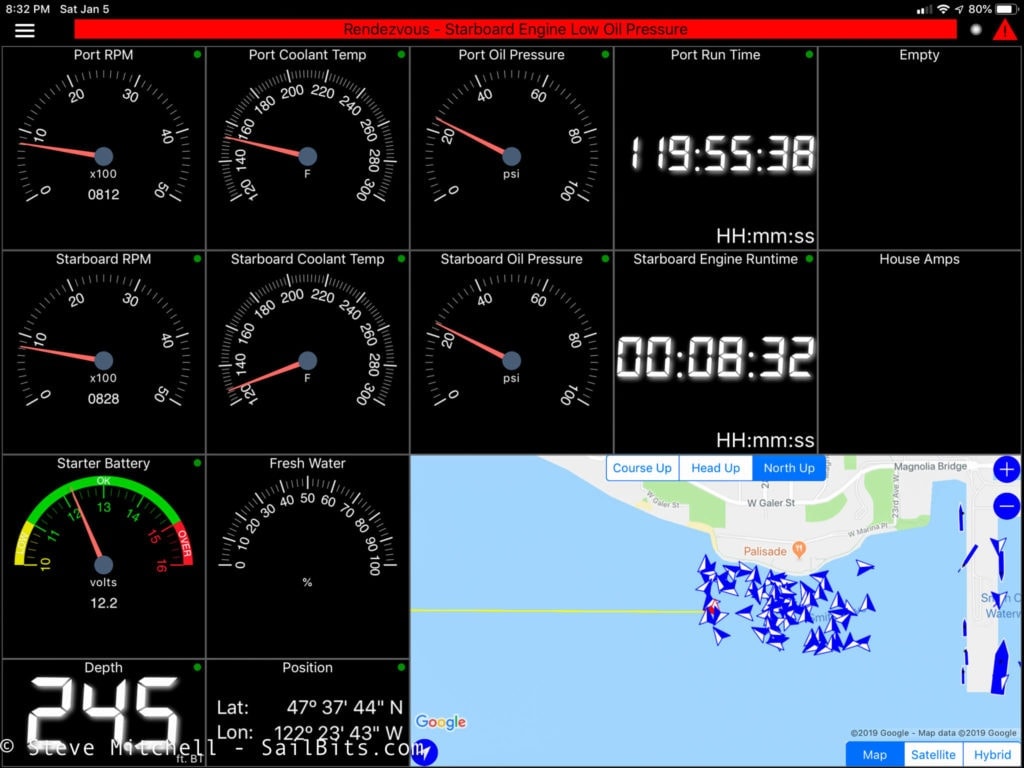
WilhelmSK using SignalK server to grab data off the NMEA 2000 network
I have a Raspberry Pi running SignalK on Rendezvous, and always use my favorite iOS app WilhelmSK to see data from the server. Above I’ve configured a screen to show the engine data in the top two rows. The engine hours are off because I used it on Grace initially and didn’t reset the hours.
Final thoughts
I consider an engine monitor a required piece of equipment on any boat that has older engines. It provides better visibility and clearer alarms across a wider range of electronics so you know more about the performance, and potential problems, with your engines.
The Actisense EMU-1 is the best solution on the market for this need. It has ample connections for gauges, alarms, and dual engine tachometers. It has a secure and easy to use cable system, clear indicator lights showing you what is going on, and a library of gauges to choose from to make configuration easier.
I’m very happy with having my engine data on my network, including some data I didn’t have at my flybridge station, and I know it will keep me safer and better in tune with how my engines are performing for years to come.
Archived Comments
These are read only comments from the old system. Scroll down to participate in SeaBits Discussions, our new interactive forum attached to each article.
Ben Ellison
February 3, 2019 at 9:13 pm
Wow, Steve, this is an amazingly thorough explanation of EMU-1 why and how. But I have something to add. In my view the hidden jewel in the system you’ve installed is that now you can set up engine warnings that might save you from ever having to deal with critical alarms. For instance, on Gizmo I get alerted if the coolant temp gets even a little higher than normal, which is way below the High Temp alarm value set by the engine manufacturer.
I keep hoping that the MFD brands will make this easier, but Maretron already does. I discuss here:
https://www.panbo.com/mfd-engine-monitoring-better-but/
- Steve Mitchell
February 3, 2019 at 6:29 am
Great point Ben – being able to set other thresholds on other devices to prevent ever getting to the high water mark. I also agree and wish that other manufacturers allowed you to do this more easily.
Larry O'Keefe
February 21, 2019 at 1:43 pm
Steve, what kind of tap connectors did you use?
Larry
N5012 Miss Miranda
Anacortes, WA
- Steve Mitchell
February 21, 2019 at 6:29 am
I used Ancor marine-grade splice connectors like these https://amzn.to/2Elpymv
You definitely have to install them correctly – very tight crimp – and ensure that your wire will work with the size they come in. Some people hate these things but that is usually because they are used to splice power circuits over and over in cars and RVs.
Since these wires are low voltage, I’m OK with them. I also wrap each one in vinyl tape to ensure waterproof connections just in case.
Joel Flores
June 14, 2020 at 6:59 am
Hello steve, Nice details on your explanations towards the Actisense EMU-1, i was wondering if how did you trace up your panels on the tachometer, I have a newly bought EMU-1 and im trying to put it to place onboard my VDO Gauges on the helm, i have twin 1080 hp MAN D2840 LE 403 engines, aboard Sunseeker Manhattan 64, i hope you can help me out. Thank you and God Bless!
-Joel Flores, Subic Bay, Philippines
Garett davis
July 2, 2020 at 4:37 pm
Hello Steve,
we are thinking of installing a emu1 on Volvo md2030 we want to run some gauges off off the raymarine panel through nemea connection . we would need temp and oil pressure sending units is this going to work ? any feedback would be helpful
thank you
Garett
Glen
July 15, 2020 at 5:08 pm
Great article! Very detailed and easy to understand.
Too bad the manufacture, is not able to convey this information as nice as you have. I’m finding it hard to find good installation and setup info from the manufacture Actisense themselves.
I’m in the process of getting ready to install my new EMU-1 tomorrow on my single engine sailboat. I have tach, oil pressure, engine temp high temp alarm, low oil pressure alarm and fuel level. I’ll be taping off of the back of my existing gauges. I’m using all Raymarine gear.
For the tach it has a pickup that senses the teeth on the flywheel of the engine. I’ll have to figure out how many teeth are on that wheel.
Glen

