

I’ve written a lot about my boat network, and in particular, Peplink products that offer a ton of functionality and features. However, those come at a cost – the top of the line compact unit from Peplink can run almost $1000. For the last 6 months, I have been playing with configurations and hardware that cost less, but still provide flexibility and features that more expensive solutions offer.
The Search
I started by thinking about the criteria for on-boat networking and came up with some basic, high level requirements.
Local WiFi – must be able to create a local WiFi network running both 2.4Ghz and 5Ghz bands. Both are required because many locations have too much interference for 2.4Ghz to work properly.
Local Ethernet ports – there should be a few Ethernet ports on the device to allow for connection to items on your boat that cannot use WiFi.
Remote WiFi – must be able to grab remote WiFi signals and use them as a source for the Internet connection. Ideally this should be done via an externally mounted antenna/system.
LTE Internet – must be able to use a standard LTE connection to provide Internet access.
DC power – should run off of DC power, preferably 12v.
Relatively inexpensive – commercial vendor solutions start at $600 and don’t meet all of these requirements. Most are $800-1200 for all requirements, so this solution should be cheaper.
Modular – if possible, it should be modular so various components can be swapped out for lower/higher performance, and when protocols/standards change/improve.
Note that I did not include plug-and-play or dead-simple configuration. I am willing to spend a bit more time setting something up, and have a deep computing and systems background, but I tried to make this solution for someone who has a moderate computing background, or is at least willing to do some work to save some money. If you expect a simple wizard or one screen configuration, this is not the product/solution for you – you are better buying one of the more commercial solutions.
Commercial Solutions
There are a ton of options out there for Internet access both at home and while mobile. I’ve mentioned a few before, including Peplink and Cradlepoint. These are fully commercial solutions that cost quite a bit of money, have tons of features, and are really good for networking nerds like myself, or folks who need abundance of features or functionality. They are generally produced for mobile applications, but lately many manufacturers are targeting the marine industry. The problem with many of these solutions is the cost, both initial and support for ongoing years, and the proprietary hardware they lock you into. I personally use the Peplink Max Transit on Grace and recently upgraded to the newer LTE radio version which was almost $900. I have dual LTE SIMs that can I choose from, 2.4 and 5Ghz WiFi, a LAN port that I uplink to a switch, and a WAN port that goes to my WiFi booster. You can see more details in Grace’s Redundant Internet Setup.
I use fancy rate shaping features, monitor things from cloud services, and do all sorts of other wonderful things that I find interesting, but that I have heard from many boaters, are not interesting to them. It is a great piece of hardware and software, but it comes at a price, and locks you in to their ecosystem.
In addition to those vendors, there are marine specific solutions like the Wirie, Rogue Networks, and many others. Many use the same hardware as you will see below adding a simplified UI to the product, and providing remote support. The cost for this is usually 2-4x times the list price of the hardware, and can drive their solutions up to a similar price point as larger commercial vendors. At the time of this article, the Wirie Pro with LTE added on is $800, and has less than half the features of the Peplink. They are often hard to get (out of stock a lot!) and don’t necessarily have the support department behind them that the larger vendors do.
The biggest reason to choose any of these vendors is the all-in-one solution and support. If you don’t want to get your hands dirty configuring a MikroTik, then look no further, these are for you.
Many people also grouse and complain about how much these solutions cost compared to their “home WiFi router” – take a minute and remember two things. First, if you have been in boating long enough, you know anything with the word “marine” before it makes things far more expensive! Second, does your home router have an LTE connection along with a long range antenna boosting a remote WiFi signal? I thought so. You only have one piece of the three part puzzle that you need on the boat.
Testing
I tried a number of different vendors software and hardware, and reviewed even more online. The first set of tests involved looking for a solution where all or most of the functionality was in one single system. This proved to be very difficult, and pushed the cost up very quickly. In many cases, the only solutions were integrated from several other pieces of hardware, and sold by a company as a service, with large price tags as a result.
Even cutting down some of the criteria didn’t fix the biggest problem of all – LTE internet access. While getting a product that has an LTE radio in it isn’t that hard, having good software around it is surprisingly difficult to find without caveats or features you don’t need. Many companies, including Peplink, Cradlepoint, Mushroom Networks, and many more, provide an entire set of products around managing internet connections via LTE. The features alone around failing over between LTE links, VPN sharing, signal strength monitoring, etc. are very complex, and warrant the $800-1000 price tags for some of that equipment.
After discarding all of the expensive vendors, that left a lot of smaller companies and platforms. Having used many of them at work and in past projects, after reviewing even more of the smaller companies, I finally settled on two front runners – MikroTik and pfSense.
I considered several other commercial and open source projects but was never happy with the feature set or hardware that they produced. In many cases, they did not produce hardware at all, and required that you buy off the shelf stuff, which is fine, but once you throw in DC power, switch ports, and WiFi radios, it gets expensive, or requires integration.
pfSense has been around a very long time, and are primarily known as a firewall product. In recent years they were purchased by Netgate, and have been producing their own hardware. However, you can install pfSense on hardware of your own if you so choose. It is an amazingly full-featured firewall with tons of options and features, and plugins to add even more functionality. However, their WiFi support is complex, has limited hardware choices for a DC 12v install, and very poor LTE radio support.
MikroTik has been around a long while as well, and combined with their RouterBoard hardware, offers a crazy amount of differing hardware platforms all with the same OS. I’ve written about MikroTik before, and use a Groove AC as my main remote WiFi unit on Grace. MikroTik offered far more hardware choices that looked good, have an OS that is similar in features to pfSense, although sometimes difficult to interact with, but also had bad LTE support.
At the end of all this testing, I never found a single solution that could provide the core items you would find in a Peplink router – LTE, WiFi and some ethernet ports, all running at 12v DC. Time to break things up into parts!
LTE Solution
After a lot of attempts at trying USB dongles, LTE WiFi access points (commonly called Jetpacks or MiFi), I stumbled across a set of products from Netgear that looked perfect – the LB1120 is the model I chose. This is an LTE modem with varying configurations of Ethernet ports, and nothing else. Not a USB dongle, WiFi access point that has crappy features, or anything else – just raw LTE radio and Ethernet port, which was perfect for my configuration. It is also quite powerful radio/signal wise.
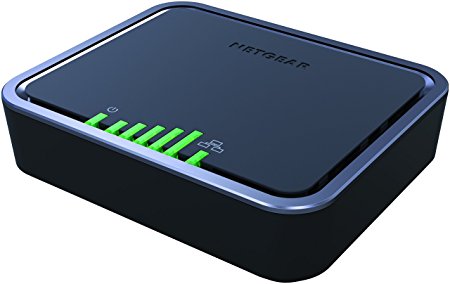
Netgear LB1120 LTE modem
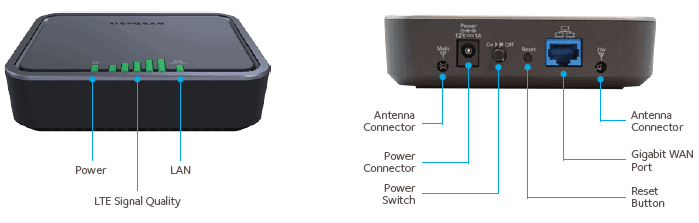
There are three models to choose from, the LB1120, LB1121, and LB2120. The LB1120 has a single Ethernet port, the 1121 a single Ethernet port that can accept PoE, and the LB2120 with two Ethernet ports – WAN and LAN.
I chose the LB1120 so that I could have a simplified configuration – one LAN port that connects to my on board router and provides a high quality LTE signal.
The LB2120 could work depending on your setup, and I actually tested that unit and had high hopes for it. It has a LAN port and a WAN port with failover functionality built in. I had tried to use the WAN port to connect the remote WiFi grabbing device, but found that when the WAN port failed a health check, it took the port down, which meant that I could not configure the device upstream of it to fix the problem. Sort of a catch 22 situation that would require disconnecting that upstream device in order to add a new WiFi network that I was trying to amplify, so I wouldn’t recommend it for that particular configuration.
The LB1121, which can be powered by PoE, is not likely worth the cost, as it would have to have another device capable of producing PoE. If you continue down and choose not to use a remote WiFi grabbing device from the router, then you could feasibly use it to power the Netgear but I didn’t test that.
Note that I tested the Netgear LB1120 on AT&T and T-Mobile in the US. Your mileage may vary with other providers. It does appear that this device does not have world-band coverage, at least in the US, so please review the models and band coverage carefully if you need international coverage.
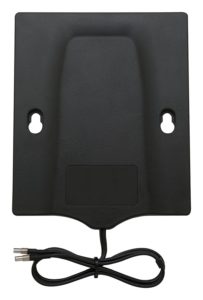
A must have accessory for any of the three models is the Netgear MIMO antenna, which plugs into the two ports on the back of the modem and helps ensure you have a quality signal.
The performance of this Netgear setup really impressed me in all conditions. The power of the radios and additional gain from the antenna made for one of the highest performing LTE solutions I’ve ever used. The diversity radios made a huge impact on throughput, and not having other random features made for a really simplified configuration. Having software that will use the WiFi device upstream if available, and fall back to LTE when unavailable is similar to high end features on commercial solutions.
This would be a fantastic addition to a boat network with an existing router, but without any LTE.
Router Solution
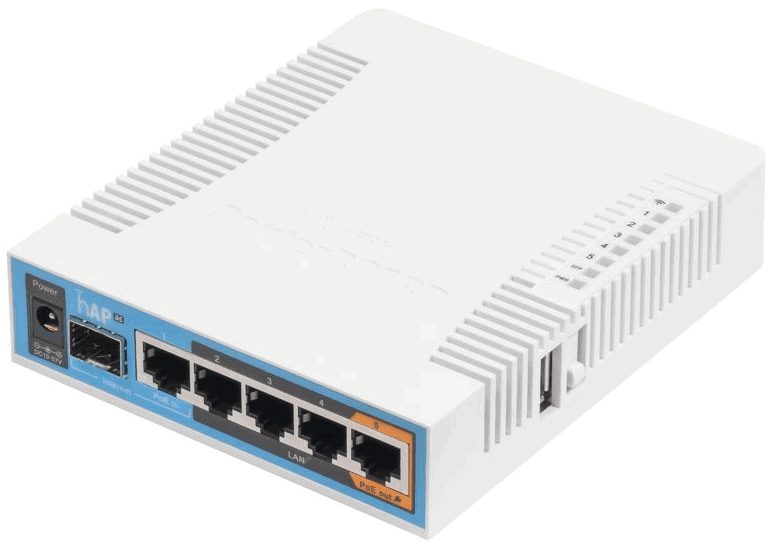
After testing a bunch of different hardware and reviewing many others online, I found the best router to be the MikroTik hAP AC. The hardware is simply superior to anything else I could find for the price. It includes a 2.4Ghz/5Ghz WiFi AP, 5 ethernet ports, including one PoE, and operates off of DC power over a wide range. The operating system has a lot of flexibility, and while relatively esoteric and sometimes hard to use, provided most of the features (if not all) of the more expensive commercial choices.
I don’t understand how MikroTik can make such a powerful box for so cheap – the feature set and hardware rival solutions router makers for your home or office.
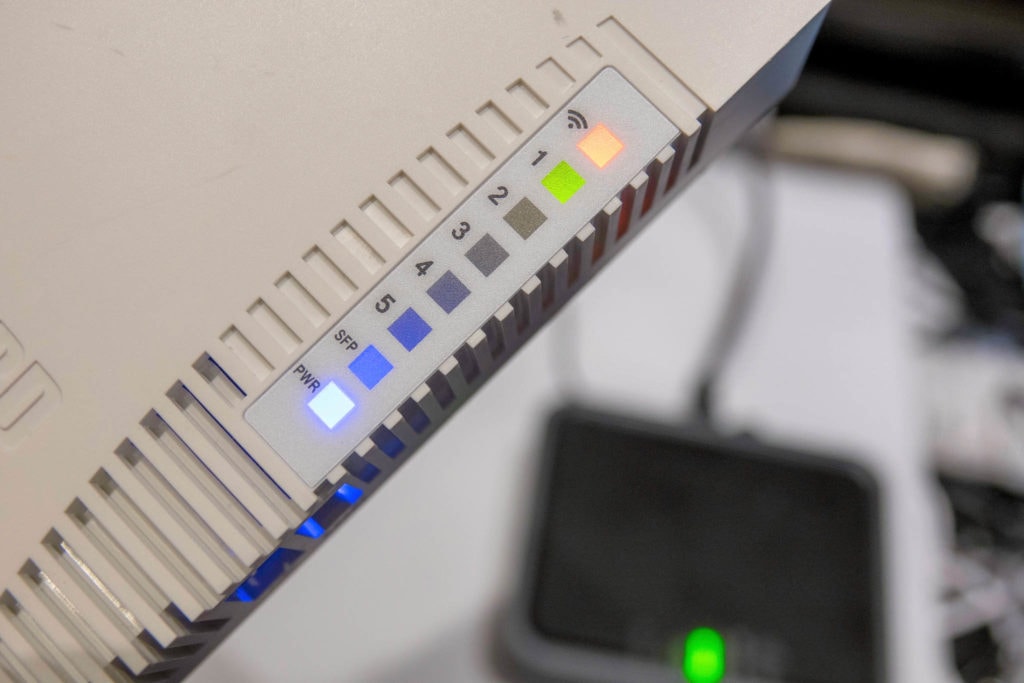
MikroTik hAP AC lights showing WiFi active and Ethernet port 1 connected
The hAP has 5 ethernet ports, one of which can generate Power over Ethernet (PoE) power outbound to run another device, and one which can accept PoE power in to run the entire router. I chose to use DC power from the boat, and keep things simple. It also has a USB port if you want to try to use their LTE support (don’t), lights for each port and the WiFi radios, a reset button, and that’s about it.
The biggest challenge to any MikroTik device is configuration. Using MikroTik’s winbox configuration tool can help with this, but ultimately you will have to do some research depending on your exact configuration.
I have included a basic configuration example from my testing which setup the hAP in the following:
- Ethernet port 1 as the WAN connection – this is what should be plugged into the Netgear and is “outside” the firewall
- Ethernet ports 2-5 as your LAN connections, protected by the basic MikroTik firewall and able to be used for cabled devices
- WiFi radios for both 2.4Ghz and 5Ghz turned on with network name “your-ssid” and password “your-password” – please change these!
- Basic firewall setup denying all traffic from the WAN port but responding to ping and allowing existing sessions. Your mileage may vary, and I highly recommend reading more on MikroTik’s site and forums about improving security and your firewall.
The configuration file is available here: sailbits-mikrotik-hap-ac
MikroTik Groove step-by-step setup guide
Remote WiFi Solution
Having done extensive testing in this area a bit over a year and a half ago, I revisited the various vendors that were part of my tests then, and looked for new ones. Even with that update, I still stand by my current solution for this – the MikroTik Groove AC.
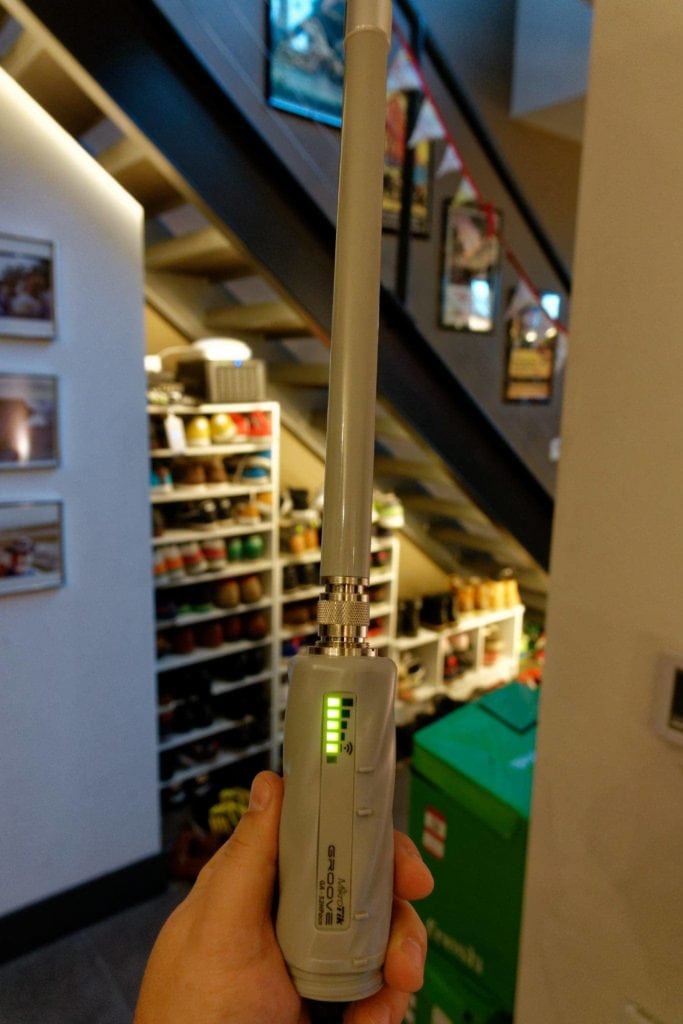
The Groove is a two piece WiFi unit that runs off of Power over Ethernet. It is meant to be mounted outside so that it has a better chance to pick up remote WiFi networks, and comes with clamps and points to make that easy. There’s also an adapter to provide PoE power from a wall wart – I modified mine and connected it to my 12v DC system on the boat.
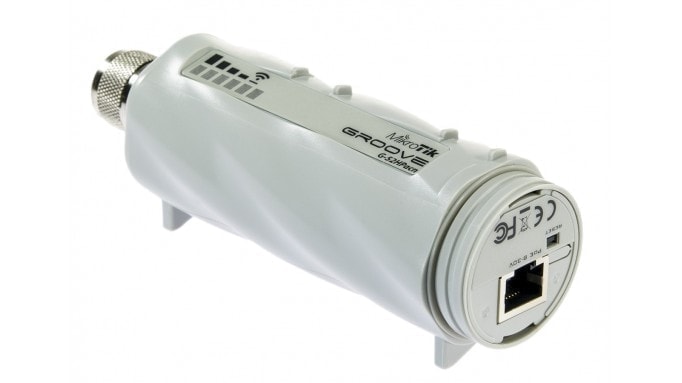
There’s one Ethernet port on the bottom with a water proof cover. You can run an outdoor quality Ethernet cable from the unit inside to where the router is.
International users please note: the link below is for a US only “locked” version. If you are using this internationally, you should look for the “unlocked” international version.
Configuration Choices
I decided to show a couple different configurations possible with this set of equipment based on needs.
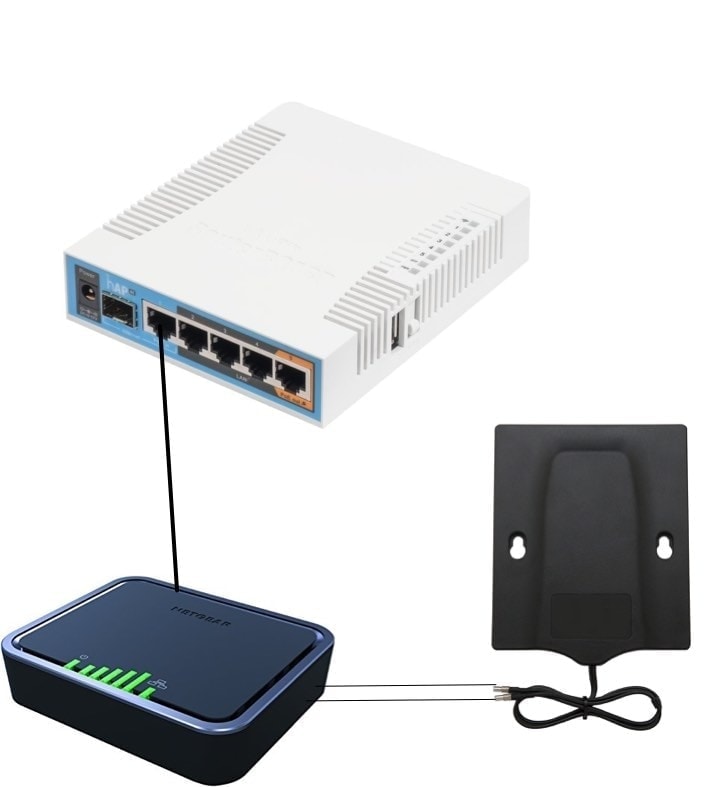
LTE & Remote WiFi
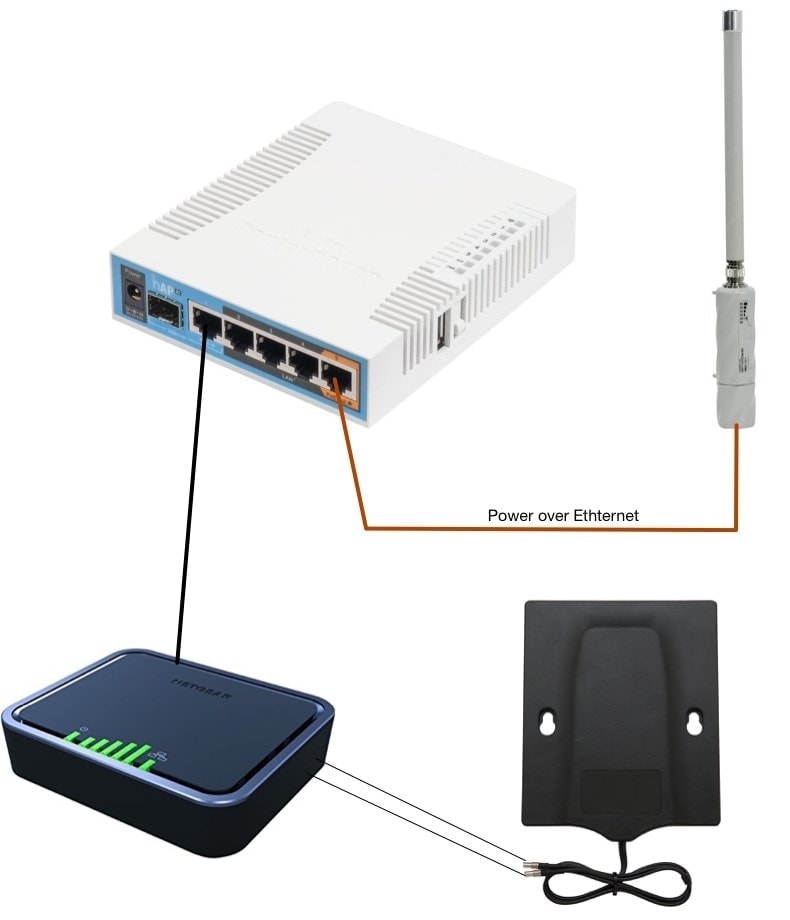
This is the full featured solution with both LTE and WiFi internet sources available. Port 1 on the MikroTik hAP router connects to the Netgear for LTE internet access, and port 5 connects and powers the MikroTik Groove via power over ethernet (PoE) to capture remote WiFi signals.
To configure failover between LTE and WiFi, I recommend reading Two gateways failover and Advanced Routing Failover on MikroTik’s site. Please note the example configuration file provided above does not include the failover configuration.
Based on how you configure failover, you could have WiFi as primary when a network is connected, and only use LTE when absolutely needed. I personally use LTE all the time, and only turn remote WiFi on when I know there is a network nearby that is high quality, and that I can get on reliably. I have found most marina networks to be slower than LTE or have issues with quality signal (see Marina WiFi is Hard). As a result, I have mine configured with the MikroTik Groove disabled most of the time unless I absolutely need it, and rely on LTE.
Whichever way you configure it, this setup gives you the best of both worlds with plenty of flexibility.
LTE Only
This is the cheapest and simplest configuration, but also one that many folks choose if you don’t care about grabbing remote WiFi signals. Pretty simple and straightforwards – ethernet from router to Netgear. The example configuration provided in sailbits-mikrotik-hap-ac will work for this setup.
Given that less and less marinas seem to be providing WiFi (at least around here), this seems like a more likely way for folks to get Internet on the boat via LTE.
Power
All of these devices accept 12v DC. The MikroTik can accept from 10-57V, the Netgear accepts 12V, and the MikroTik Groove accepts PoE from 10-30V.
I’ve run the Netgear on the boat for 4+ months at widely varying voltages from 11-14+ without any issues, but your mileage may vary. I doubt it is designed as well as the MikroTik – if you’re worried, either run it off of AC/inverter power, or use a buck converter to take whatever voltage you are producing on the boat, and make sure it’s always 12v.
For the MikroTik router and the Netgear, I simply wired their barrel connectors into a DC fuse block each with their own fuse matching the manufacturers specs. For the MikroTik Groove, I prefer using the MikroTik hAP router’s PoE port, but I have also used the provided PoE adapter, lopped the barrel connector off, and run it off of the varying 11-14+ volt boat power system by connecting it to the same DC fuse block with its own fuse.
Modularity
Not only is this setup modular to the point that you could swap things in and out, but you don’t have to use all of the pieces to begin with.
If you already have an onboard router, but don’t have LTE, grabbing the Netgear is an easy way to add it with minimal cost, but providing a high performance connection.
Same with the on-board router – if you don’t have one now, and are a DIY’er, the MikroTik has a fantastic set of WiFi radios for both 2.4Ghz and 5Ghz, runs off of boat power, has a ton of ports, and can be expanded on later.
You can even combine a booster with this configuration and supercharge it, although it will add almost double the cost. You can read more about how to do this in Best LTE antenna and booster for the boat.
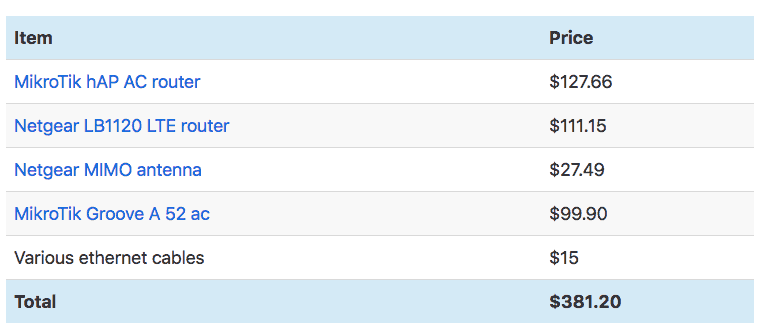
Pricing
Here are the general costs at time of writing.
LTE & Remote WiFi:
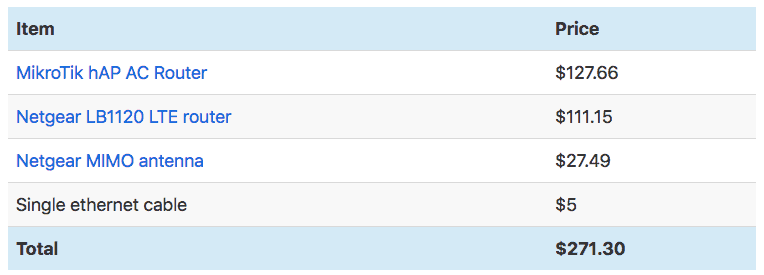
LTE Only:
Comparison
While saving this much money is nice, it is important to review the benefits in choosing something like this over a more expensive commercial solution.
Pros
- Less expensive than a single commercial solution
- Modular – when LTE category X comes out, you don’t have to replace the entire unit to get the faster access (which is the case with Peplink/Cradlepoint).
- Simpler components – if you need to replace/upgrade/change one part, its easy to do.
Cons
- 3 devices instead of one – adds more cabling, power, etc.
- Complex configuration – this is not something to overlook. The MikroTik OS in particular is complex and very modular, but also very frustrating to many people. It is best if you have some sort of computing background – this solution is not for those who want plug and play or simple wizards to set things up. If that is what you need, you are stuck paying for a more expensive solution.
- Integrated features missing – the commercial solutions have features that take advantage of the fact that they are controlling all aspects of your Internet connection – WiFi, LTE, LAN, etc. – and can leverage that for some really nice features. Some of these can be achieved with the above, but they are not as robust.
Conclusion
For roughly half the price of a single-vendor solution, you can build an Internet setup on your boat that allows for a local 2.4Ghz & 5Ghz WiFi networks, four Ethernet ports, LTE internet access, and remote WiFi internet access. It does require a bit more configuration, but you will have a quality solution that can be updated, upgraded, and expanded on without much effort.
Archived Comments
These are read only comments from the old system. Scroll down to participate in our standard commenting system.
Bryan Austin
April 17, 2018 at 7:15 pm
Steve,
I’m really glad I found your forum and your posts about putting Internet on your boat. I’m a self proclaimed “Boating Geek” and have put together a similar system. Peplink SOHO, Mikrotik Grove 52, Netgear 815s cellular modem with the weboost 4G and new Wilson marine antenna with 35′ of cable. I’m going through some networking growing pains as well as some less than favorable AT&T cellular signal strength in our marina. Wifi is current unavailable.
My main (first) question is how you set up the cell modem and MikroTik. Are they both left in router mode or as bridges? Seems to me, I can access their configuration when in router mode vs, plugging them directly to a PC to reconfigure or select a new marina wifi. Then I’m faced with a double router or other DNS inconsistencies.
Second, w.r.t. DNS, do you leave the MikroTik and cellular modem, and router for that matter to utilize the automatic DNS servers? Or should the wifi and cell modems point to the Peplink router gateway as the DNS?
Last, my cellular signal in the marina seems weak. We get 5-8 Mbps. Sometimes we see 20-25 and other times we see 1-2. Very wide ranging. Speed tests through my boat system are generally less than via my iPhone (direct to LTE). How can I boost my cellular rate? Shorter cable? Different antenna?
Really lastly…are you familiar with AT&T unlimited data plans available on eBay? Thoughts?
Steve Mitchell
April 17, 2018 at 7:36 pm
Hi Bryan,
Thanks for commenting!
I have helped another person implement a SOHO with the Groove – Peplink’s software helps make that easy since it is very similar across their different platforms.
I would always setup any device upstream of my firewall device (SOHO in your case) in router mode. That way you can administer them, as you mention, but also so I could use whatever firewall they have in them as well. That just adds another level of protection.
Yes you will be double NAT-ing things, but that happens in many places, and unless you are doing something specialized, like a complicated VPN or some gaming programs, you’ll be OK.
For DNS, this is the way I would set things up:
The upstream devices (MikroTik, cellular router) use whatever the provider sends to them. That means it will change based on who you’re connected to via WiFi in the case of the MikroTik, and whatever AT&T provides on the cell router. Some would argue that you should configure them to use Google DNS or CloudFlare’s new DNS servers that offer better privacy, less tracking, etc. Unfortunately, many WiFi systems in marinas use a captive portal or other way of signing in, and block you from using DNS servers that aren’t theirs. Some cellular providers do this, although I don’t think AT&T is one.
Then on the SOHO, everything inside the network should use it as its DNS source of course, but the SOHO has configuration for each of the WAN connections. You would set each one to use whatever they hand out to you, which in both cases are likely to be the local addresses for the MikroTik and the cell router.
So in reality, you’d have, say, 192.168.50.1 as the DNS on the SOHO, and that is what your local clients would use. The SOHO would then have an upstream DNS server of 192.168.1.1 for the MikroTik, and 192.168.2.1 for the cell router, that being their IP addresses each. They would then in turn have DNS addresses they would get assigned to use for whatever upstream.
Seems like a lot of hops, but it isn’t that bad. The other thing you could do is add additional DNS servers in the SOHO, which they allow you to do per upstream WAN connection. This is where you could completely override using the MikroTik or cell router and use 1.1.1.1 (CloudFlare) or 8.8.8.8 (Google) which are much faster. You would need to test that the upstream provider isn’t blocking these, but this would speed things up a bit.
On your antenna/booster setup – check out the review/project I just posted a few days ago at https://sailbits.com/best-lte-antenna-booster-boat/
I would recommend for your setup:
Swap the Wilson antenna for the WirEng BoatAnt. I saw significant gains from this antenna over the Wilson.
Reduce the cable from the antenna to the booster to 15′ if possible. You say it’s 35′ now? That adds a significant reduction in the antenna overall benefits.
Hope that helps!
Aquabelle
May 29, 2018 at 5:50 pm
Steve: in your Enchilada/Two Tamales configuration, what are you using the port on the Netgear LTE for?
- Steve Mitchell
May 29, 2018 at 9:38 pm
Aquabelle: thanks for catching that! I had originally given my configurations funny names, and had three configurations instead of two. I also was using the Netgear LB2120 instead of the LB1120, but after testing found that the LB2120 was not suited for the configuration, and given that it cost more, I removed it from my recommendations.
The other configuration missing was the MikroTik hAP AC router connected to the Netgear LB2120, and the Netgear using its WAN port to connect to the MikroTik Groove. That was much simpler in terms of the MikroTik hAP AC configuration, letting the Netgear choose to use the WiFi MikroTik Groove or LTE, but it didn’t work reliably. In particular, the Netgear would shut off the WAN port if connectivity wasn’t available via the Groove, which meant you couldn’t get to the Groove to configure it to use a different WiFi network. Sort of a catch 22.
I’ve updated the post to remove that name and make sure things are all consistent!
aquabelle
May 30, 2018 at 10:22 pm
Steve: is there a strong case for the gigabit ethernet ports in our typical on-board applications? The MikroTik hAP Lite is available with ac wireless and almost the same spec, but has standard 10/100 ports…and is about 40% of the cost. I am thinking of CE/MaxSea and networked radar and sounders….
- Steve Mitchell
May 30, 2018 at 9:41 pm
Aquabelle: the hAP Lite has one other missing piece – 5Ghz wireless. If you frequent decent sized marinas, I highly recommend you don’t skip that feature. I can think of 3 marinas near me where 2.4Ghz wifi is so saturated that even on my own boat down belowdecks, it is unusable.
However, back to your original question – most marine equipment that I have come across, even ethernet connected high fidelity sounders/radars, would operate fine at 100 megabits. I’m sure over time some of the newer stuff will use more bandwidth, and I would steer away from anything that is not a full switch. Hubs and some of the MikroTik stuff can have impacts if they are a simple bridge and not fully switching.
Gavin
June 11, 2018 at 6:44 pm
Hi Steve, Im also in Elliot bay marina and exploring both wifi and cell service antenna setups and determining which route to go. couple of questions. Reading the NMEA guidance on antenna placement, it seems there are distinct implications of placing certain antennas within a certain distance of other antennas. – especially VHF. have you investigated any challenges with placing your cell and Wifi antennas too close to other antennas? I am trying to fit two VHF antennas, wifi, cellular, Radar, Satellite, and GPS pucks within a short amount of space…
in Seattle, (I’m T mobile customer currently) but when looking at pay as you go short term data sim cards I have a choice, would you go T mobile for the data sim?) if so, would you still recommend the peplink max transit and specifically the LTE-A model?
happy to provide beers and talk in the marina if easier and more fun! 🙂
- Steve Mitchell
June 12, 2018 at 5:59 am
Hi Gavin,
Antenna placement is definitely something to consider. It sounds like you have a lot to put all close together, but that is not unusual on boats.
The rule of thumb is to separate everything by 3 feet, and not put similar type antennas or services next to each other. So for two VHF antennas, I would space them apart as far as possible given they are going to be using the same frequencies, on opposite sides of the boat if at all possible. Everything else can be relatively close as long as they are disparate services or frequencies, such as WiFi and GPS. Without knowing more about the space you’re trying to stick everything, and the type of radar that you’re using, I couldn’t be more specific than that.
I use T-Mobile as my primary provider both for all of my phones and tablets, as well as the boat. Their T-Mobile One plan is what I use for all of those devices, with the T-Mobile One Plus International plan for the data card in my Peplink. That allows for full LTE speeds and roaming in Canada.
I definitely recommend any of the Peplink products if you are willing to pay for them. They are more expensive than some of the other setups, but you get what you pay for in terms of advanced and more polished features, such as switching from LTE to WiFi more or less seamlessly. In addition, the Peplink MAX Transit has two SIM slots, so you can switch between T-Mobile and another provider (or two T-Mobile SIMs for more overall monthly data) and many other features.
If I were buying anything right now, I would make sure it is compatible with LTE-A as that is rolling out everywhere, and you don’t want to buy something that doesn’t have support for the higher speeds.
Always open to a local chat!
Gavin Gee
June 15, 2018 at 4:22 am
Great article Steve. I pulled the pin and bought all this gear: skipping the max transit for now. would love to see your config with both wifi and LTE setup. (if you have this setup). My current question is whether I should set both the groove and the HAP AC router to both be Routers with NAT in place, or whether I should configure the Groove as a bridge. If I wasnt going to setup LTE it would be super simple to have the groove be the router and just have the HAP AC be a wireless access point. Can you see any issues with having both the Groove and the HAP both be configured as Routers? ( I was going to create separate network address ranges so routing doesnt get weird between the LAN-HAP network and the Hap-Groove network)
- Steve Mitchell
June 15, 2018 at 9:54 pm
Sounds like lots of new fun toys!
I prefer to set them routed for a couple of reasons. First, routed mode means you can have separate networks, firewalls on each of the devices, and know exactly what you are connecting to at any time. Having a firewall on the Groove is nice because whatever WiFi AP you’re connected to could be compromised or have other traffic going on that you don’t want to repeat down to the hAP AC. It is also clear if you give out organized network addresses what is coming from where when you are debugging things. 192.168.10.0/24 is the hAP AC DHCP scope and WiFi/LAN network addresses, 192.168.20.0/24 is the Groove, etc. etc.
I’ve also seen bridge mode on MikroTik devices completely hose networks, mainly because, well, they’re bridging. Bridges are powerful in that they usually forward everything from one side to the other. So if you had crappy traffic coming out of your hAP AC, and the Groove was in bridge mode, the Groove will happily forward it out onto whatever WiFi network you’re connected to. If someone noticed, they could ban you, or in many cases, if you are spewing too many packets, advanced WiFi network systems will slow you down or cut you off. Having a NAT means things that are forwarded by a bridge wouldn’t necessarily be forwarded by a NAT/routed configuration.
Bridges in general to me are just harder to deal with when there is a problem.
Many people worry about double NAT’ing or the number of NATs, and that just isn’t something to worry about anymore. On a mobile device, you’re being NAT’ed many, many times – even on a home network connection, or a marina WiFi connection, you are undoubtedly not directly on the Internet, and are being NAT’ed at least once. Another time doesn’t hurt, and it doesn’t add any significant latency or processing power for these situations.
But if you didn’t want separate networks, etc. you could configure the Groove as a bridge, and the hAP AC as the router. I don’t remember exactly how you’d be able to get into the Groove if it was in routed mode, it might get funky if it is not connected to something…
The best way, if you want a bridged config, would be as you mentioned – the Groove as the primary router, and the hAP AC bridged. I’d take a look at the CPU specs though, as I think the hAP AC has a much better CPU and more ram than the Groove, and would likely be a better candidate as a router.
Mark McGovern
August 14, 2018 at 1:23 pm
Steve, first off thank you for sharing your knowledge and experience with us. I am just beginning to set up my boat network and this site has been an invaluable resource for me! That said, I’m not remotely close to a network engineer so most of this completely new to me. Your configuration file for the hAP AC was quite helpful. Is it possible for you to share your Groove configuration file with us as well?
- Steve Mitchell
August 14, 2018 at 9:56 pm
Hi Mark,
I am working on an article specifically about setting up and configuring the Groove which should be ready shortly. I’ll make sure to include the configuration file from that in that article, and post an update here when I’m done!
Joseph Hardin
October 18, 2018 at 10:13 pm
I’m a bit confused about the use of the WAN/LAN ports on the router. I understand the LTE modem going to the WAN port. But how can the Groove WiFi booster go to a LAN port on the MikroTik router? Isn’t it a WAN source also? Is this taken care of in the router configuration scripts? Thanks for the articles. Great stuff. Wildly useful.
Patrick St-Onge
February 14, 2019 at 8:04 pm
I got all that hardware 🙂
The Groove was setup as CPE/router, connected to a wifi network.
The terminal of the groove even pings google ok.
The Groove ethernet is connected in ether5 of an HAP ac and this is where it goes sour.
No matter how I change the bridge, nat, routing, making ether5 a WAN port I cant seem to be able to have a proper return route to the Groove52.
I can ping back the Groove from the HAP ac of course and vice-versa
What am I missing?
Can anyone share their configuration? I want people connecting to the HAP ac to have wifi connectivity – of course 🙂
Many thanks!!
Patrick
Ballard58
May 15, 2019 at 10:43 pm
Hi Steve,
Thanks for the great write up. I’m assuming this set up can be combined with a WeBoost 4G-X in front of the Netgear LTE router? If the router is located next to the booster internal antenna, I assume it would reduce the need for the MIMO antenna. But what do you think? Thanks!
Tim
July 11, 2019 at 2:22 pm
I bought all the hardware from Germany. My boat is in Holland.
I had a couple of challenges and have get to get it all working.
The groove was not accessable via IP out of the box and I had to use winbox to get to ithe MAC address to configure it.
Also all the Mikrotik routers have the same default IP and since you have the groove and the hap on the same network there is a conflict. I was able to get the IP for one router changed to avoid the conflict. I can now log onto the netgear modem, the groove or the hap admin consoles and have been able to configure them,as recommended, including getting the groove online at the marina wifi. The groove works fine on its own connected directly to,my laptop.
What is not clear is how to get LAN Port 5 on the hAP reconfigured to be a WAN port and how to easily switch between the LTE and Wifi WANs without physically moving cables. I was working on the issue for a few hours and have yet to get it working. I can ping and get to the consoles of all three devices but cannot get any internet traffic through the groove via the LAN port. I have read that this can be done by updating the NAT but I have to figure out how to do that.
Overall I would suggest that the articles stress the complexity of getting this working as I see others have had the same problem. I’m sure that a network engineer can get it working, but I am software engineer and am finding it very complex and may never get there Anyone going this route should,be aware of the time required to configure the hap and the possibility that they may never get it to work.
Sorry to sound frustrated but there seems no way to do this without rolling up my sleeves and digging into the many config settings to try to trace the traffic.
Tim
Greg Davydov
October 12, 2019 at 4:00 pm
Hi Steve,
Looks like that NETGEAR 4G LTE Modem (LB1120) supports only US LTE bands (2, 4, 5, 12). So how to use it in Caribbean, where all countries supports different LTE bands (3, 13, 17, 20, 30, etc)?
So for the Caribbean installations may be better use iPhone tethered directly to the router and use multi-SIMM adapters with local SIMM and GigSky or GoogleFI simm?
Bernard BOUIS
September 27, 2020 at 5:42 pm
Hi Steve,
Thanks so much for your articles. Really appreciate your knowledge, but some time to technical for me. I am actually sailing down the CA coast to cruise to Mexico and beyond. I am looking at an economically satisfying solution for WiFi and LTE connections.
I was directed to your website by somebody who followed your advices. I was looking at your “Modular, cheaper boat internet solution via Netgear and MikroTik” and looking at adapting it to international setup. I liked the price and I think I can work with the MicroTik setup, but looking around I couldn’t find a similar modem to Netgear that will work internationally. What would you replace the Netgear for international use?
If you think you could also update your 2018 article with product that came out lately, I would really appreciate. Looking forward to your reply and advices.
Regards.
Federico
December 1, 2020 at 6:10 pm
Hi Steve!
I am looking for a LTE system to install on my sailboat. I am mostly interested in the LTE side rather than the WiFi. I am very often far from Marina and I usually fight against LTE signal which is often very low in sheltered bays.
The system should even have a low current consumption.
So I was thinking to install a LTE external antenna with a Router/Modem.
I was looking at the DIY system solutions that you provided to go cheaper and I wonder if there are better choices in 2020/2021?
I think the best solution would be using a WiFi router with a modem with SIM to put as near as possible to the external antenna and plug them with the LAN cable.
Do you have new advices on these devices?
Thanks!
Lance Lott
January 26, 2021 at 5:36 pm
Hi Steve,
I recently purchased a MikroTik Groove and for longer range wifi connections am planning to be able to connect it to my Peplink Max Transit (Cat18) (I will have two Poynting Omni-400’s mounted externally) but am not quite clear on the power requirement for the Groove. The install is on my sail boat with a 12V system. I clipped this sentence from this article; “For the MikroTik Groove, I prefer using the MikroTik hAP router’s PoE port, but I have also used the provided PoE adapter, lopped the barrel connector off, and run it off of the varying 11-14+ volt boat power system by connecting it to the same DC fuse block with its own fuse”…. On the POE injector that came with the Groove it show Input power 18-57V and on the ac power adapter for the POE it shows 24V Output @.38A, on the radio itself it shows 8-30V. If I do lop off the barrel connector and wire to my 12V bus it looks like it should work but Is there another or better option? also of note; I also plan to be able to connect one of the -400 antennas to the 2.4Gh connection on the Peplink directly or via a splitter as well for most normal wifi needs.
- Steve Mitchell
January 26, 2021 at 6:26 pm
Hi Lance,
Unless something has changed recently with the MikroTik Groove, it can accept that wider amount of voltage, which is 8-30V. If you connect the PoE adapter directly to your battery system, it would be providing something between 11-13v I would assume, and would happily power the MikroTik.
You can also get a dedicated PoE injector similar to this one from Tycon https://amzn.to/3iRGIe4 which take 12v DC battery power, and output 24v PoE. They make them in just about any flavor you want, so you could get one that does 12v-48v. However, the higher you go, the more power it could take depending on the efficiency of the conversion.
I’ve used the above unit a lot in my own installs, and those for customers. I’ve also just used the DC power connector with the included PoE injector.
On your 400 antenna for 2.4Ghz – be aware that most splitters add a significant amount of loss. Sometimes that amount is so high (1-2dB) that you negate any gains from the antenna, and it might perform worse. In situations where a dedicated antenna can’t be used for both, I would recommend unplugging it from one connector and plugging it in to the other. You’ll need an adapter for the cable (which will add loss too) for one or the other. - Lance A Lott
January 26, 2021 at 6:43 pm
Thanks Steve. All makes sense. I did order an adapter for the wifi connection so I can just swap the cable over and also purchased the recommended splitter from Poynting. I plan to try both setups and see what happens and which I prefer. My last decision is antenna placement; Either on the mast spreader using more coax or on the solar panel arch which is lower of course but also will require less cable. I am playing with the line of sight and antenna attenuation math now to see if there is a clear winner. In the end I might considering put one in antenna in each location to cover both basis. Any thoughts on this? - Steve Mitchell
January 26, 2021 at 9:20 pm
I would choose the location with the lesser cable runs. My experience is that the longer the run, the bigger impact on loss, and anything over about 15′ is not worth the gain you get, especially in a mast or other area where electrical interference can happen. Think of your anchor light on all night, while trying to surf, etc.
Shortest is best. Height won’t get you much since LTE towers are rarely tuned to have their power out across the water, and WiFi won’t go that far either.
Archived Community Comments
These comments were posted on the SeaBits forum before February 2026. Scroll down to join the current discussion.
This internet setup is much closer to what I’m looking for compared to some of your other posts on the Peplink/similar products. I already have a Netgear Nighthawk M1 that will suffice as the mobile modem. I haven’t seen any updates to the MikroTik Groove, but it does look like there are two newer versions of the MikroTik HAP AC since this article was written. Do you have experienced with either of those, or is there another router you would recommend for dual WAN at a similar price point?
Hi @willingham,
There are a bunch of new MikroTik hAP models that have come out. I’ve not been able to keep up with all of them, but the software is the same on almost all of them.
For the speeds you’d be experiencing with LTE, all of them would work well. I chose the hAP AC at the time because it had dual band WiFi and multiple ports. Almost all of the MikroTik platforms with multiple ports will allow you to have multiple WANs - its just a factor of configuring the software bridges. Some have limitations based on the chipsets.
All of them are more complicated with multiple WANs, and can be frustrated if one or more of the WAN ports change frequently. Their active/standby logic is very basic, so just keep that in mind. If you are not expecting a lot of changes between WAN devices, then it could work out well for you.