

Rendezvous came with a Webasto forced air heating system which was inferior in a number of ways. I decided to replace it with hydronic, but had to do some investigation first.
Existing System Challenges
The boat came with a Webasto AirTop 5500 which failed within the first 6 months of me owning the boat, right in the middle of the winter. I'm lucky that I am near Seattle most of the time, and Sure Marine, the biggest Webasto shop in the US. They took at look at the unit and determined it would be more to fix than it was worth. The heat exchanger itself was part of a recall or issue they'd seen before, allowing some exhaust to seep into the hot air path, and into the living space - generally a bad thing. It also appeared to have a ton of hours on it.
I replaced it with an AirTop 55 which is the same exact size unit, but with a newer model number and likely newer electronics. I did this because at the time, this was the least path of resistance - drop in the new unit, and be back in business.
Unfortunately, it wasn't that easy. I continued to have issues with the new unit for the rest of the year, and into the second winter I owned Rendezvous. Throughout the year of on-and-off issues, I traced all of the piping, found much of it to be installed incorrectly in just about every way. The exhaust was too long and had weird bends in places. The hot air supply was held together with heat tape, very few clamps, and split apart in many places where it was leaking tons of heat out. In one spot, I found the heat piping just dumping hot air into a wall and never reaching the vent. And don't get me started on the electrical wiring, which was not even close to manufacturer's recommendations. None of this was done by Sure Marine, to be clear.
Also during this time, I extended a smaller duct from the dinette area up into the v-berth, which had zero diesel heat until that point. Why someone would have put ducted heating throughout the boat, but left out the guest berth and head is beyond me!
The final straw was in late 2020 when the new AirTop 55 unit began shutting down every few hours. By this point I had corrected all of the ducting, fixed the exhaust, replaced the fuel feed lines, and re-run the electrical wiring. Even then, the Airtop 55 continued to shut down and indicate a general fault. After taking it to Sure Marine 3 times in the space of 3 weeks, only to have them tell me there was nothing wrong with it, I knew it was time to search for a new solution. I'm sure the size of the boat, the amount of times it had to run, and the existing exhaust was contributing to the reliability.
I put in a Wallas Spartan unit I had access to which kept me alive for a few more months, but was just too small for the boat at 15,400 BTU. The Webasto was bigger at 18,750 BTU, but that was still too small. I had a Wallas on Grace, and it worked very well, especially because it constantly circulated the air and used continuous fans, but on Rendezvous it was very loud since it had to run at near max, and just didn't heat enough during cold days.
Calculations
One key thing to do when dealing with heating or air conditioning is to ensure you have an appropriately sized system to handle the loads required. In the 90's and early 2000's, I spent a lot of time designing and building computer data centers, and learned a lot about air flow and related principles. This included things like the measurement of heating or cooling, how much you could reasonably expect to heat or cool air in a given cycle through a system, recycling air from spaces back through the system, and how to calculate grill sizes, duct sizing, and many other things. When planning an installation on a boat, you need to ensure that you consider many of these things as well.
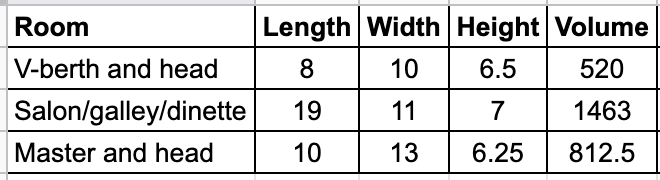
The first calculation I started with involved the size of each room. From that you can calculate the volume of the room. This is necessary to figure out the heat load, or heating requirements, for each room. You'll need to measure the length, width and height of each room (estimated in a lot of cases for funky shaped things like a v-berth) and then calculate the volume by multiplying those all together.
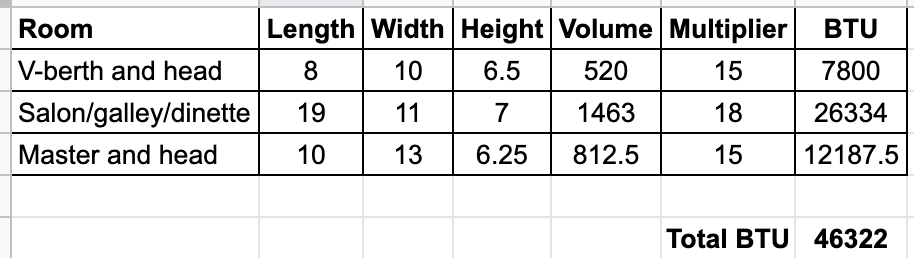
The next step is to calculate the BTU, which will ultimately give you the size or capacity of the unit/system you need for the spaces. To do this, I multiplied the volume of the room by a multiplier, and got the BTU. This is where there is a bit more art to the science.
Some vendors recommended using a multiplier of 10 for rooms, while others suggested almost 20. The average for most boats of Rendezvous age from what I could tell is 15, with spaces that are more utilized using a multiplier of 18. This assumes a few things that could change depending on your boat and location.
First, it assumes that your boat is not insulated that much. Mine has insulation in the walls in everything from the deck upwards, but in many places, it is uninsulated, such as the engine room walls and hull. If you had a different brand of boat, say one built for crossing oceans or for high latitude cruising, you might have better insulation, and be able to factor the multipler down. Although, if you intend on being in cold areas, you might not want to, and over design the system a bit.
Second, this assumes the cruising area that I am in - the Pacific Northwest. We get decently cold weather, sometimes dipping below freezing in the general area, but the further north you go, it gets much colder, which requires a bigger system/multiplier. If you lived in a warmer climate, and never intended on taking the boat into colder waters, you could get away with a smaller multipler and less BTUs.
In the end, I factored up the multiplier to 18 for the salon and galley area because it is my primary living space, much larger with taller ceilings, and has lots of windows to lose heat through. I wanted it to be comfortable, but I also knew it was leaky and prone to lose more heat.
This resulted in a number of 46,322 BTU. That's perfect, because most of the systems I was looking at were about 50,000 BTU. This was several times larger than the Webasto or Wallas, and is a good reason to make sure when you have a system installed, or install it yourself, that you have an appropriate sized unit installed.
You will also want to factor in any other heat loads that the system will be responsible for such as instant or "tankless" hot water, engine coolant heating loops, and the like. Those can add even more requirements to your design if you intend on using them simultaneously all the time. For my setup, while I intended on using hot water a lot, I felt like a 50,000 BTU unit would provide more than enough capacity to heat the whole boat while also running that piece.
What Brand to Choose?
Before choosing a hydronic system, I did months of research, participated in training programs, worked with local installers, and designed a system using each major manufacturer just to see how things would work out. I looked at a number of vendors including ITR, Webasto, Olympia, Kabola, Wallas, and some less known ones as well.
Wallas didn't make a system big enough, and it was forced air, which I wanted to get away from. Olympia and Kabola are very popular on larger boats because they are residential boilers and tend to last a lot longer. The smallest unit from Olympia would have been over 200 pounds, and required a huge amount of space, and an enormous amount of power, and even though this is what Sure Marine recommended for a live aboard, I just couldn't justify the space or power. Kabola is very popular as well, but after repeated attempts to engage the one guy in the US who sells them, I decided that I did not want to have a critical system supported by that small of a company.
Ultimately that led to two finalists: ITR's Hurricane series, and the old venerable Webasto units from Sure Marine.
Webasto 2010S
Sure Marine has sold Webasto setups for many years and has an excellent website and resources available. They also have a list of heater kits that you can start with which have all of the components you'll need for an install.
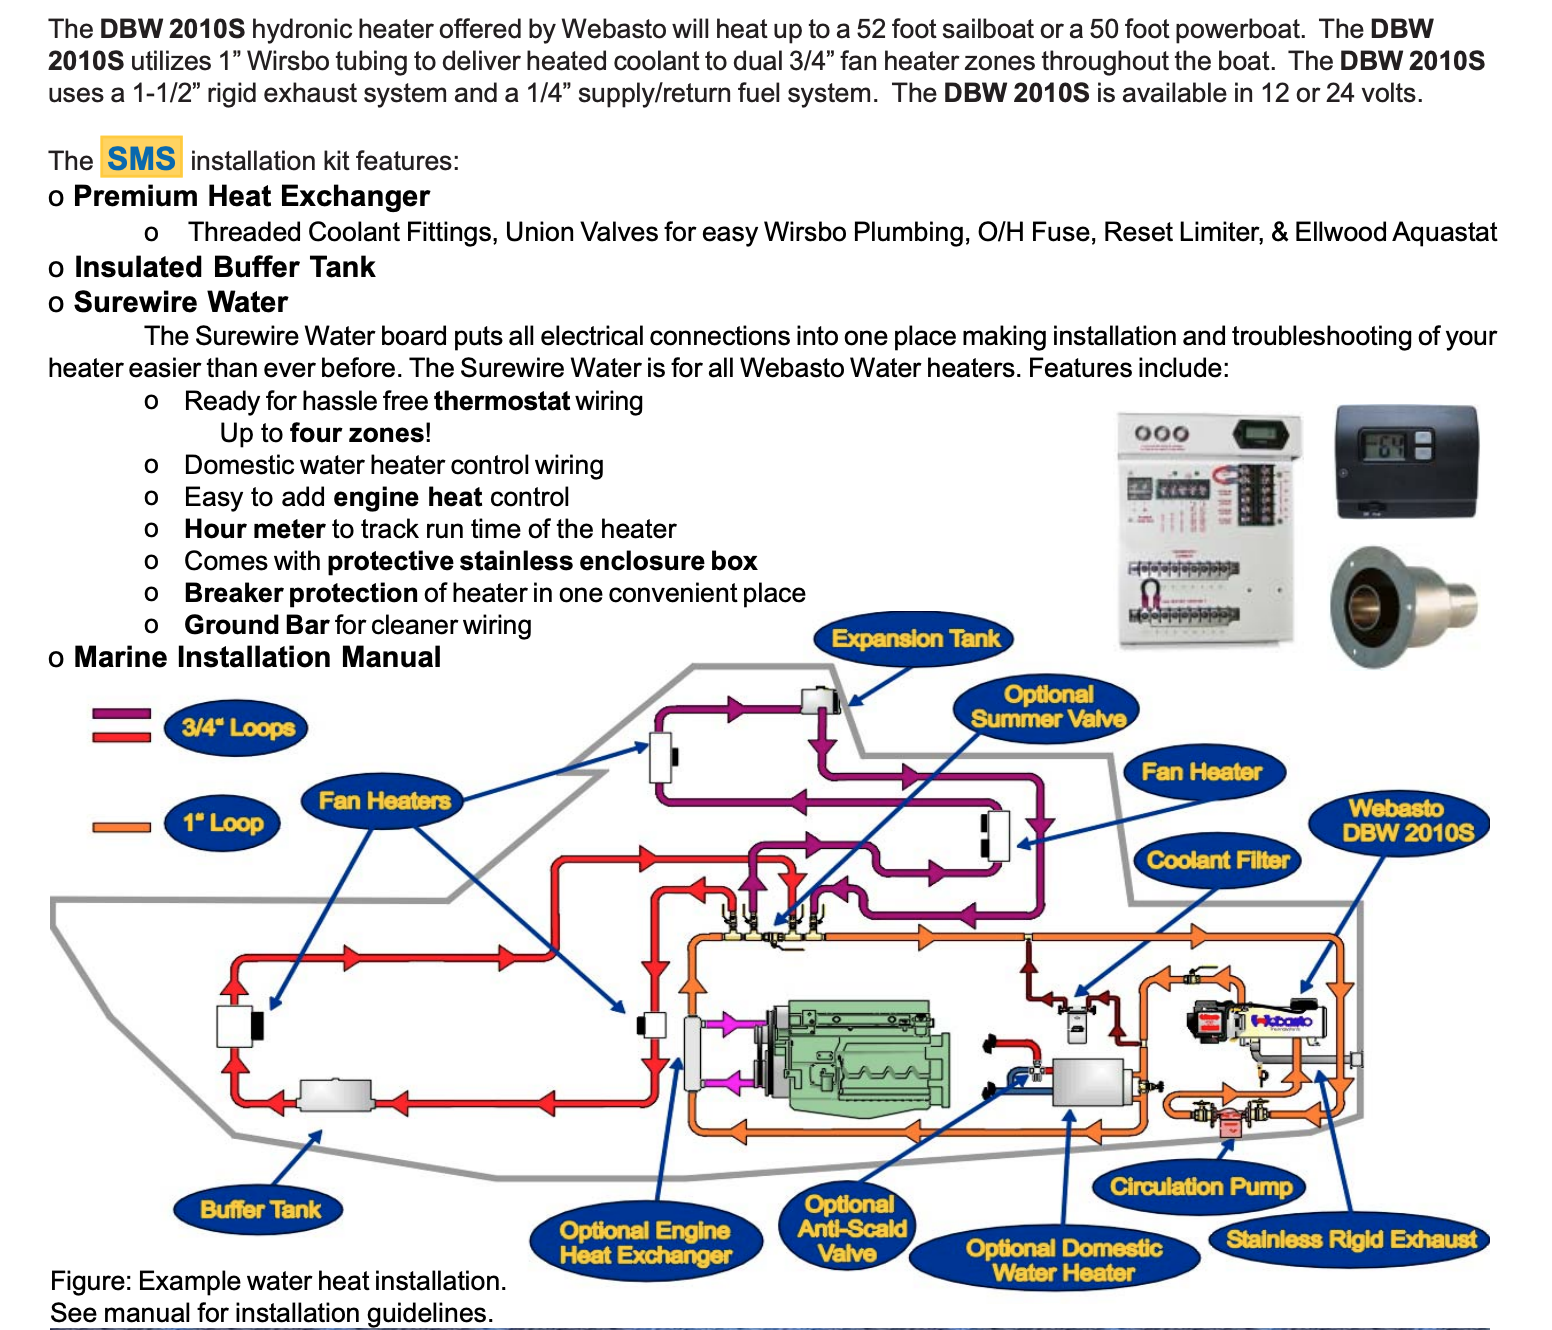
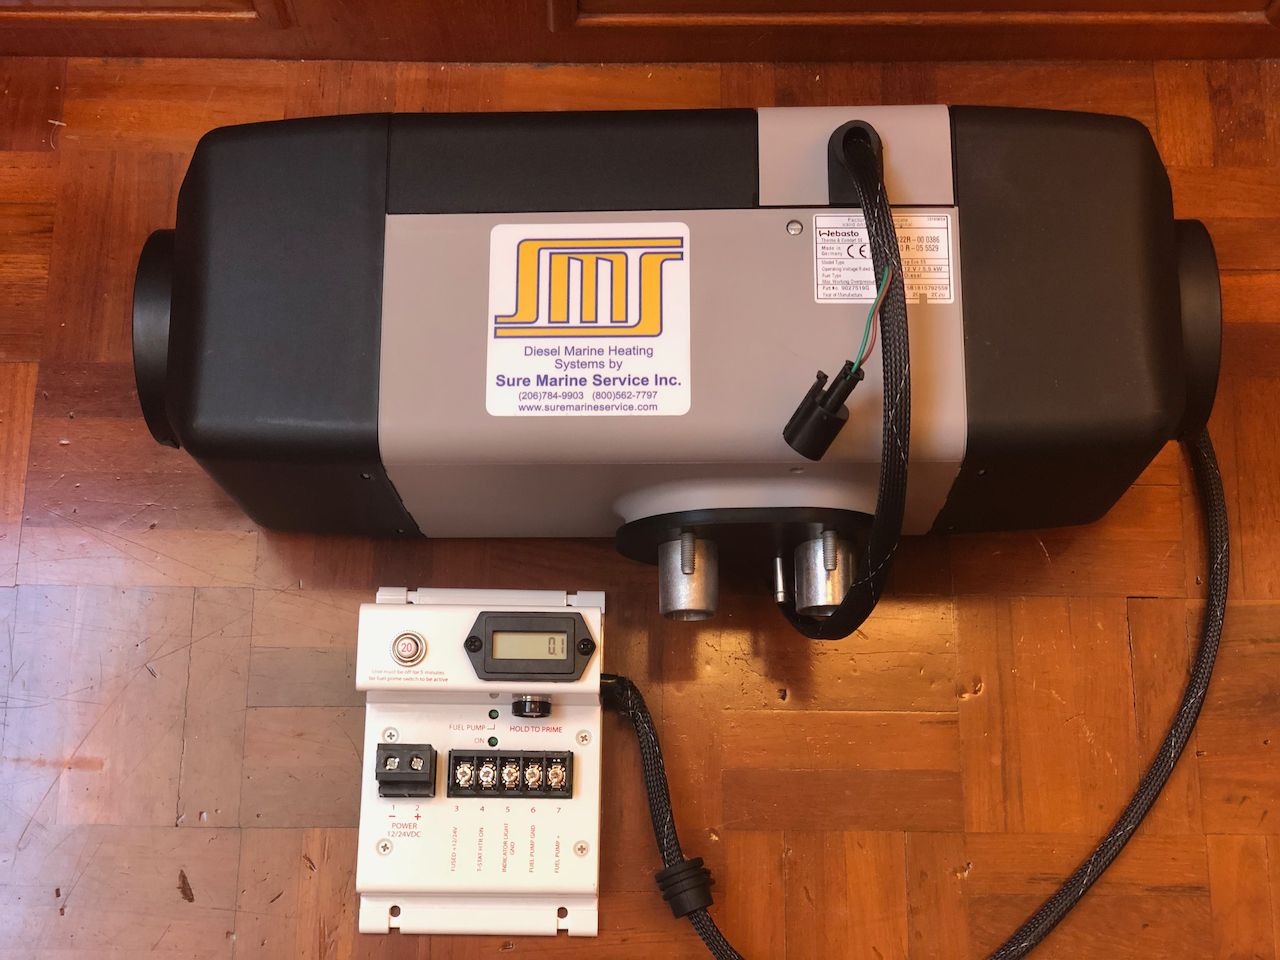
The system that made the most sense for my setup was the Webasto 2010S model, which was listed as a 50,000 BTU unit. This was a pretty traditional system that had been around for over 20 years. A big diesel boiler (the 2010S), AC or DC circulation pump, loops to various places, a loop to your water heater, expansion and buffer tanks, and a few other things.
I had a similar system on a previous boat 15 years ago, and actually did an install of a very similar system another boat I owned. So I knew what I was getting into, and some of the pros/cons of the system.
In general, these systems can be very reliable, modular, and provide a very good result. However, they are older in design, and have some issues I wanted to avoid.
Hot water - I wanted this system to provide near instant hot water while it was on. This was something I would use not just in the winter, but at anchor year round. Doing this would require an additional tank and piping, adding about $1500, as well as some complexity.
Components & Space - these systems have a lot of bits and pieces, and that can be a challenge on a boat the size of Rendezvous - mainly, finding space for all of them. They include a circulation pump, expansion and buffer tanks, manifolds for various loops so you can disable the heating loop for summer, and more. The biggest challenge that I couldn't overcome easily was the expansion tank, which has to be a certain height above everything else, and was at a loss where to put it without major surgery.
Noise / Exhaust - Webasto units are not known to be quiet. Their exhaust also gets extremely hot, and you have to make sure you have a good exhaust path. I wanted to try to find something quieter and more efficient.
DC/AC circulation pump - Sure absolutely insisted on an AC circulation pump if the system was going to be used for lots of hours throughout the year. They said that DC circulation pumps wear out far faster, and as a result need to be replaced more often. In several cases it was hinted that they wouldn't support or sell a DC pump for an installation that was being used constantly. The issue I had was that the AC pump they recommended required 80 watts of AC power pretty much continuously while the loop is on, which translates to about 7.75 amps of DC battery power all the time.
Power - the 2010 does eat quite a bit of power, and combine that with the circulation pump above, and you may have issues running things continually.
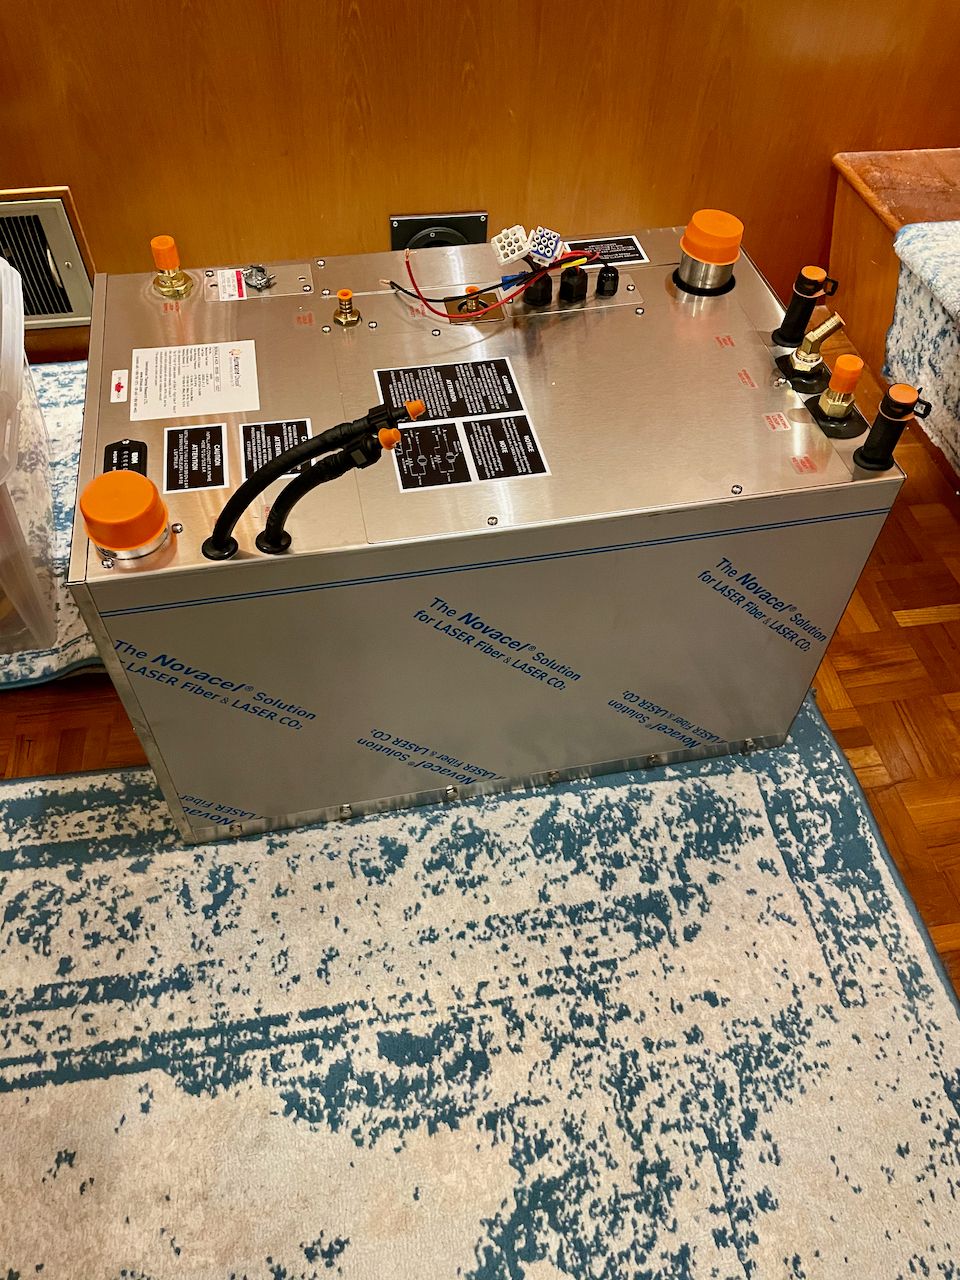
ITR Hurricane Chinook
The other system that I was very interested in was the ITR Hurricane Chinook. ITR has had the Hurricane series out for at least 15 years, and has made various different models with different features. I had worked on a number of boats with the Hurricane 2 and Hurricane 2L units, and the majority of folks seemed to love them for their reliability & quiet operation.
However, there were quite a few vocal folks who hated their Hurricanes. What I found was that in almost all cases, the people who had units they hated had some part of the install that wasn't quite right. I visited a few of them in person, and having spent a lot of time with install techs working on Hurricane, could see the biggest flaw with most of them was the exhaust routing and length. If you exceed the recommendations from ITR, the unit will simply not function reliably. Several boats I visited had exhausts in excess of this length, and had issues with flame outs and parts of things getting dirtier or more worn out than others.
Webasto units appear to be quite a bit more forgiving with their installation requirements. While they will still have burner issues, they just seem to go through those parts faster, whereas the Hurricane units will just shut down.
What I loved about the ITR units was their more modern approach to the way the burn chamber and system worked. From their website, they say "built on a low-pressure burner platform: a patented technology that offers a safe, quiet, 'no-smoke, no-smell,' diesel burner that improves efficiency while lowering system maintenance cycles."
I had been around enough of these units to know this was true - very quiet, lower temperature, smokeless burns.
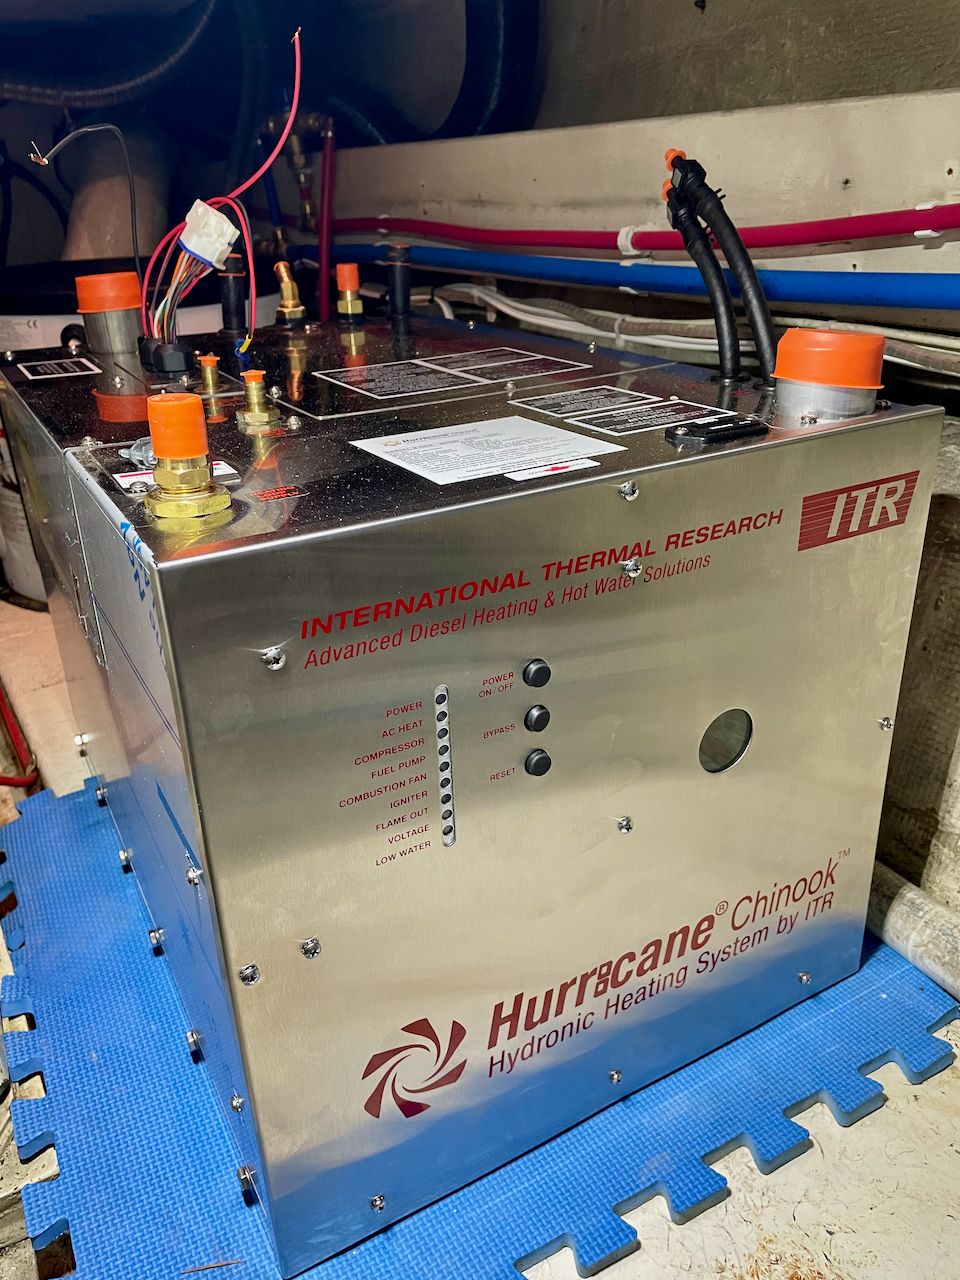
The Chinook was even more interesting to me because it was an all-in-one unit that provided 50,000 BTU of heating capacity, had a built-in on-demand hot water system, and had simple maintenance via the front panel. No external pumps, tanks, or other things were required, which simplified the installation greatly. It also had loops to pre-heat your engine, a touch screen control panel, and had 5 zones for the various loops.
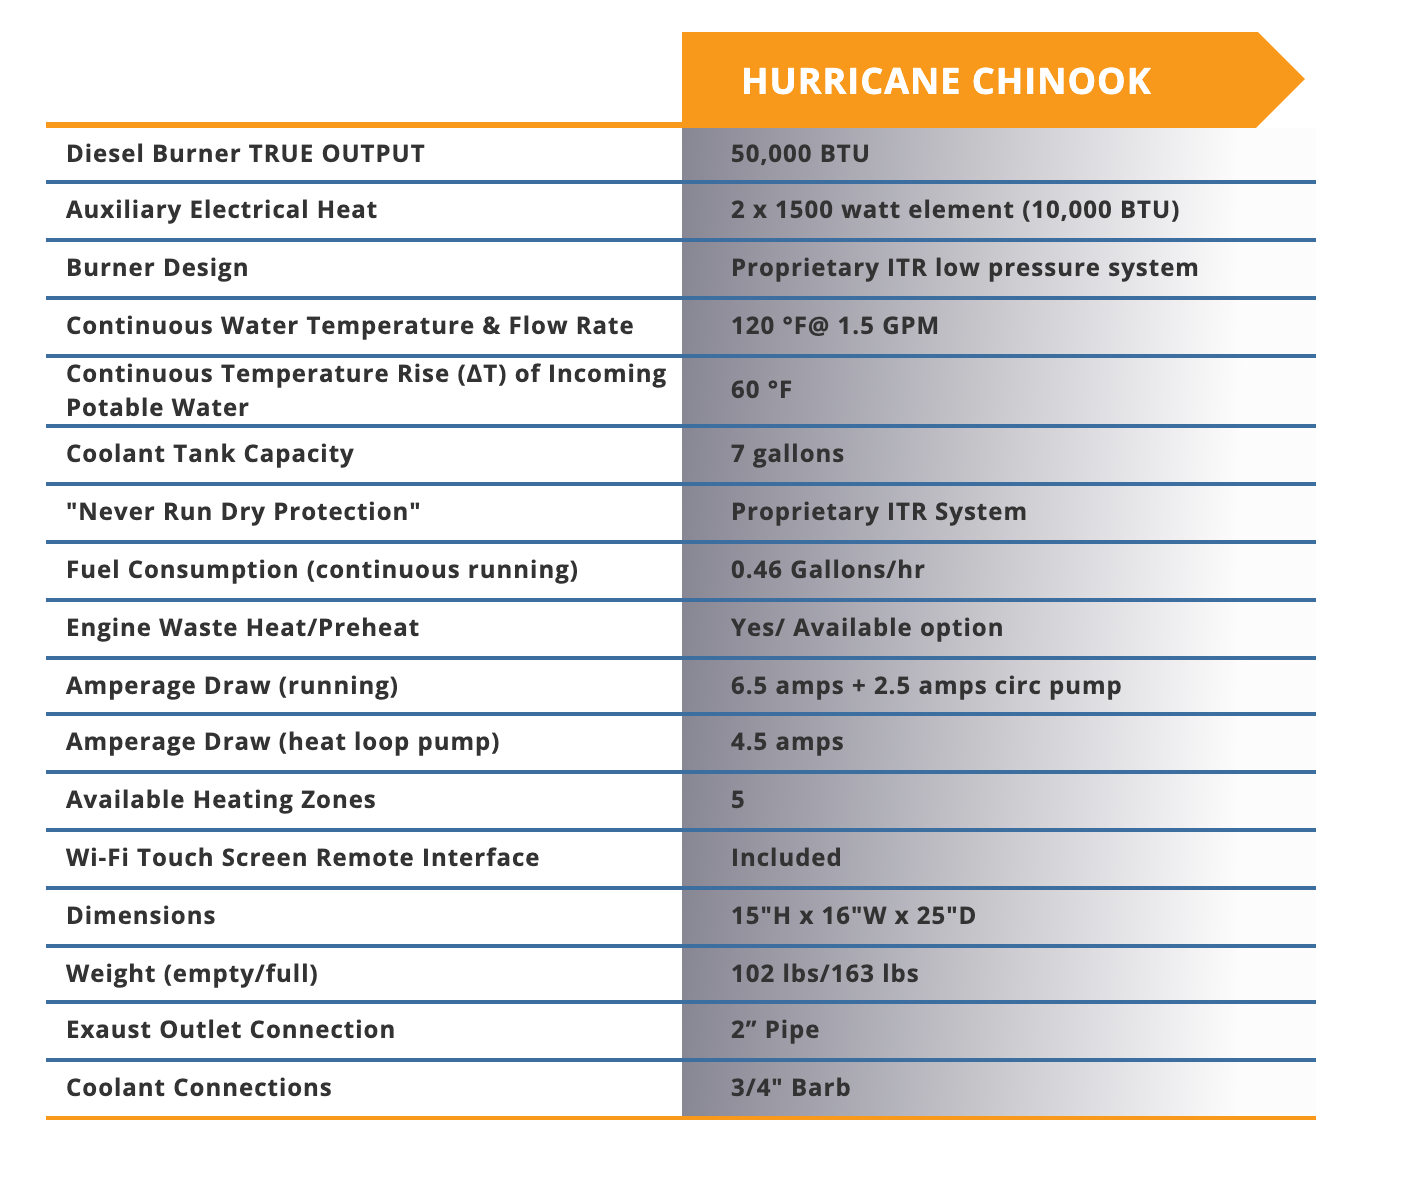
The Chinook also had a much lower power consumption, even when it was running fully, and had two AC elements you could use to supplement heating while on dock power.
This seemed like the best solution for my needs based on the fact that it was essentially self contained, more modern, quieter, lower temperature burns, and had on demand hot water built in.
The key was making sure I could install it in the space I had, ensure the exhaust run was as short as needed, and that I wasn't being sucked into the "all in one" system that could end up having more problems than a component one.
Fan Units
One of the other things to consider is what fan units to use with the hydronic system. In most cases, people have chosen the REAL units that Sure Marine is famous for, and I was already going down that road as well with my design. They have so many options, sizes, and types, that it makes it easy to get lost in the configuration details.
After doing some research in forums and talking with 10 different owners of Hurricane and Webasto systems, I found that almost everyone agreed that the ITR fan heaters were far more efficient at delivering their rated BTU, and the REAL units were less efficient and in many cases more noisy.
This data came from several owners who replaced REAL fan units with ITR units, and found that they ran less and heated areas up much faster, and were more quiet in the long run. There was also one owner who replaced ITR units with REAL units, and noticed the decrease in heating output.
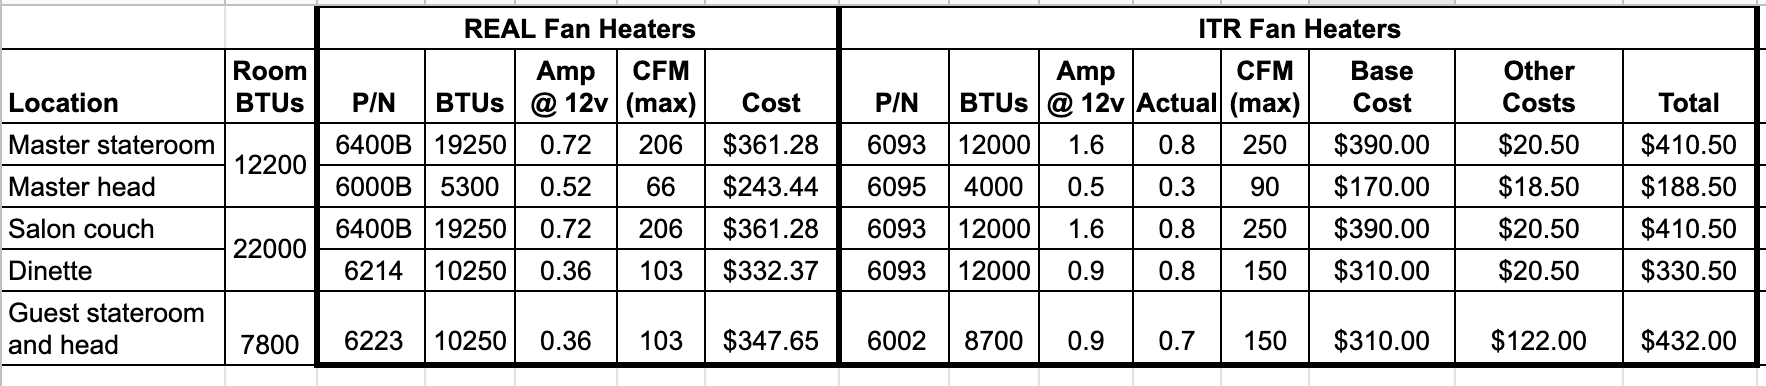
I went as far as creating a comparison spreadsheet for two reasons. First, I noticed that the CFM or amount of air that each unit moved was quite a bit different between the REAL and ITR units, with the ITR units generally having around 45-50 CFM more. I also wanted to calculate the total amperage needed for all fan heaters if they were running at the same time. This is an important calculation to include - the amperage used by the boiler/heater and circulation pump will be the largest in the system, but your fan heaters will also consume amp hours.
You'll notice that for the REAL fan heaters, there is an "Amp @ 12v" column - this is based on their spec sheet. For the ITR fan heaters, you'll see the same column, which is from their spec sheet, and then "Actual" which is what I recorded while running the fan heaters in a real situation and taking readings using a multimeter. The larger ITR fan heaters are similar in usage to the REAL ones, while the smaller ones take more amperage. Keep in mind this is with the fan heaters on high speed, which I rarely use. I almost always have them running on 50% speed which drops the amperage even more.
Design
After months of quotes, designs, discussions, and visits, I ended up moving forwards with a design around the ITR Hurricane Chinook. Now came the part I like the most - designing the specific parts of the system & the layout.
I spent even more time validating my design with existing customers, other experts in this field, but in particular with Marcello Velenosi at ITR directly. Marcello was a wealth of information, and put up with many emails, diagrams, and questions from me about the system, design, and setup. I highly recommend ITR because of how friendly and helpful Marcello and the rest of the crew there are.
The Loop
One of the interesting things with the Chinook is that in most cases, a single physical hydronic loop is the best setup. You can use additional loops, but you will need external pumps at that point, and a manifold and other bits of equipment. For the size of boat and length of hose I was planning to use, a single loop would work just fine, which in my mind, also simplifies the design.
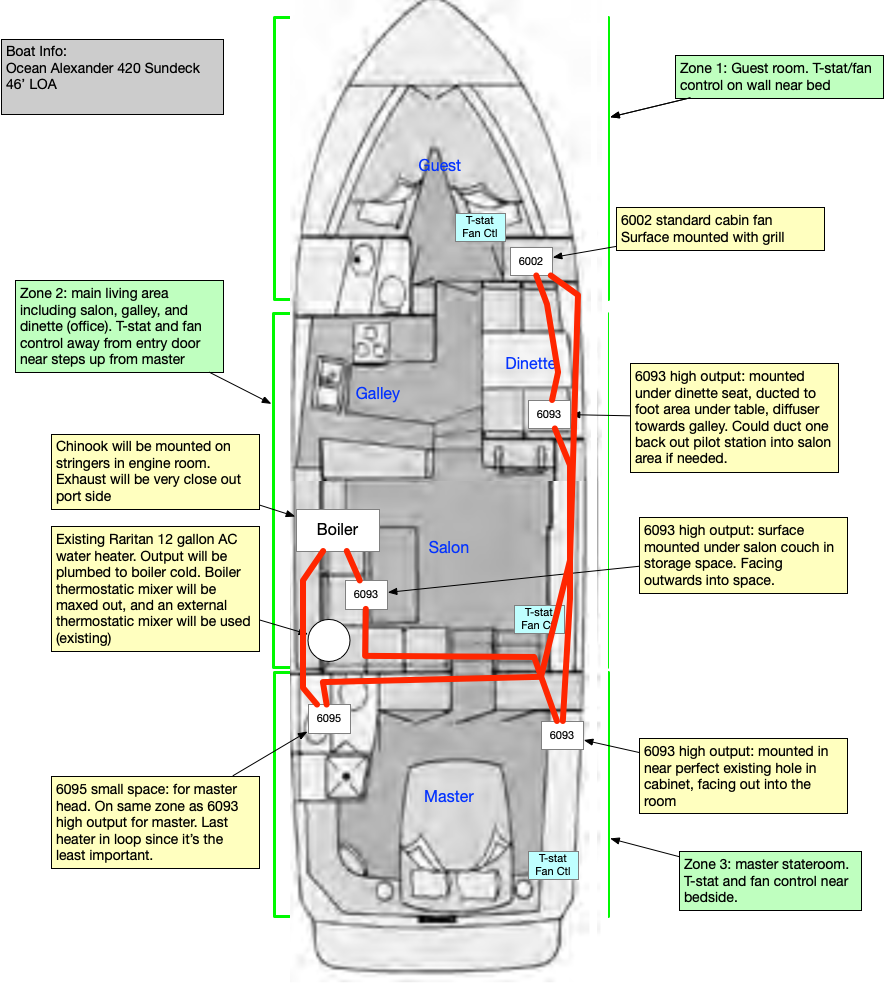
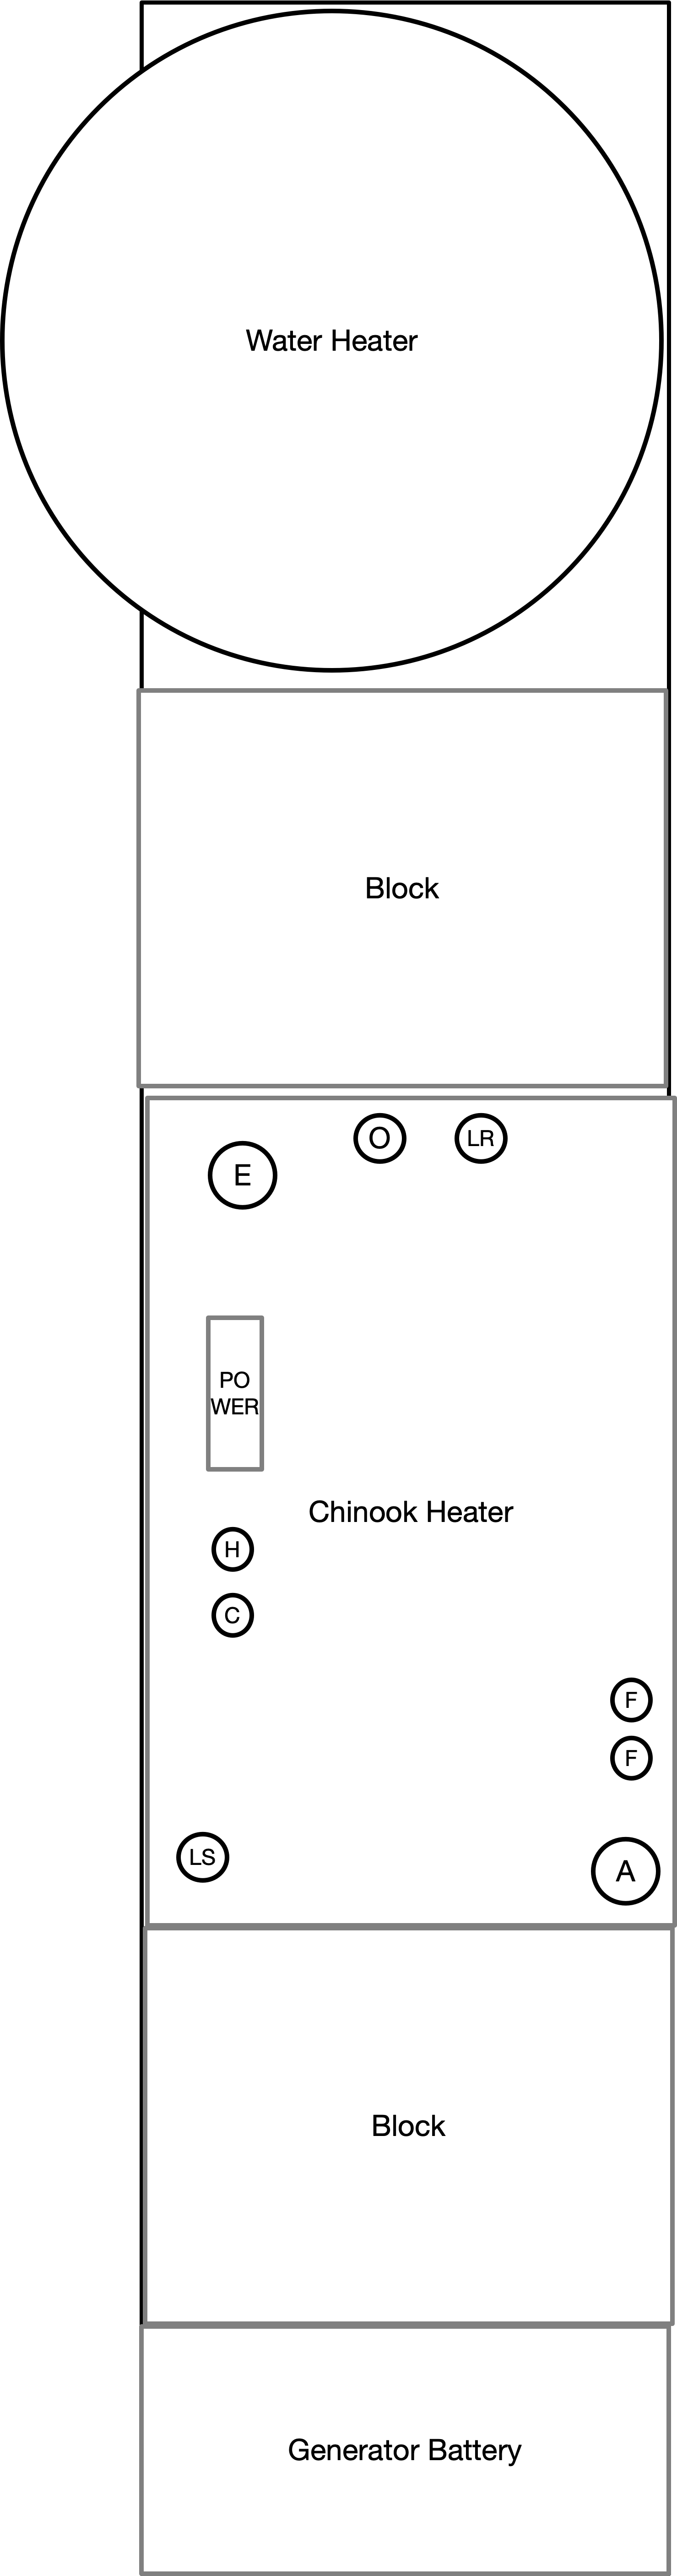
You can see from the above diagram that I have the loop start at the heater (labeled boiler) and go to a fan heater directly above it in the salon. I did this on purpose, as it is the most used space, and makes sense to have the loop go here first, as it's going to be hotter and also quick to start heating when starting from cold. It then goes into the master stateroom, then up to the dinette, v-berth, and then all the way back to the master head, and then back to the boiler.
Zones
I decided to have 3 zones - the salon, which included the salon fan heater and dinette, the master stateroom, which included the master stateroom fan heater and master head fan heater, and the v-berth, with it's own fan heater. Each zone had a thermostat placed somewhere central, and allowed for more granular control than the forced air system from before.
It is also critical to calculate the number of fan heaters and their expected amperage for each zone and loop. The Chinook has more amperage available on zone 1 than the other zones, so connecting the bigger fan heaters to that zone is important. If you exceed these amperages, the unit will shut down or not function correctly. If you have zones that require more than the system can provide, you can use a relay and higher amperage setup, similar to older style hydronic installs.
I put my biggest draw fan heater zone, two large 12,000 BTU heaters for the salon and dinette, on zone 1.
Fresh Water
One of the benefits of this system is to be able to have hot water at any time it is running. However, I wanted to retain my existing AC powered 11 gallon Raritan water heater, mainly because I had replaced it only about a year ago, but also as a backup in case the heater was down for maintenance.
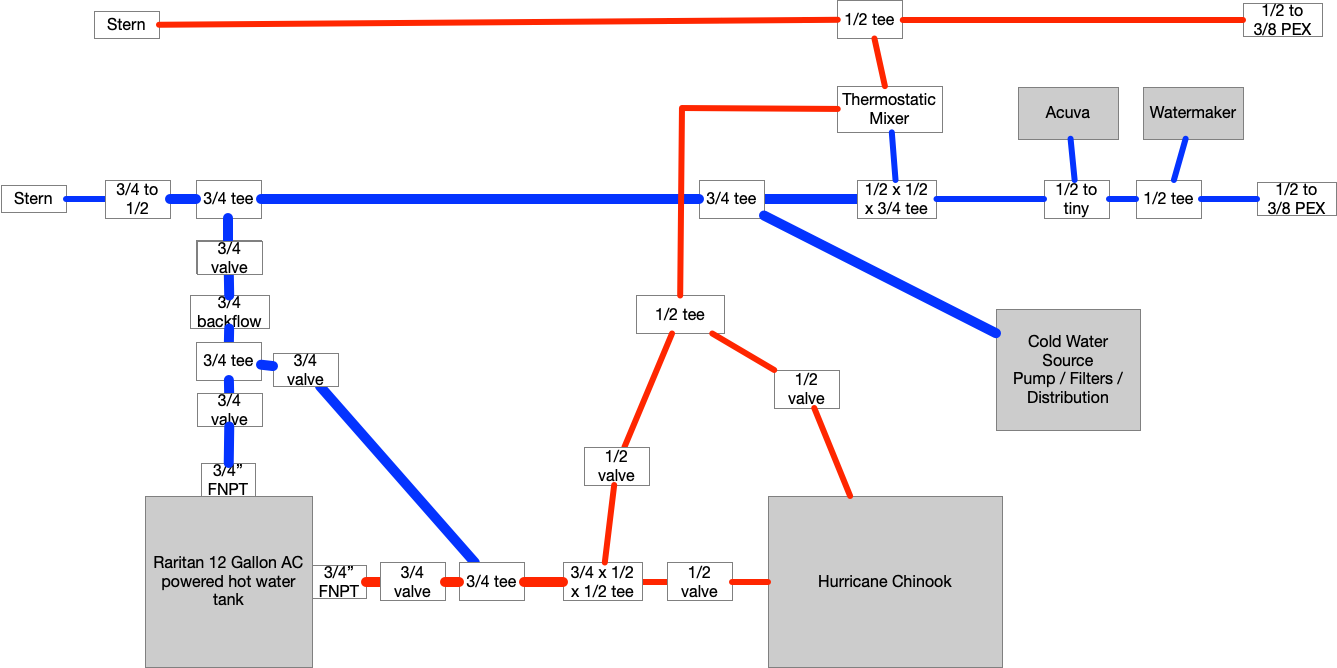
This required a bit of thought as to how I could plumb the fresh water system through the existing hot water heater, and into the Hurricane Chinook, while getting the benefits of both. Part of the challenge is that the Chinook has a thermostatic mixer inside of it that is designed to regulate the max temp of the hot water to prevent scalding. By having a source of hot water downstream of it (the Raritan hot water tank) it could cause some crazy behavior when it comes to the thermostatic mixer.
Thankfully, Jon Fitch, a helpful boater who had the predecessor unit to the Chinook, the Zephyr, saw some of my comments about this and contacted me via email. He provided information on how to bypass the mixer, and what he did to make his system work correctly.
The diagram above shows the design I came up with that allows me to have the benefits of both systems while being able to isolate either one using a series of valves.
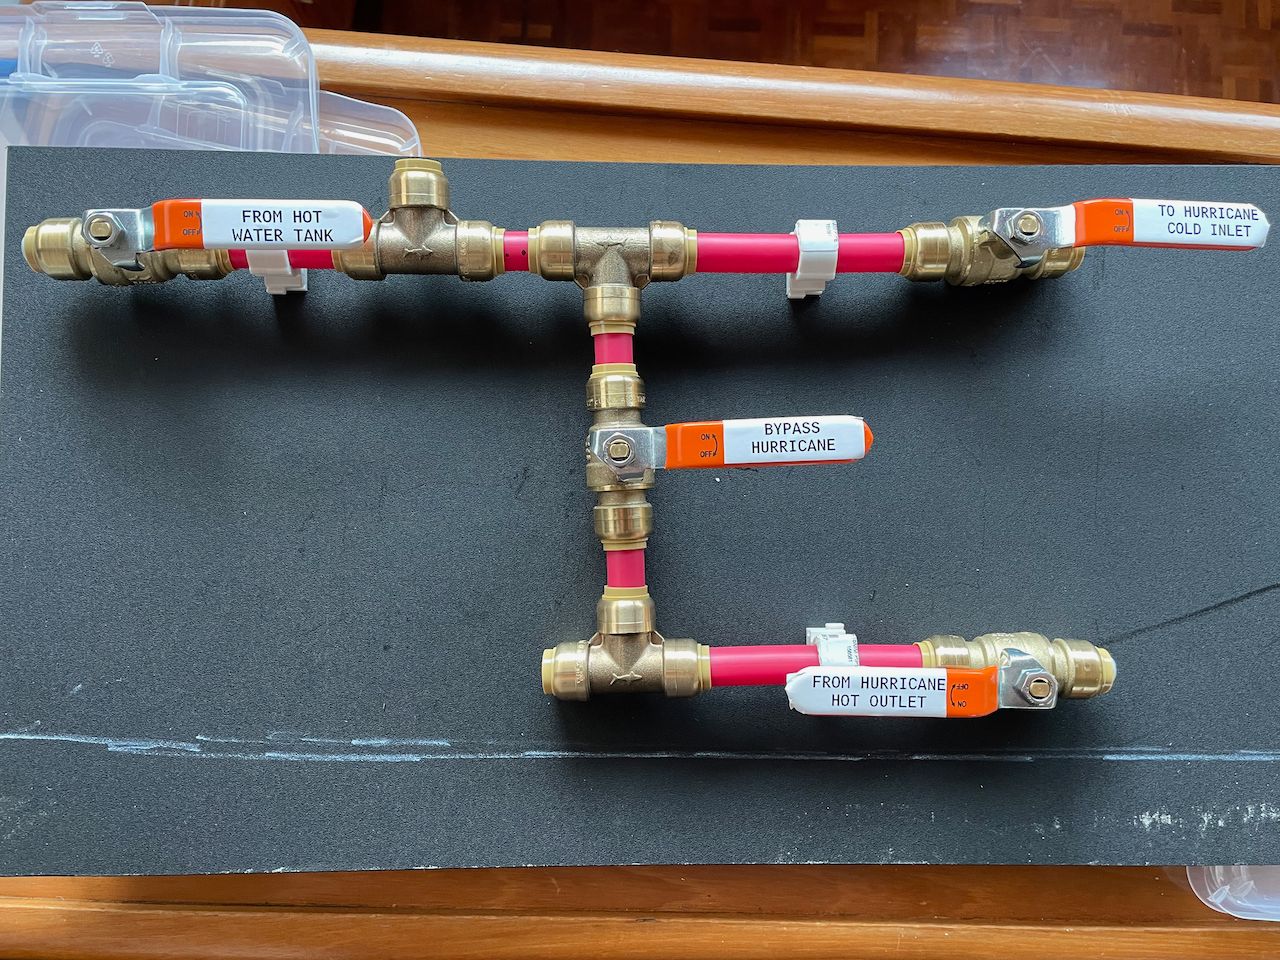
I created this valve system prior to ordering the Chinook since I was already in the middle of redoing my fresh water system.
Exhaust
The exhaust is one of the most important systems in any hydronic heater, and especially with Hurricane units. I went through many iterations of my design looking for the right spot based on the length of the exhaust. I could go from the unit itself right up into a void in the side of the engine room and out the hull. Other places were too far away, or had the exhaust in areas where I would have to navigate around it during normal engine room checks.
Piping / Hoses / Clamps
This was another interesting area to explore in the design. Many of the newer systems use PEX piping which is very easy to manage and use. However, everyone recommended insulating it when going through colder spaces such as engine rooms and near vents. My initial thoughts were to not use PEX because the piping wasn't insulated. If the point of the system is to create a loop of hot liquid, why would you use something that isn't insulated at all throughout the boat?
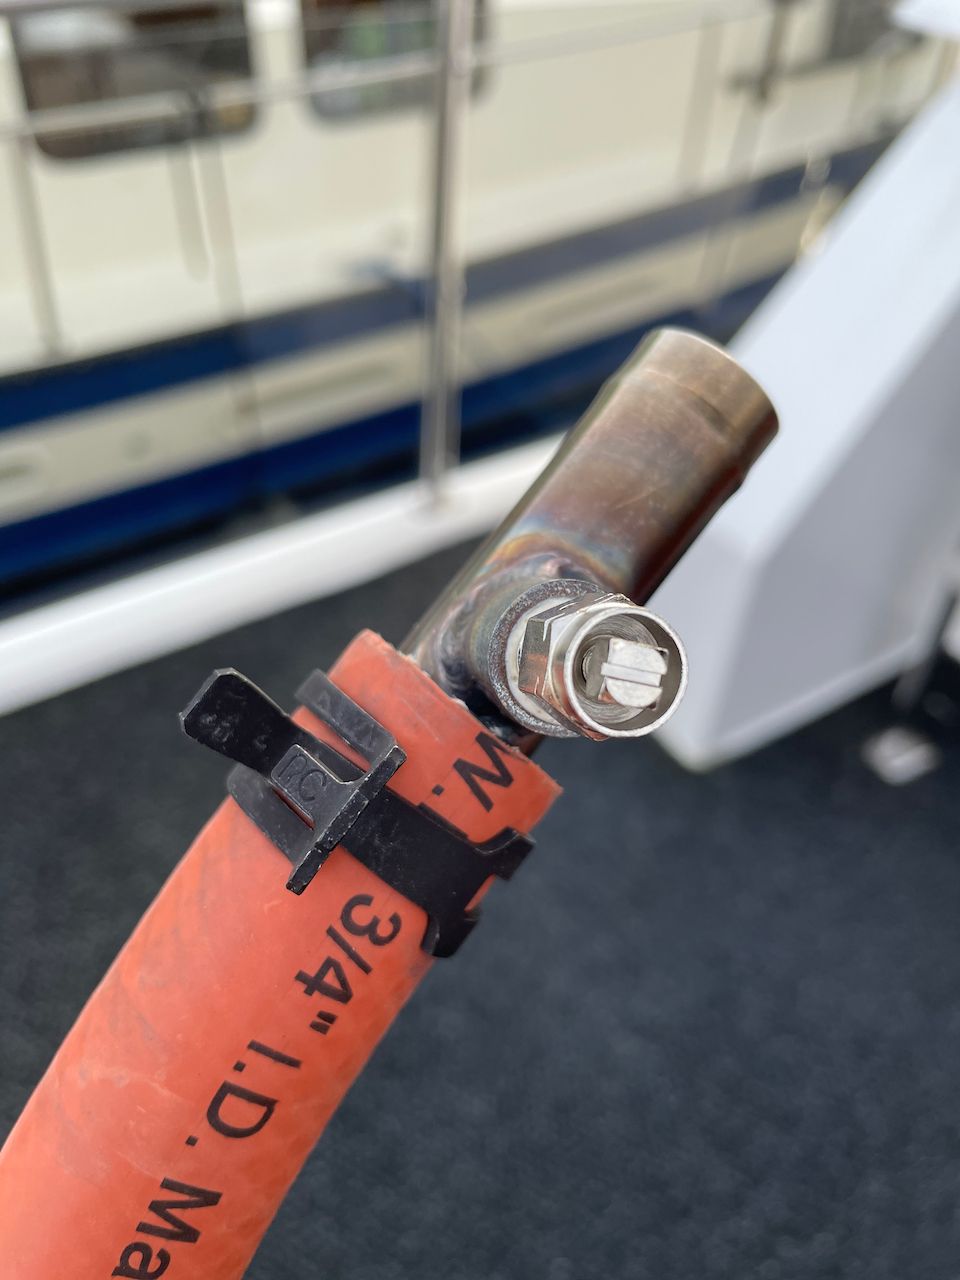
Many people recommended traditional heating hose which is quite thick and has its own insulating properties, is pretty easy to snake through locations, easily cut to length, and very robust against chafing and the like. The downside is that it is quite heavy, and you can't bend it at sharp angles or you'll pinch the flow. I chose to use hose for my installation.
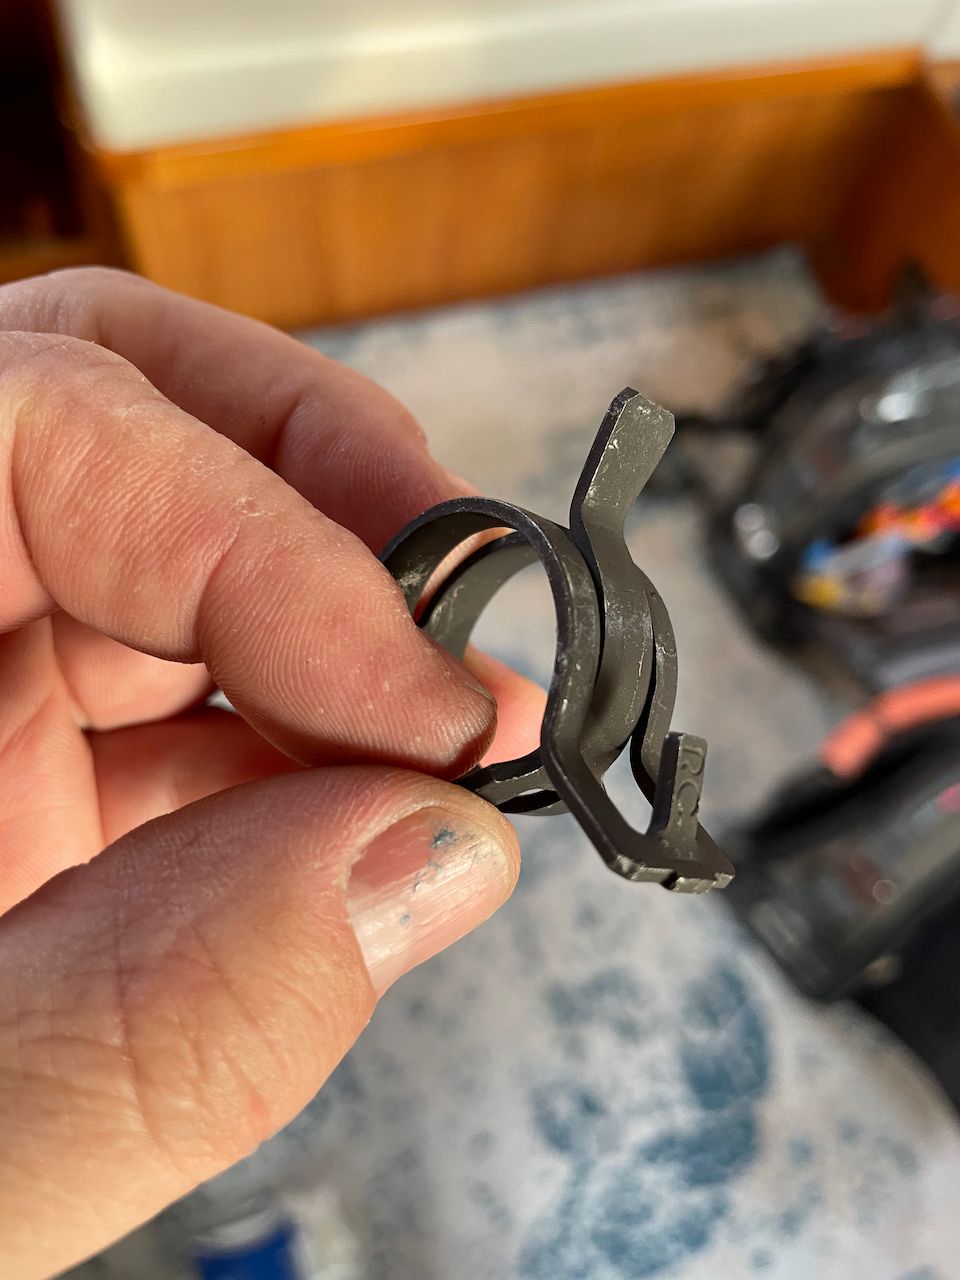
The other tech to choose here is how the hoses are attached to the heater and fan heaters. Many people use standard worm-drive style hose clamps, but almost every tech and vendor steered me away from those and to these beefy steel clamps. Because they are like springs, and are extremely tight, they will flex with the hose as it gets hot while the system is on, and cold when it is off. This prevents leaks, which are very common with a standard hose clamp which has a fixed tension.
Ordering
Once I had my design fine tuned thanks to the folks at ITR, I ordered everything heater related from them, and all of my wiring and hardware from Fisheries Supply here in Seattle. ITR has offices in a suburb of Vancouver, Canada, and US offices near Vancouver, WA. Within about 2 weeks, a pallet was on the way.
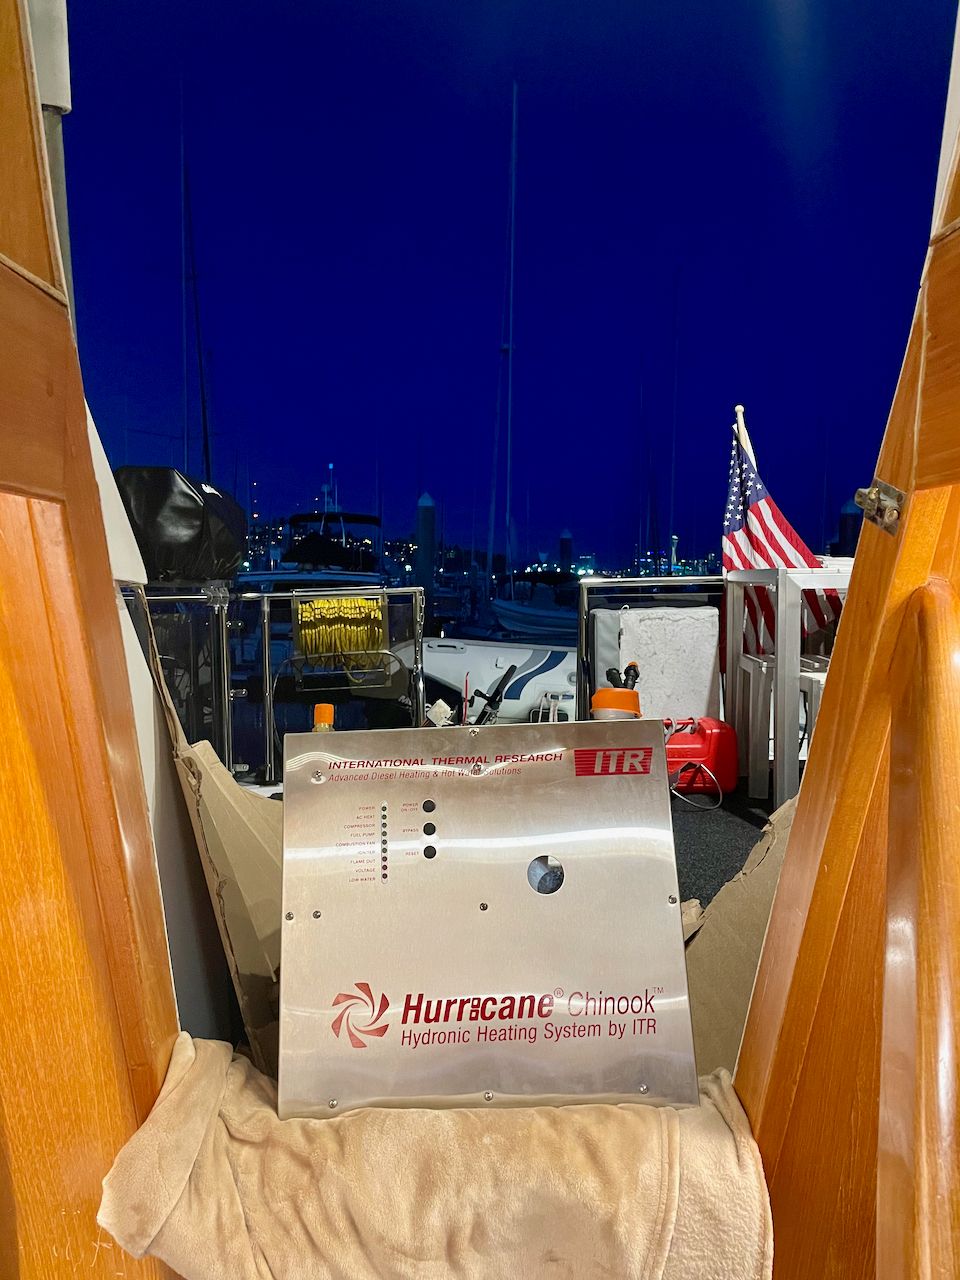
This is one caution if you do decide to do this install yourself - the heater is quite heavy, as is the hose, and all will be packaged on a pallet. This means you may have to deal with a non-standard shipping company that does not have lift gate trucks, or has issues delivering to marinas. I had mine delivered to home, and broke down the pallet on the sidewalk.
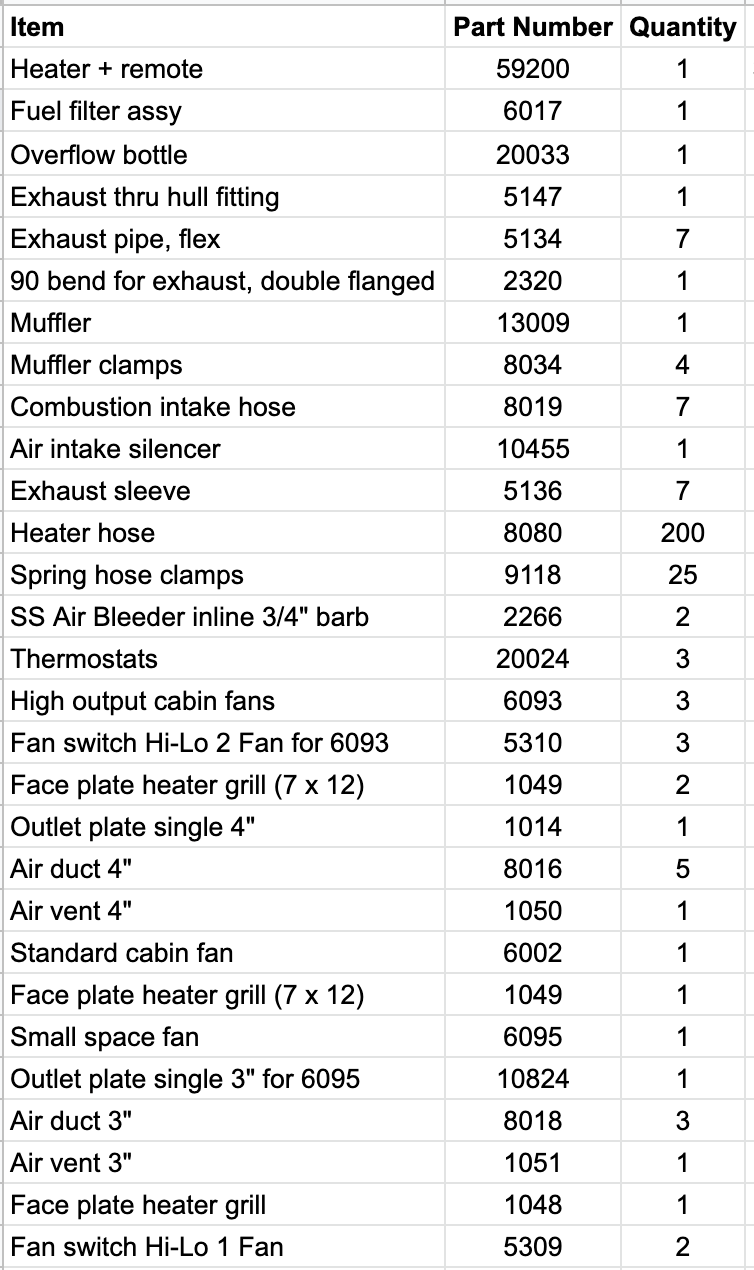
I ended up spending about $9500 for the heater components, and about $500 on other supplies including wire, brackets, screws, and exhaust blankets. That made the total around $10,000.
As a comparison for hiring someone to do this install, I was given quotes ranging from $15,000 up to $28,000 based on the system (ITR, Webasto, etc.) and complexity.
It's important to note that not all heater companies, including ITR, will sell direct to an individual. In many cases they will insist you go through an authorized installer. This is for a number of reasons, including the fact that their installers are trained and will do a better job than someone doing it for their first time, and because you will have a lot of questions or design issues that someone needs to handle. ITR were kind enough to work with me given my background, and I appreciate that greatly.
However, if you do not have a good DIY background and some knowledge of electrical and plumbing, doing this sort of install yourself is not recommended.
I did find it nearly impossible to find authorized dealers or installers that were willing to call me back. Of the 5 provided by ITR, only two returned my calls, and they weren't interested in the work. While it is hard to find quality vendors for just about anything marine related, this seemed more difficult than it should be.
Installation
Installation of a hydronic system is not for the faint of heart. This was my 3rd installation in the last 20 years on boats I've owned, and it was just as difficult as I remember, although the one-box aspect of the Chinook helped a lot. The biggest challenges were getting the main unit into the boat, and pulling the hose and wiring to the fan heater locations.
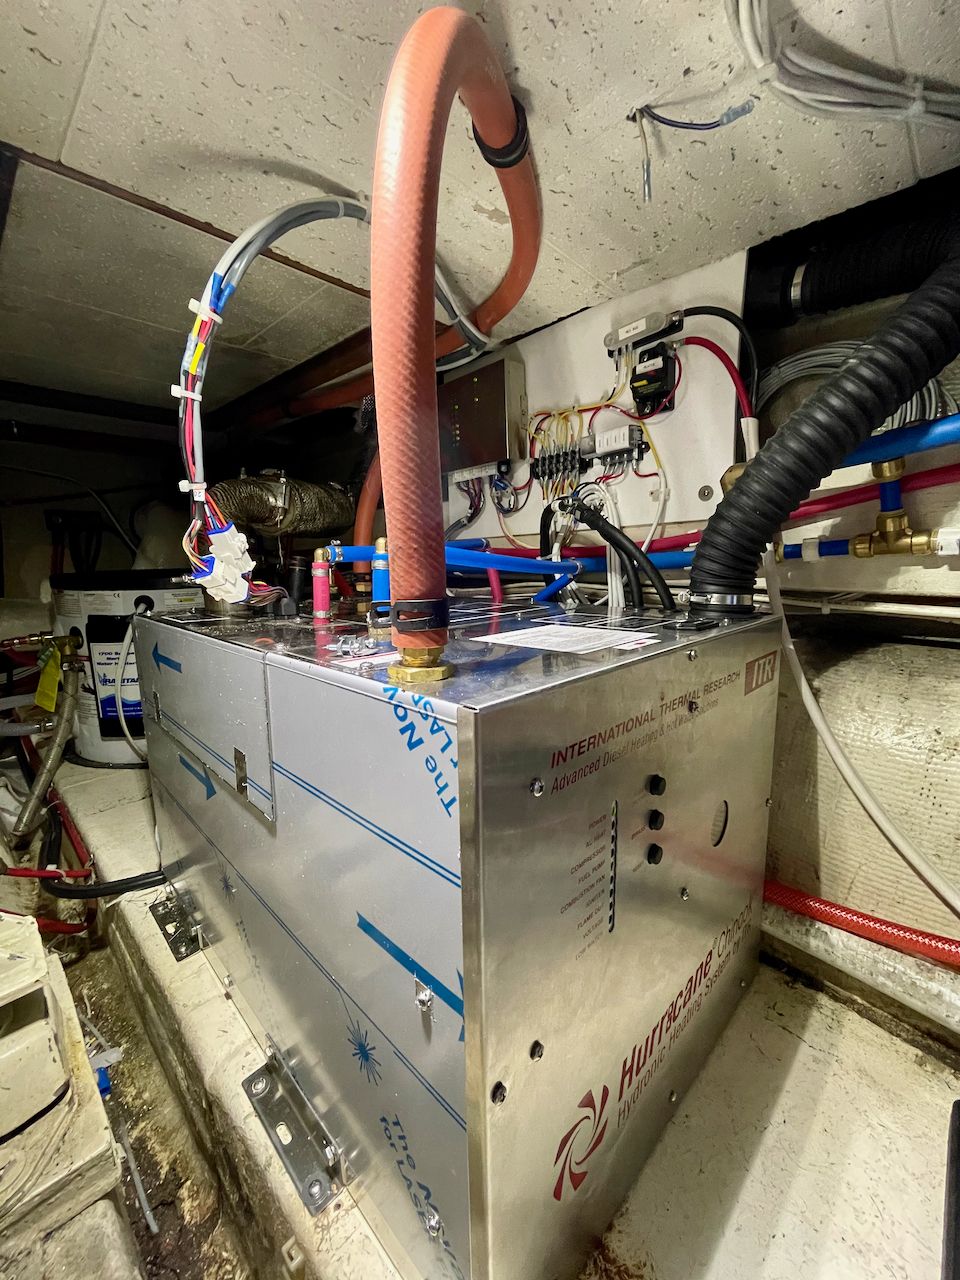
Heater Placement
The all-in-one nature of the Chinook is definitely a selling point - you don't have to have separate circulation pumps, header tanks, etc. - but it also can be a limiting factor. The unit itself is 15" high, 16" wide, and 25" deep, so it requires some planning for how you get it aboard, and where it is mounted.
I used my favorite diagramming software OmniGraffle and detailed measurements of everything to try a bunch of different layouts. The port side of my engine room, outboard of the port engine, was the best location for the heater. However, it required moving the AC water heater further astern, and eventually removing the generator battery for ease of access into the Chinook's front panel. I laid it out, along with the various connectors on the top of the heater to ensure I had clean paths.
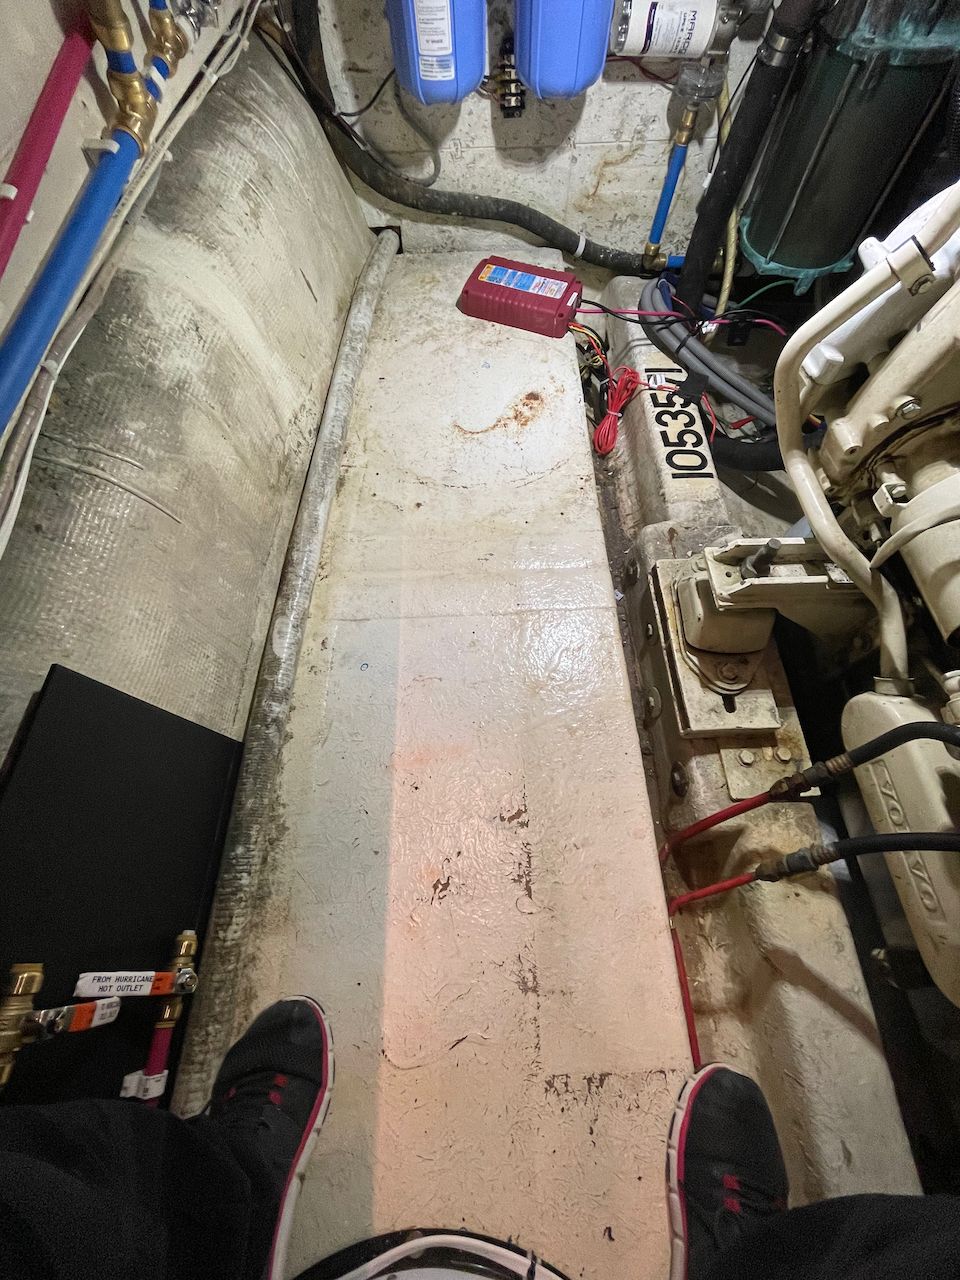
There was quite a bit of usable space for the heater, a great platform that happened to just be the right width for the heater and install brackets, and space behind and in front of it to access things.
Getting the heater aboard required two people as it weighs in at 106 pounds. I can usually manhandle an 8D battery myself, which is more than that, but those are a bit less bulky than the Chinook, and are generally going OUT of the boat, as they are being replaced with something more efficient and smaller.
The heater also has some pretty sharp corners, so care was needed around the woodwork.
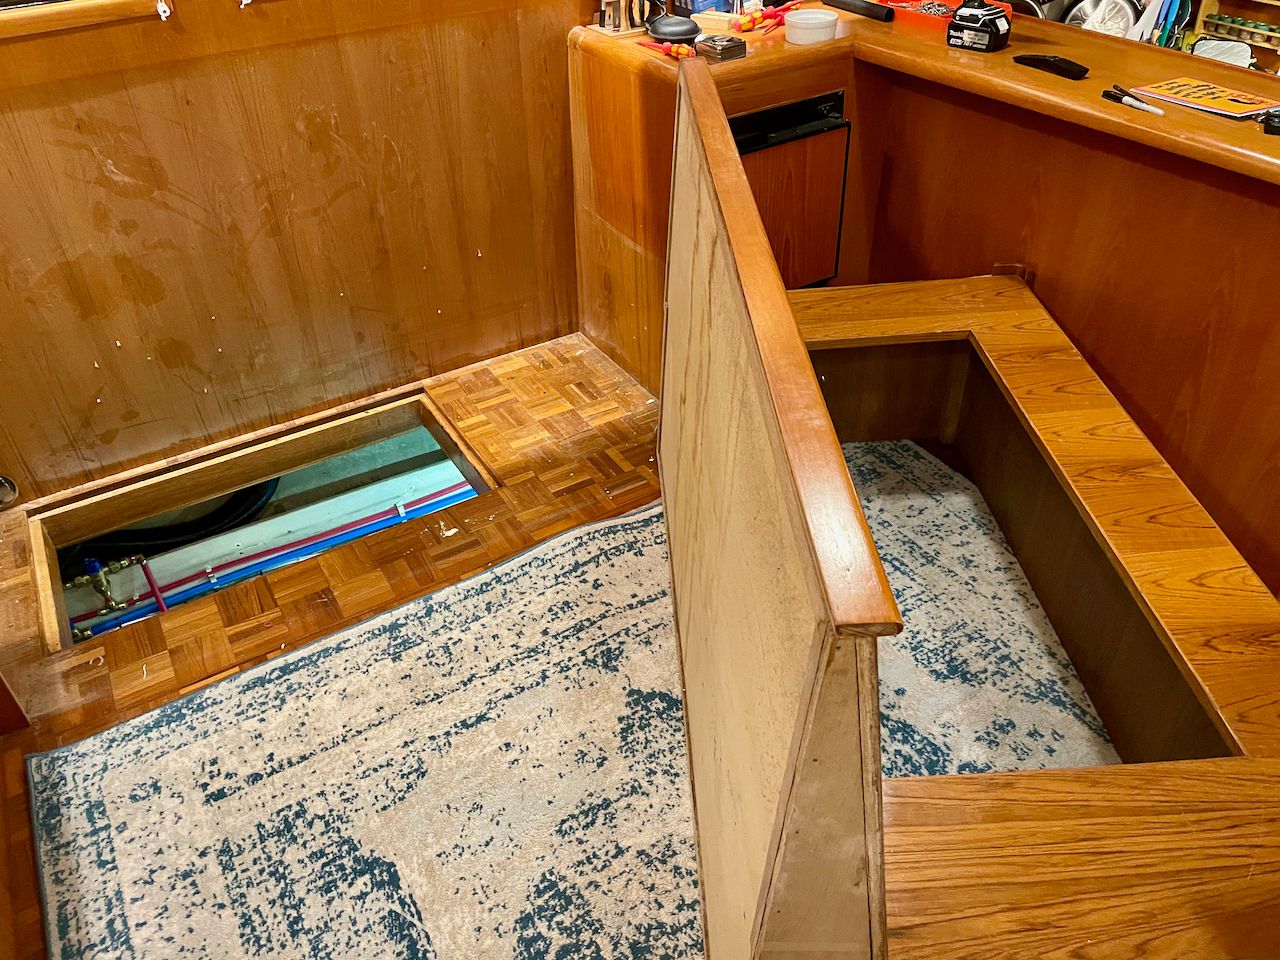
I rarely involve my husband Josh in any of my projects - he has his specialities and I have mine. However, I needed help this time around because of the weight of the heater. I also made an error when planning for the install, and realized that because of the offset nature of the salon couch hatch and access panel above, I couldn't just lower the heater down through as I had hoped. The salon couch structure would have to be removed in order to make enough room for the heater to be dropped in the hatch. This wood structure was attached to the wall with screws, and likely had not been removed since the boat was built in 1988. To say Josh was horrified seeing me remove this was an understatement, and a reminder that DIY on boats is not for everyone!
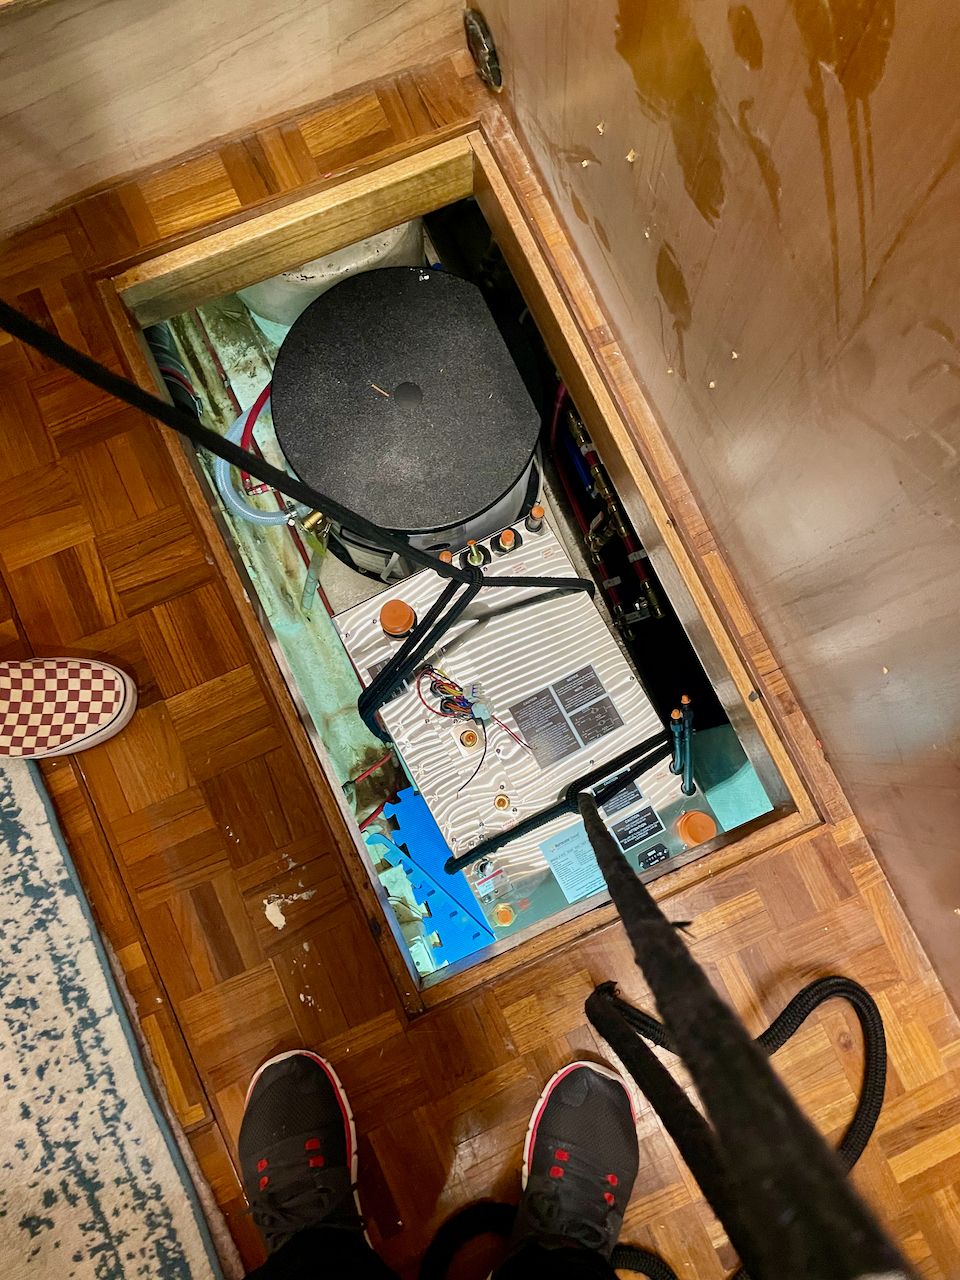
Using some lines, we lowered the unit in and forward of the existing Raritan AC water heater. The eventual resting place for the unit was about 2 feet further forwards away from the water heater.
I placed the heater on a pad to allow me to move it around while finding final positioning. In particular, I needed to find the exact perfect spot for the exhaust and air intakes. The exhaust in particular had some rigid stainless steel pieces that would dictate specific positioning.
Now it was time to move onto the exhaust system before final mounting of the heater.
Exhaust & Air Supply
The exhaust on any heater is going to be one of the biggest dictating factors for where it is installed. In my case, I was going to run the exhaust across the top of the unit, up through a void in the engine room into a space where I could have the exhaust exit the side of the boat well above the minimum height requirements.

The one downside to the Hurricane series exhausts is that they are HUGE! I needed to cut a 4" hole in the side of the boat to mount the exhaust fitting. I test fit it and then measured about 99 times before making the hole.
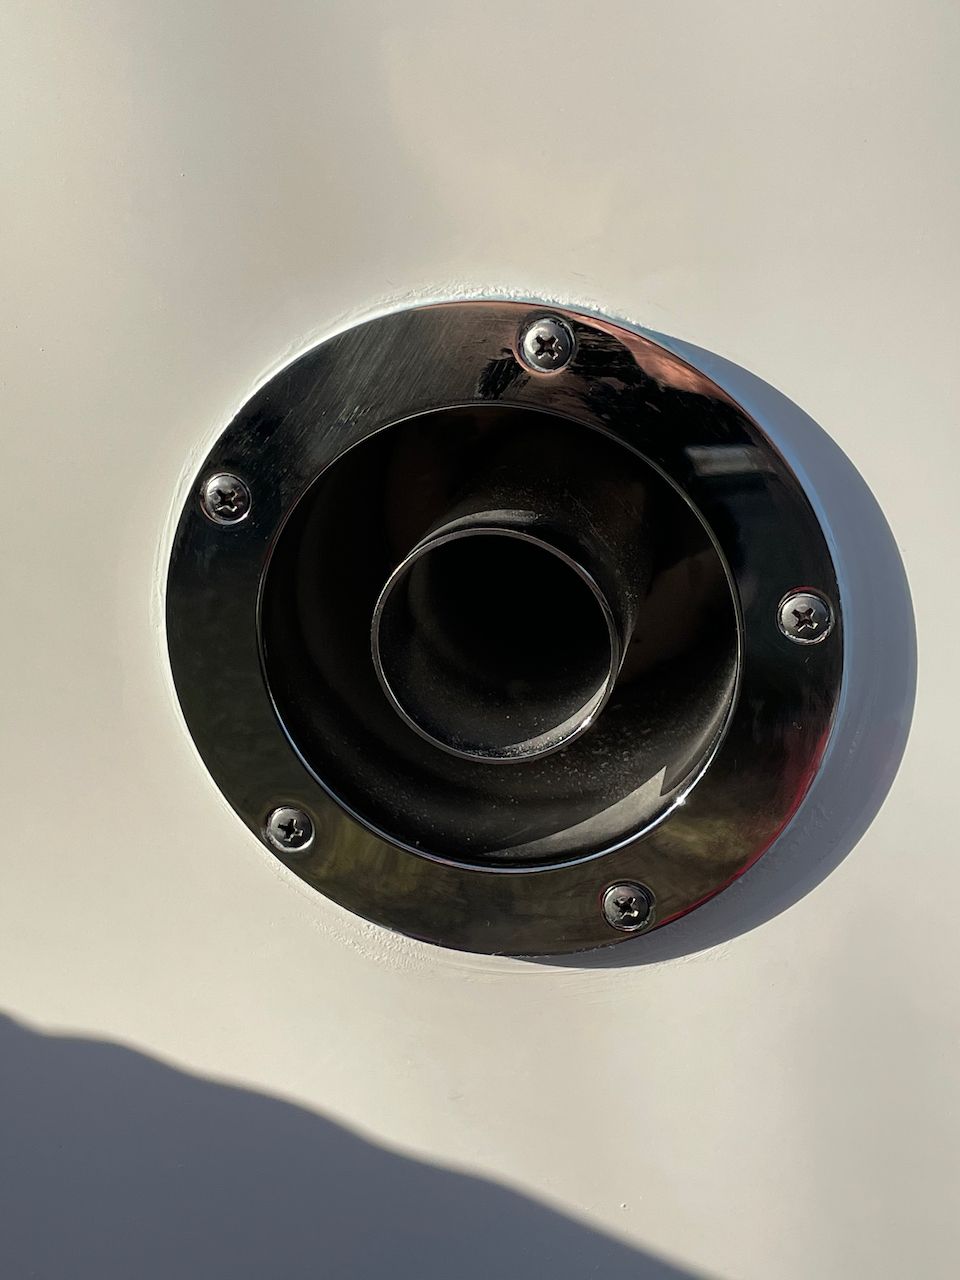
It looked really good after I was done - I like the mirrored polish. Keep in mind that this is also the source of combustion air for the unit - the inner circle is the exhaust pipe, and the outer area is where air is pulled into the unit for the burn process. I like this sort of exhaust better than traditional systems because it means you can close up your engine room vents in cold weather, and your heater still has all of the air it needs to run. Wallas does this as well, but most Webasto units use combustion air via a small pipe in the engine room, and outside air from similar vents routed to engine room vents.
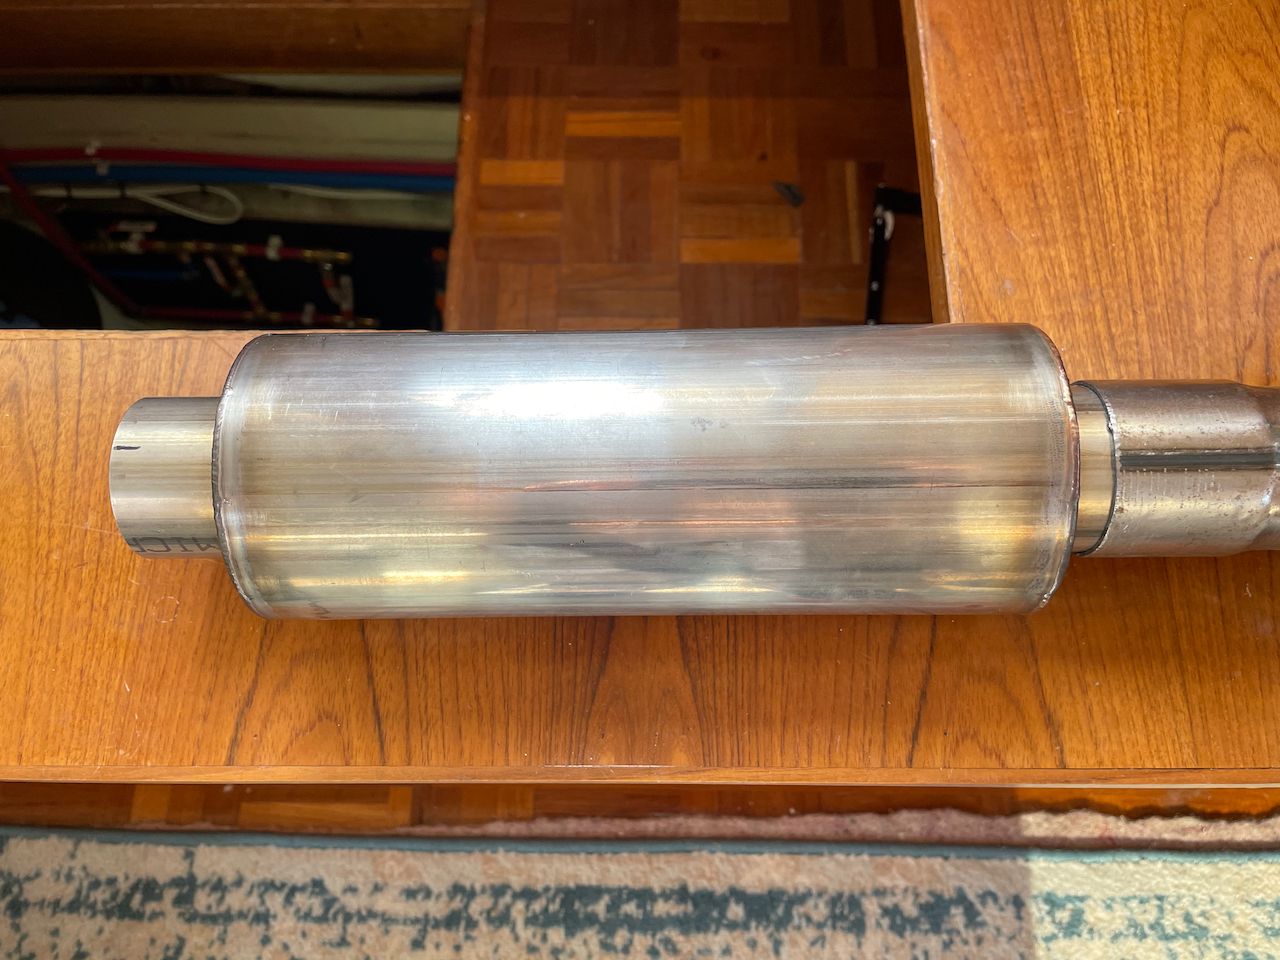
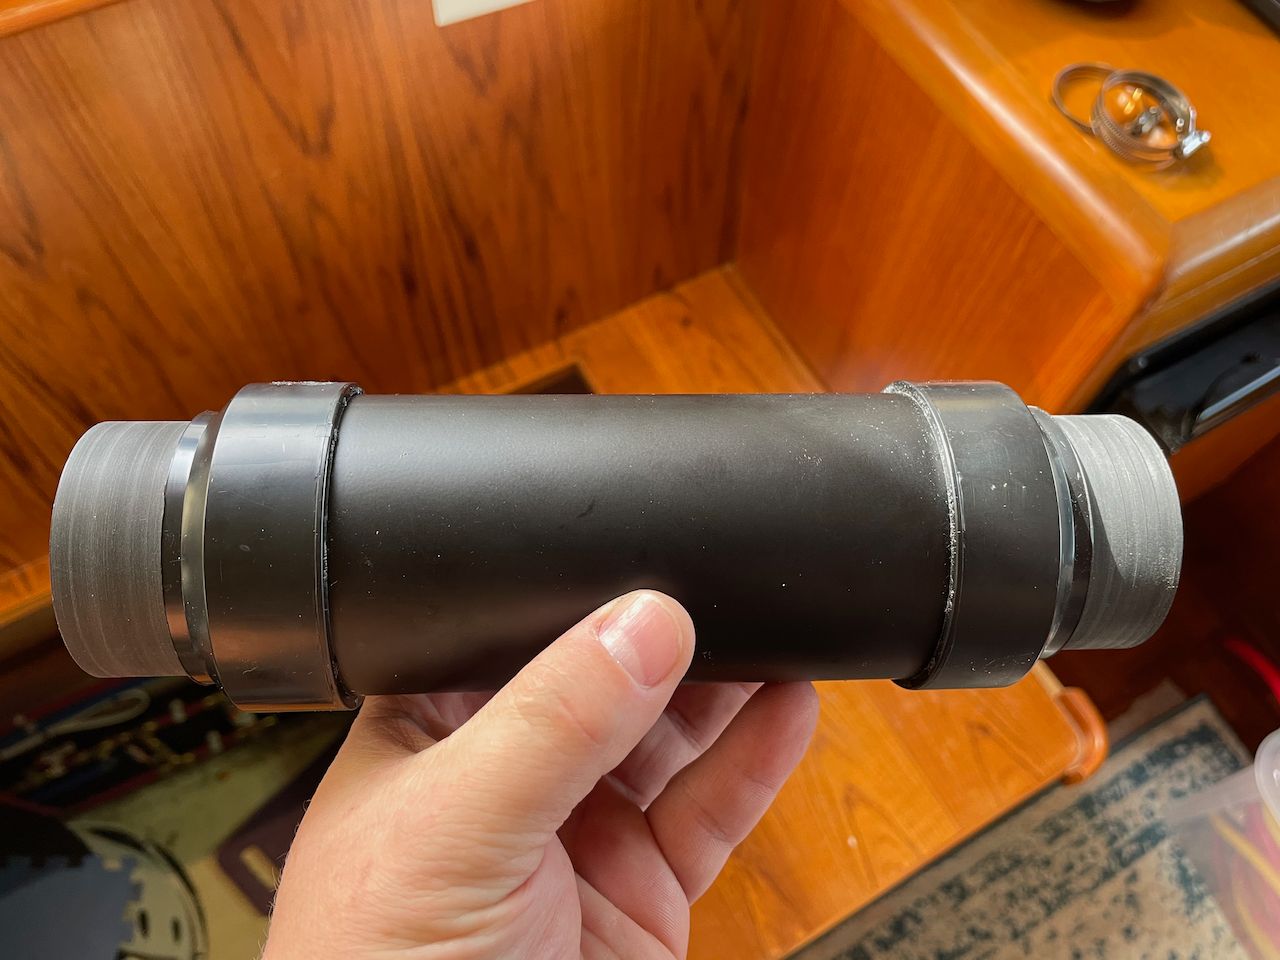
Exhaust muffler on the left, and air intake muffler on the right
ITR recommended I purchase a muffler for both the exhaust and the air intake. They've added these in the last few years, and they're definitely worth the cost. You don't have to have them, but the noise will be quite a bit higher without them.
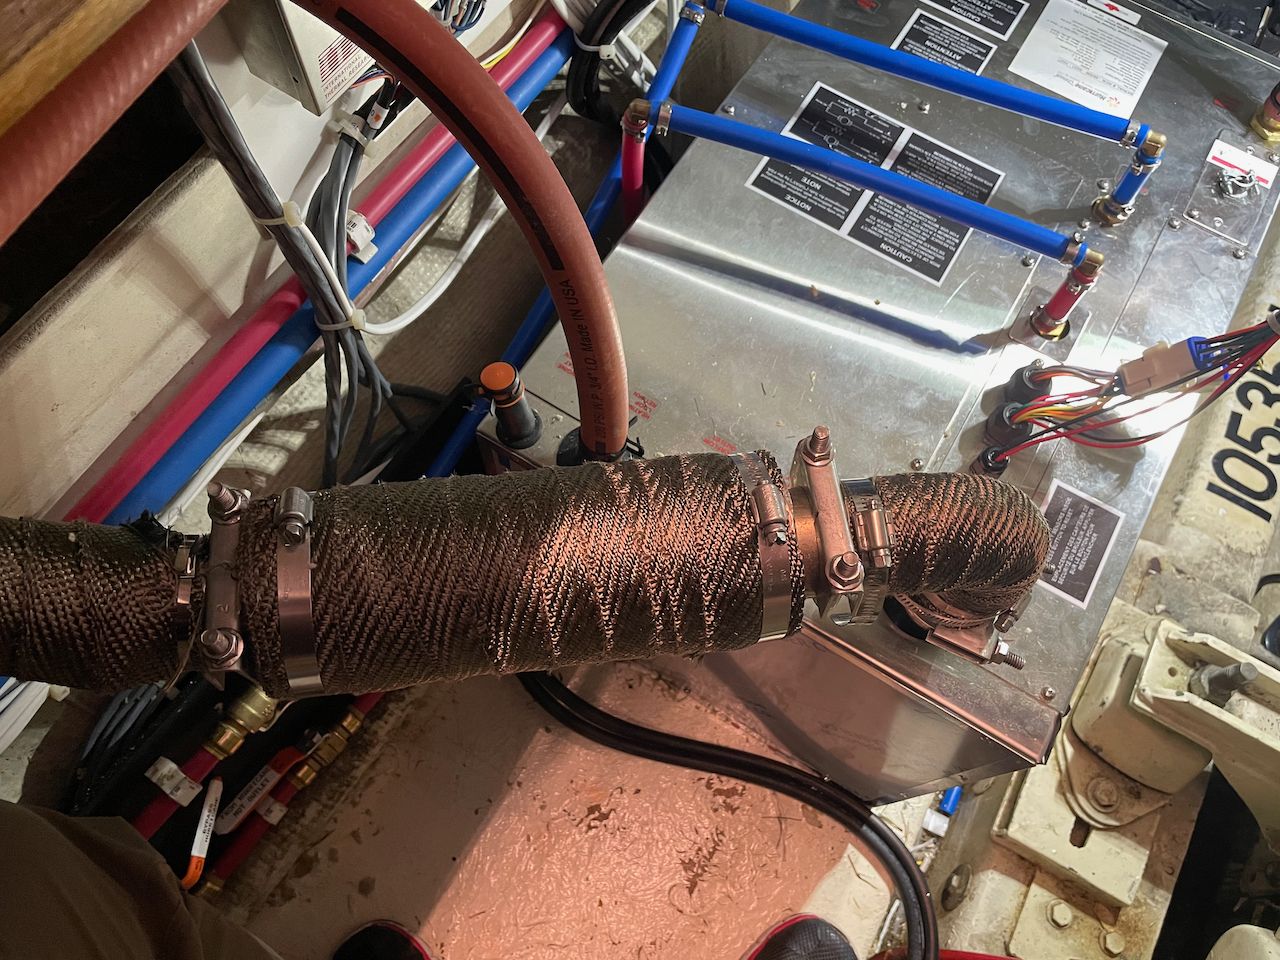
One thing that ITR couldn't provide at the time due to shortages was exhaust insulation. I decided to try using something others had recommended which was the same sort of high temperature wrap used on performance car exhausts. Unfortunately it did not work as well as I had hoped, and I had lots of fiberglass bits everywhere during install. It kept the heat down, but not enough for what I wanted where it passes up into the void to the exhaust itself.
I ended up getting recommendations from some of the commercial fishermen I know and went to Ballard Insulation, now owned by K. Fox. Insulation. They made a custom set of blankets for the whole exhaust system in just a few days, and it was far better insulation and easier install.
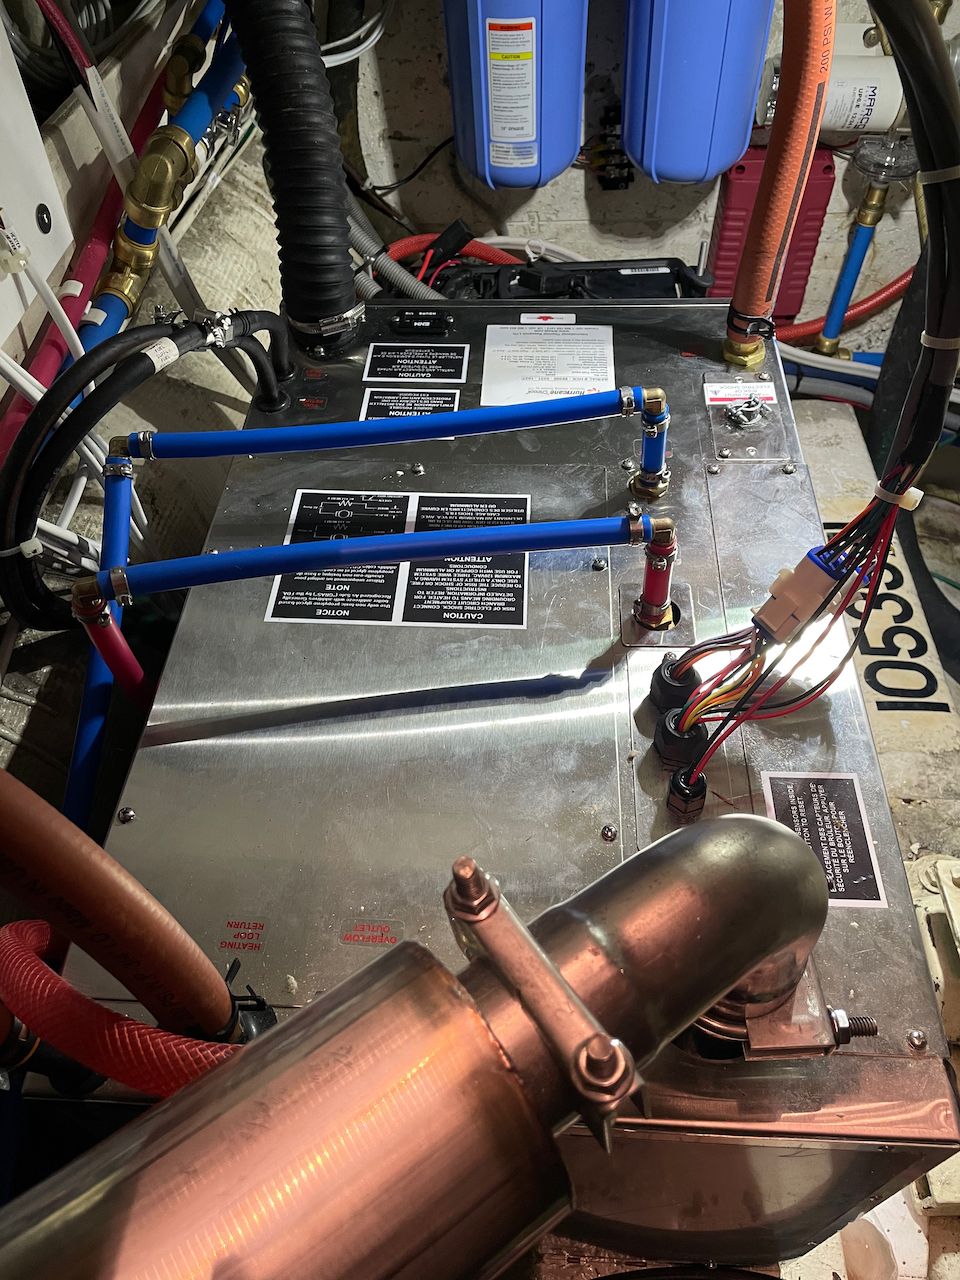
Mixing Valve
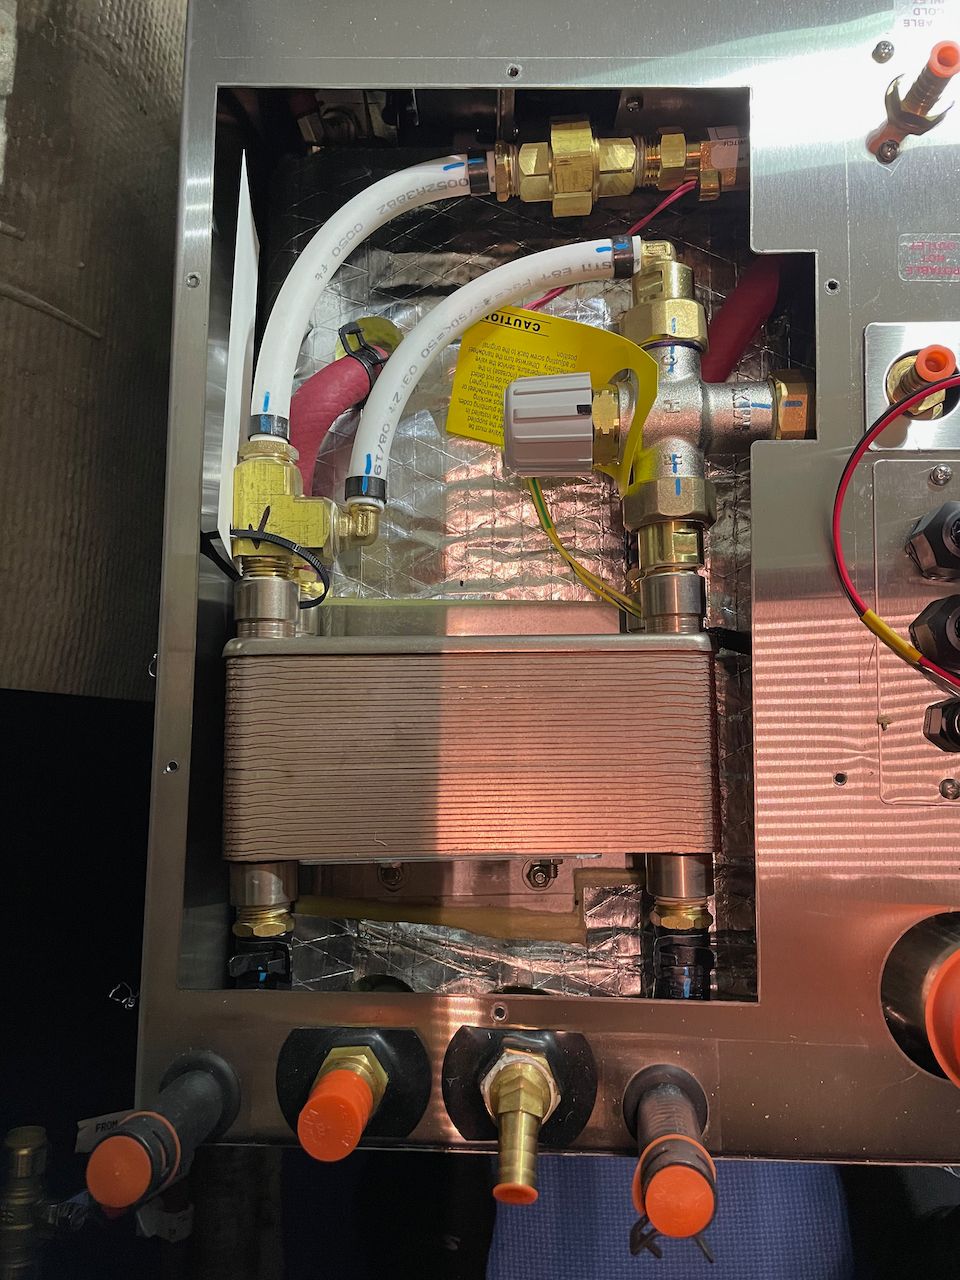
I mentioned earlier that I needed to mess with the thermostatic mixing valve in the Chinook to be able to use my downstream AC hot water tank. This can be done by removing the top cover and adjusting the grey knob you see in the upper right of this photo. I set it as high as possible, and then backed off just a little bit. I found having it completely maxed out caused the upstream thermostatic mixer to freak out at times and have pulses of cold water.
If you're using the Chinook without a downstream AC water heater, you can leave this set to factory settings.
Control Board & Wiring
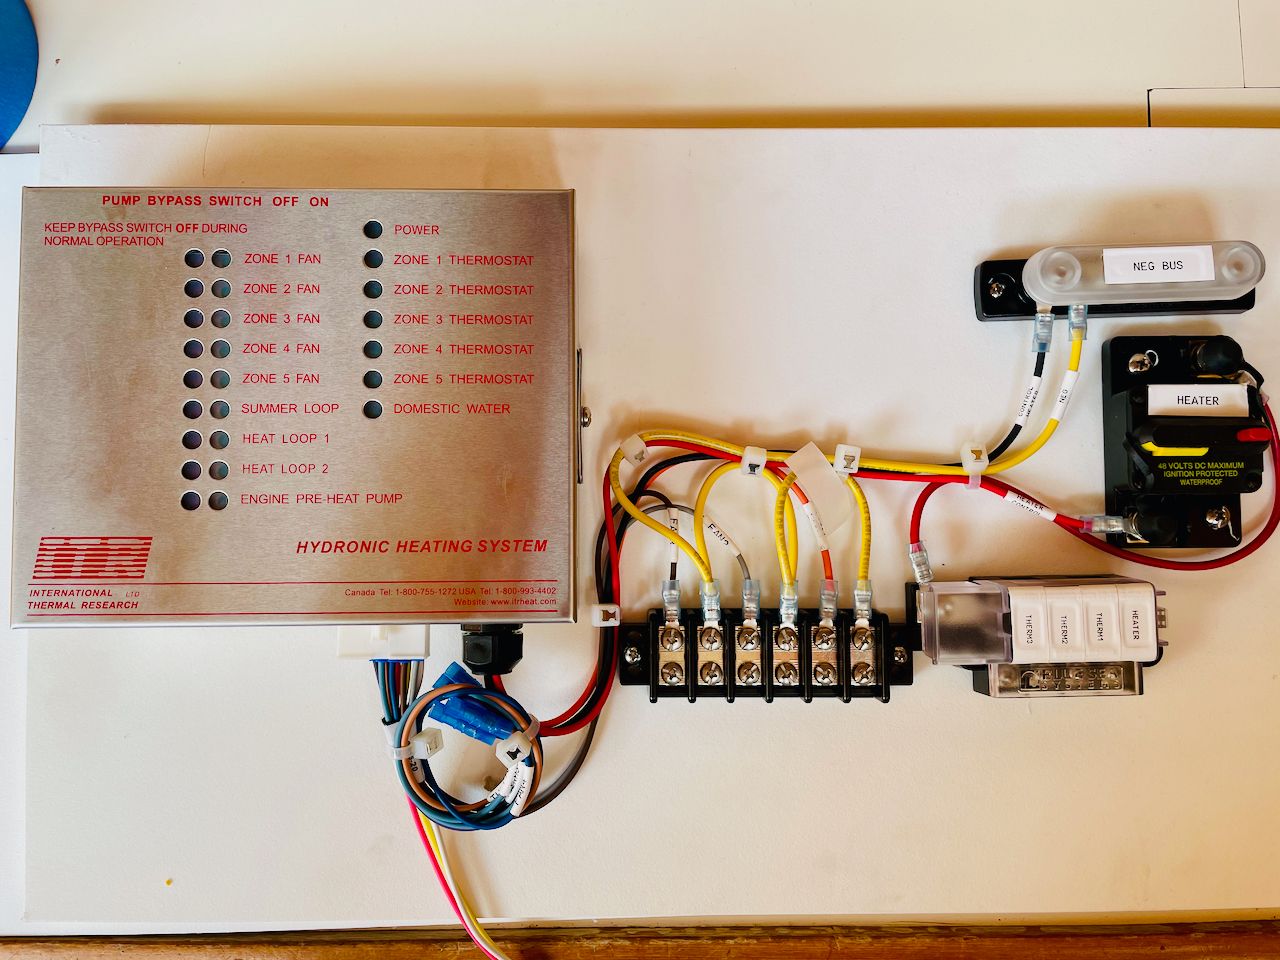
One of the things I really loved about the install of the Chinook versus other systems is the really slick control board and status light setup. I mounted mine on a piece of starboard and built a block for each zone I intended on using (middle of the picture) plus a fused block for the thermostats (to the right) and a main system fuse for all power to the system.
As with every other heater I've installed, and consistent with every manufacturer, you must make sure that the heater has a dedicated circuit, preferably to the house bank, with a fuse or breaker that can't normally be switched off. Switching off a heater when it is in the middle of a burn cycle can have catastrophic results to the heater itself - if it has no power to run cooling fans, and there is still burning diesel, parts of the heater can be damaged, requiring major repairs. I chose the same setup I've used for years which is a covered circuit breaker mounted at the heater itself. I never want this at an electrical panel or other location where someone can accidentally trip it.
I really love this control panel - it shows a light for each zone and function, plus all of the connections to the heater, control panel, and other bits are using modular plugs which make it hard to screw up. The lights make it easy to glance at and see a quick status of what the system is doing if you suspect an issue.
For all of the wiring, I used appropriate marine grade wire with the appropriate size either recommended by ITR, or calculated based on the length and expected amperage. To each fan heater, I ran wire to provide power, and to each thermostat smaller gauge wire. All wiring went back to the control board. From the control board and heater, 6 AWG wire was used to provide power from the house bank with as short of a run as possible (less than 5 feet). I pulled the wire separately from the hose, but I generally ran the fan heater + thermostat wiring together.
Hose Installation
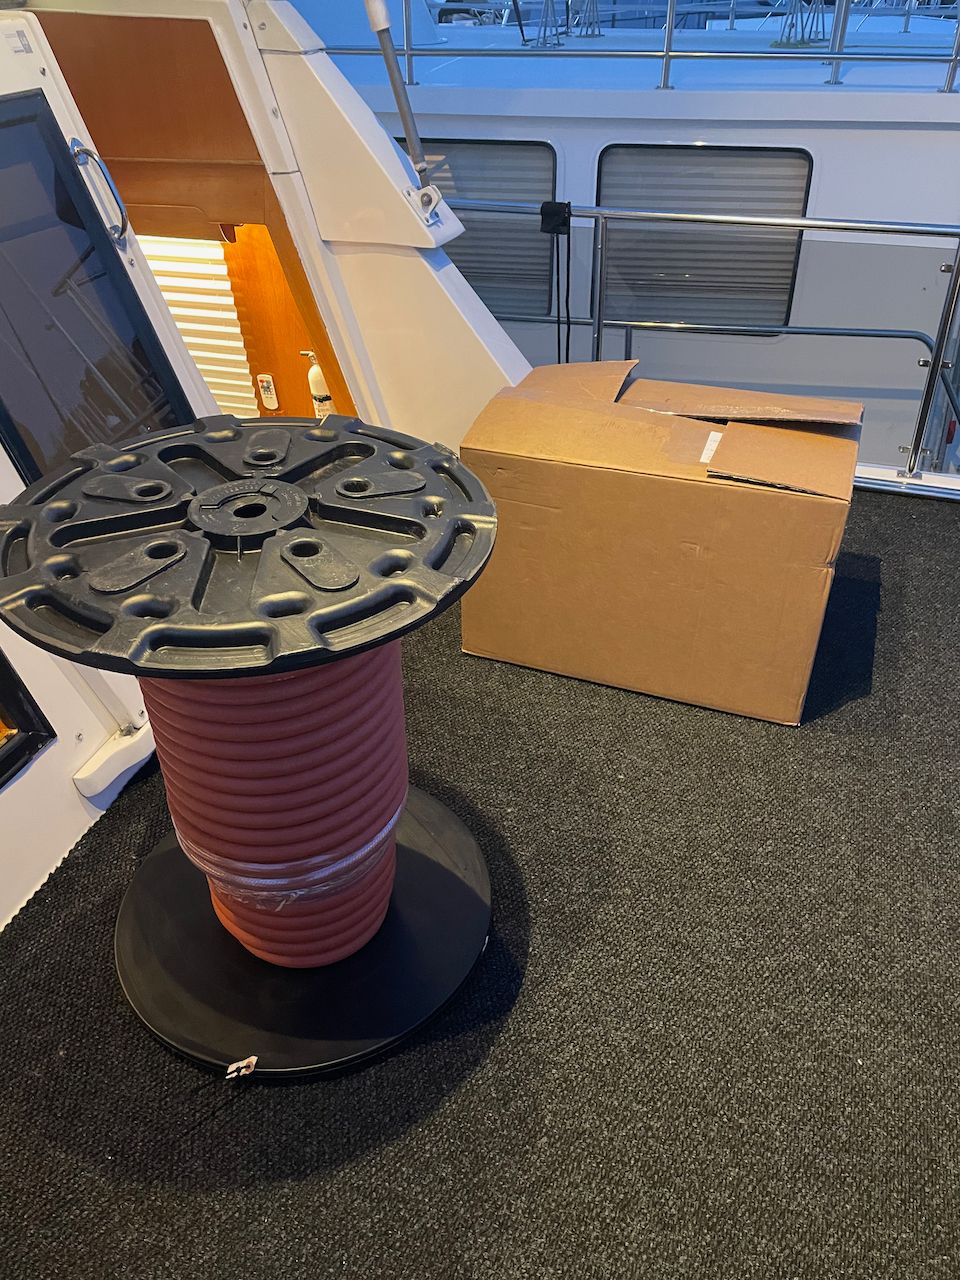
This doesn't look that big, but it was plenty heavy! And because it was still pretty cold outside, it was a bit of a bear to work with. I ended up taking sections inside the boat and warming it up so it was easier to work with. Still, this is the most physically demanding part of the installation - dragging the hose to the various locations.
I was lucky because I had completely re-ducted the entire boat as part of the process in the first 2 years of owning her with the forced air systems, so I knew exactly where I could go, and had holes already cut which were much larger than the hose needed.
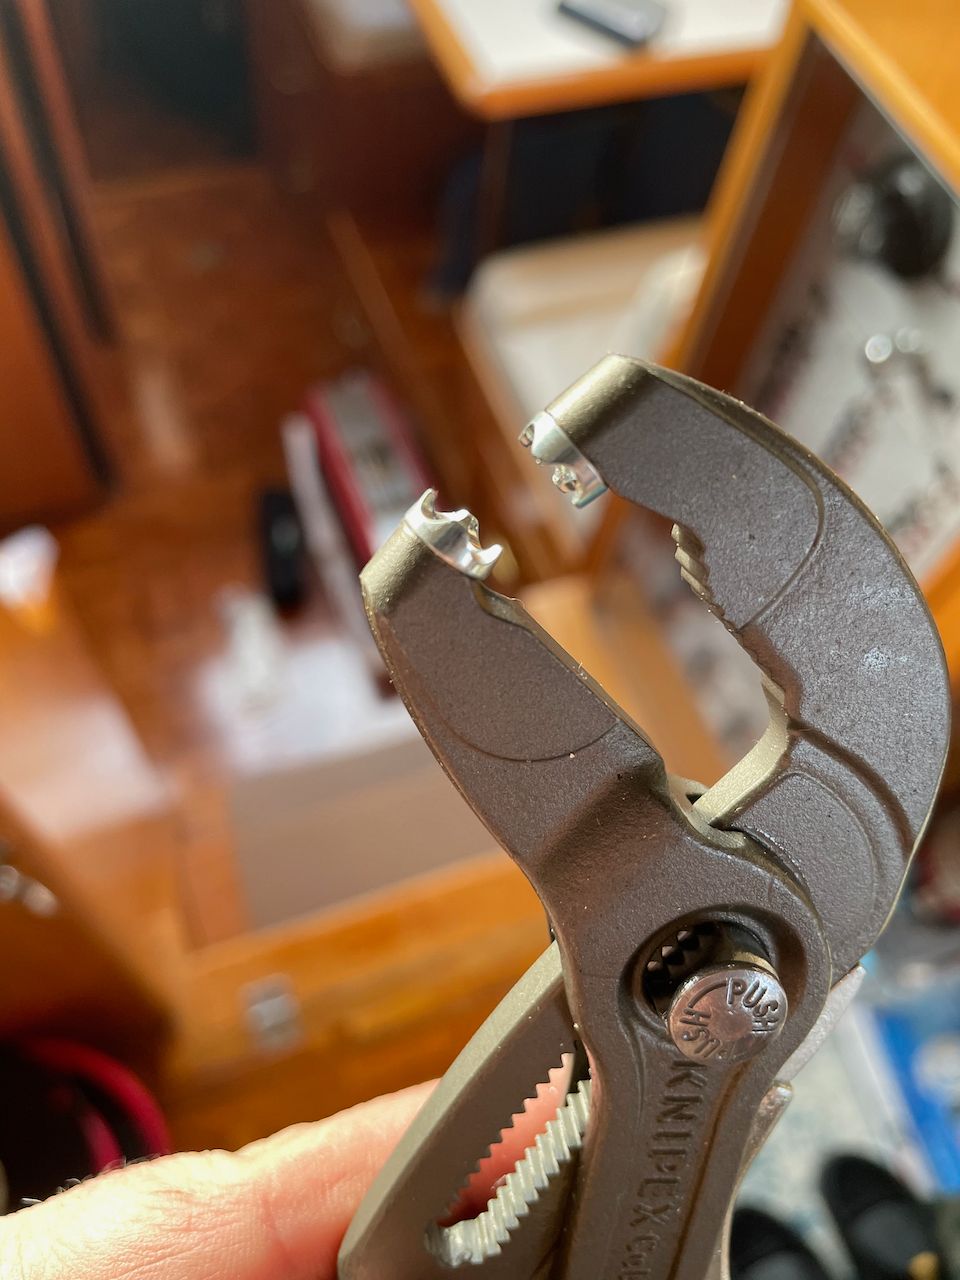
I used the spring clamps I mentioned earlier in the design, and a pair of Knipex hose pliers to get the clamps on the hose. Heating up the ends of the hose with a heat gun to get them on the fan heaters was helpful.
I had two spots to bleed the system - one right above the heater in the salon under the couch where the fan heater was going, and one at the extreme end of the system in the closet where the fan heater was for the v-berth.
I must have won the lottery because I bled the system for about 15 seconds while filling it at the v-berth, and have never had to do anything since then. It ran flawlessly from the beginning. This is in sharp contrast to the Webasto systems I had which required a lot of fussing to get things right.
Fan Heater Installation
The fan heaters themselves were the most fiddly part of the installation, as you have to pick where they go, cut holes, run wiring, thermostats, and fan controls, and make it look good.


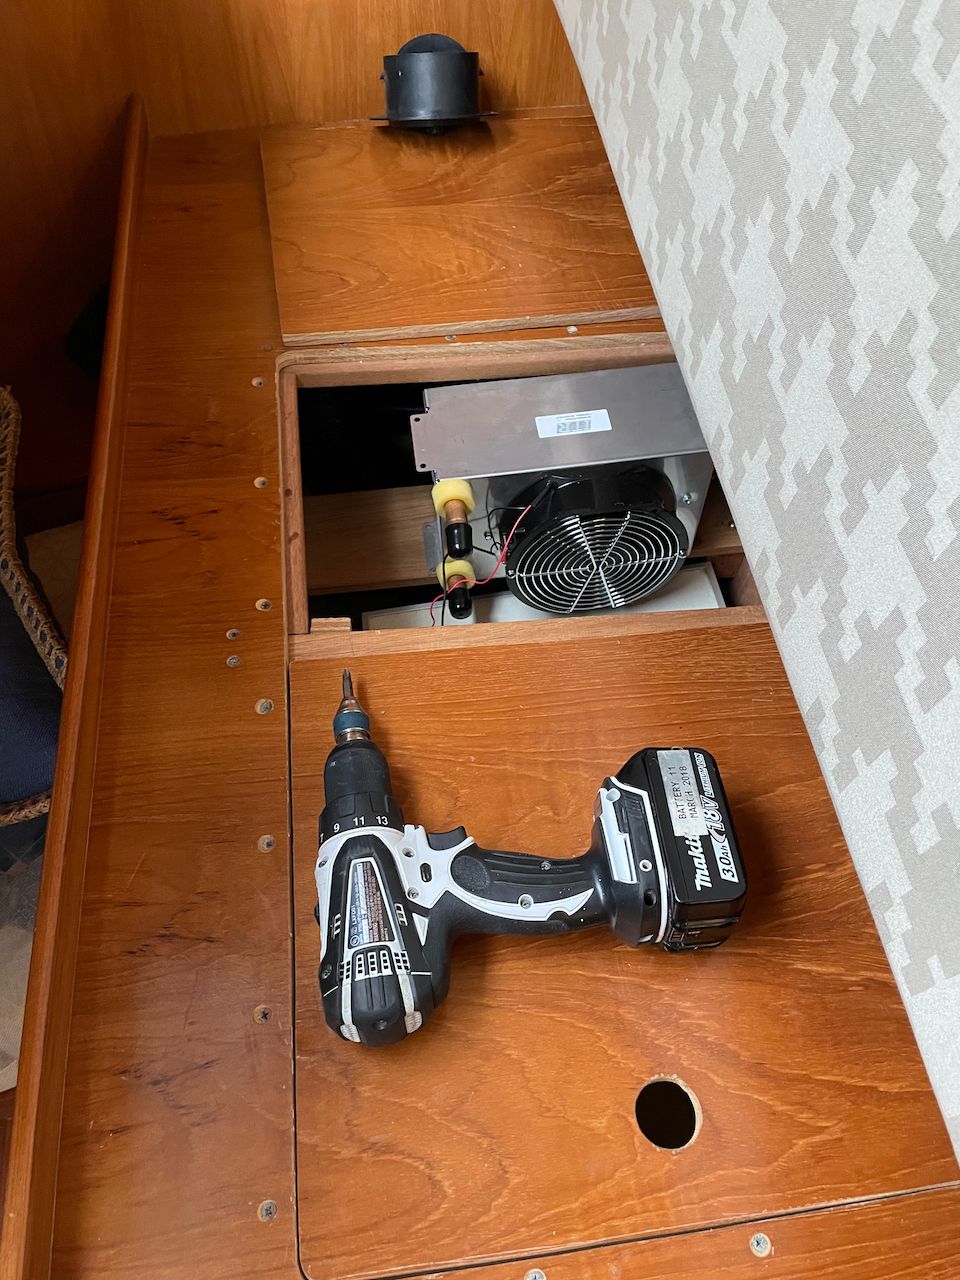
Fan heaters being installed
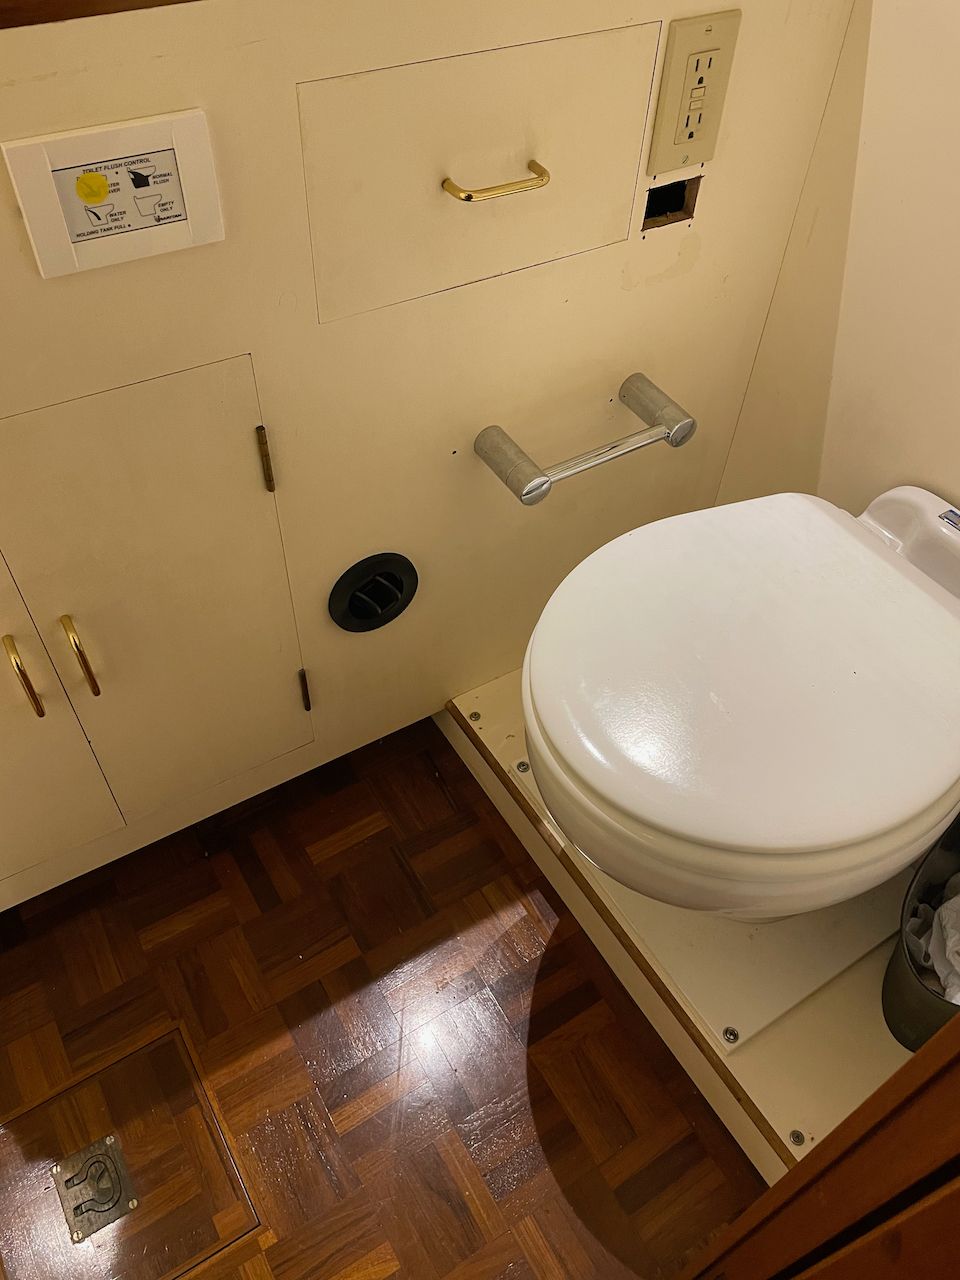
The master head and dinette fan heaters were mounted out of the way in hidden locations, and ducting was run from them to specific outlets. For the dinette, it was under the seat pointing towards the galley. For the master head, it was strategically placed to point at the toilet seat 🤣
All of the other fan heaters were directly mounted with grilles in front of them. This provides the least resistance since it does not have to be forced down a duct, and quickest heating as a result. However, the noise is a bit louder than having a duct, as the duct provides some distance from the fans.
One other nice note about the ITR fan heaters is that they all have aquastats on the hydronic piping that are connected in-line with the fans. This means that until the coolant reaches the appropriate temperature, the fans won't come on. All of the other systems just turned the fans on when you first turned the main system on, blowing cold air around before the loop got hot enough. I think having the aquastats at the fan heater is a nice feature.
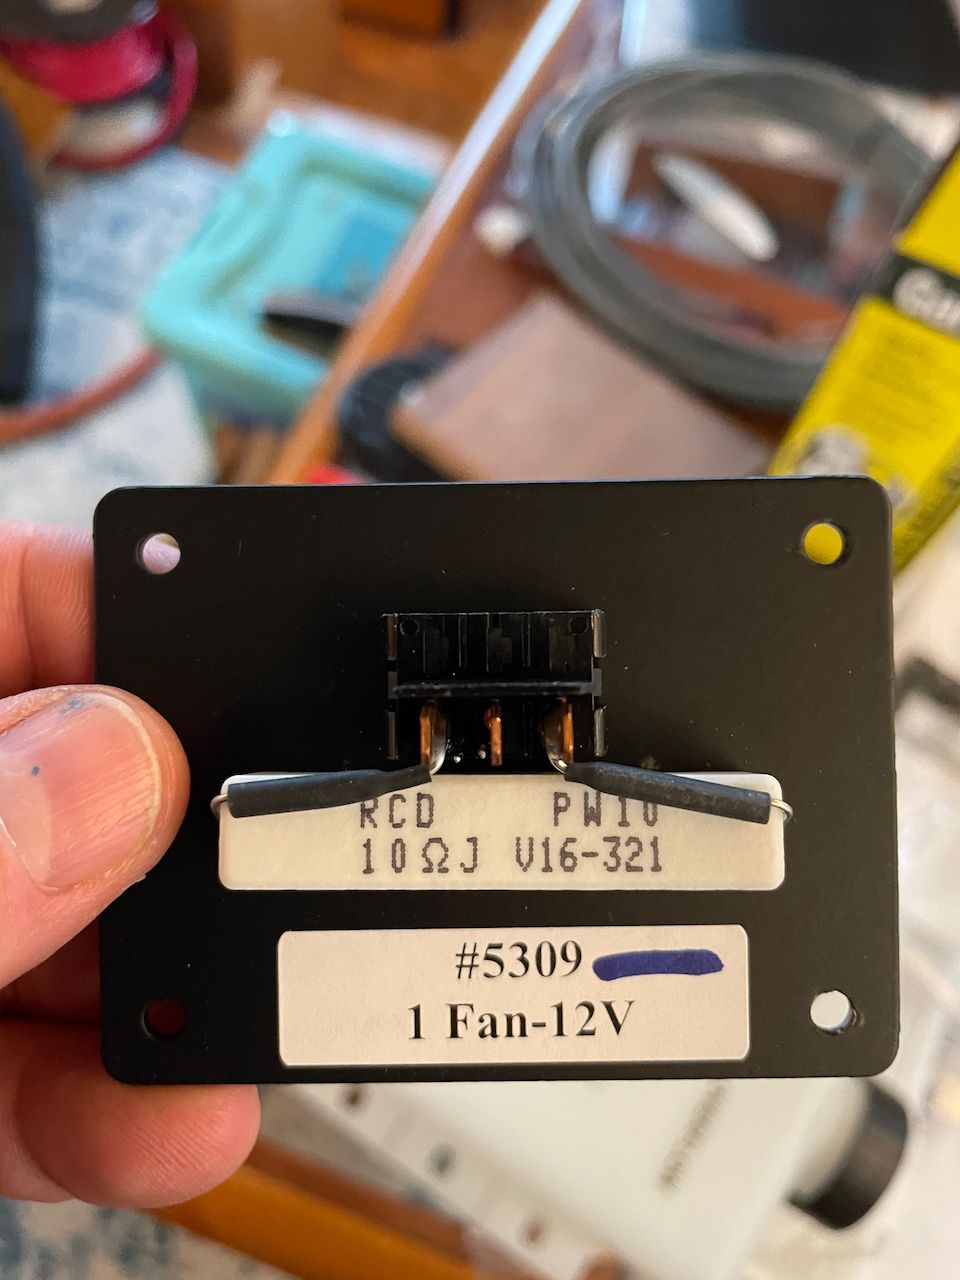
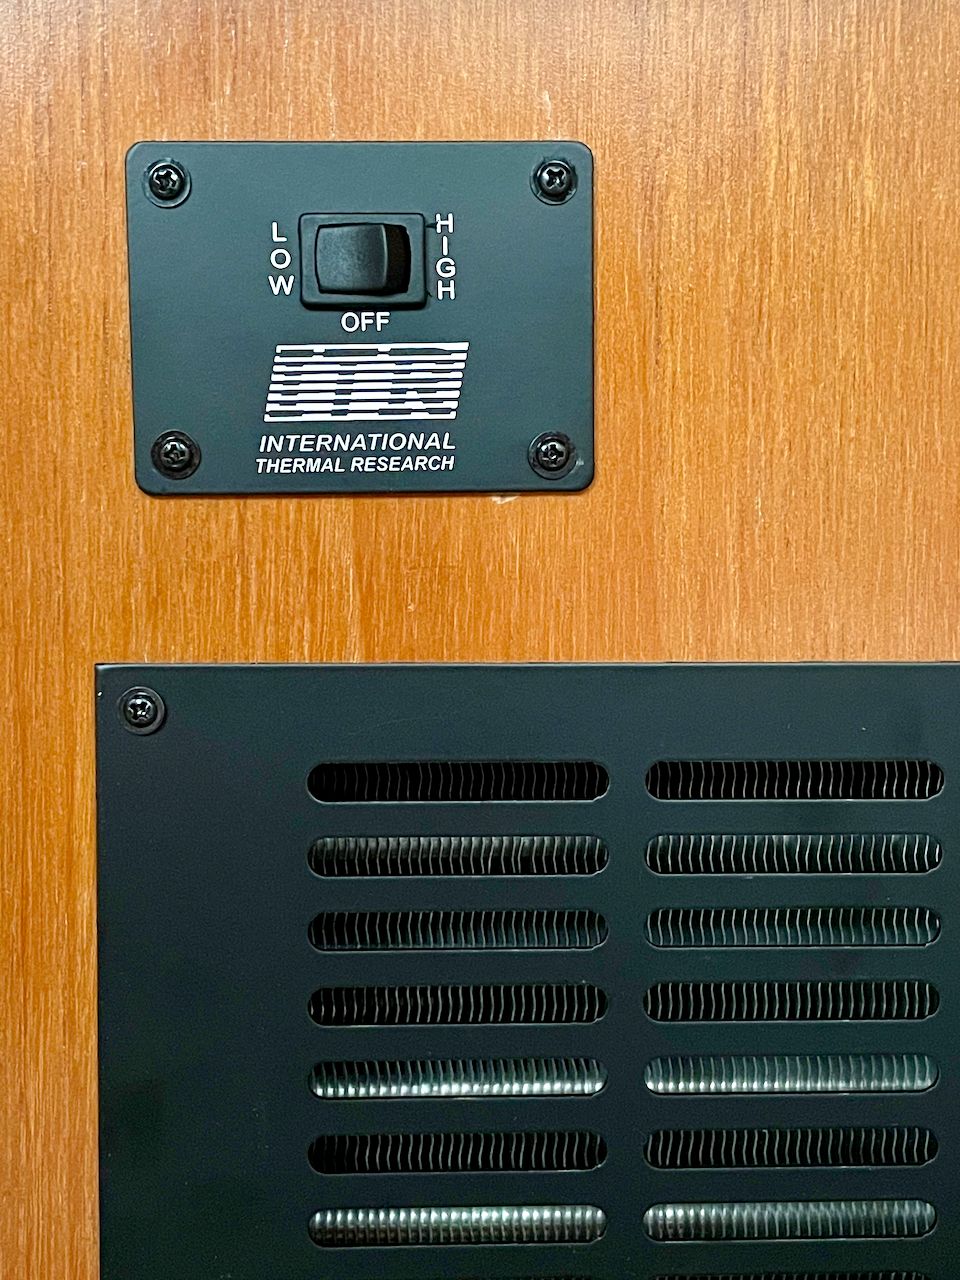
Speed controls
I also purchased speed controls for every fan heater. There are different models for a single fan heater or multiple fan heaters based on amperage. You wire them on the positive lead from the control board zone supply in-line between that and the fan heater itself. 99% of the time, I run all of the fan heaters on the low setting, with the exception of the small master head unit. Very rarely, when the boat is cold and I've been gone (rare!) do I turn them up to high. They're quite a bit louder on that setting, and heat things up amazingly fast.
I also had a separate speed control for each fan heater unit, and didn't tie the salon+dinette or master+master head units together, that way I could adjust the speeds and whether a unit was on more granularly.
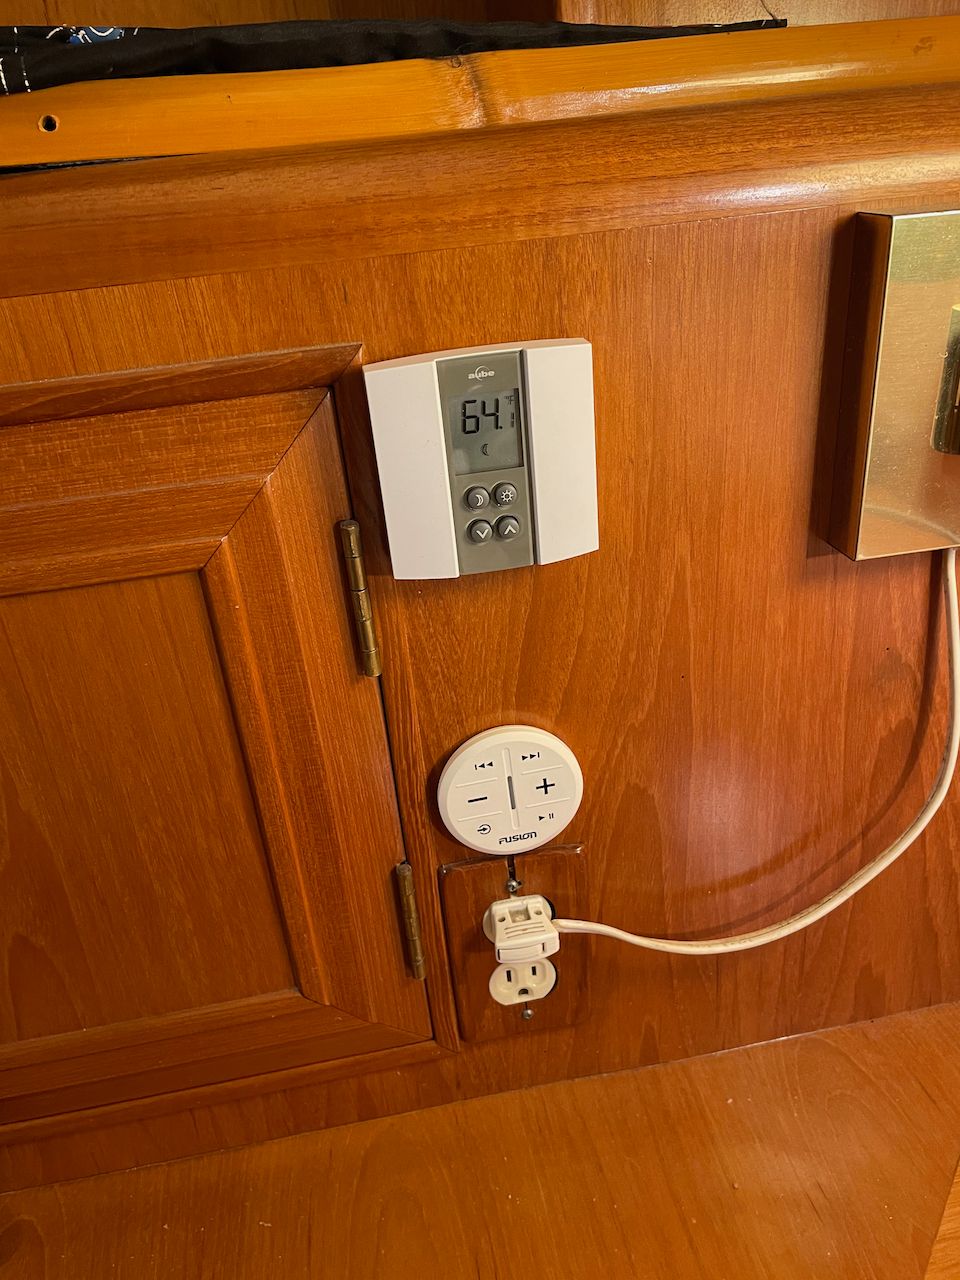
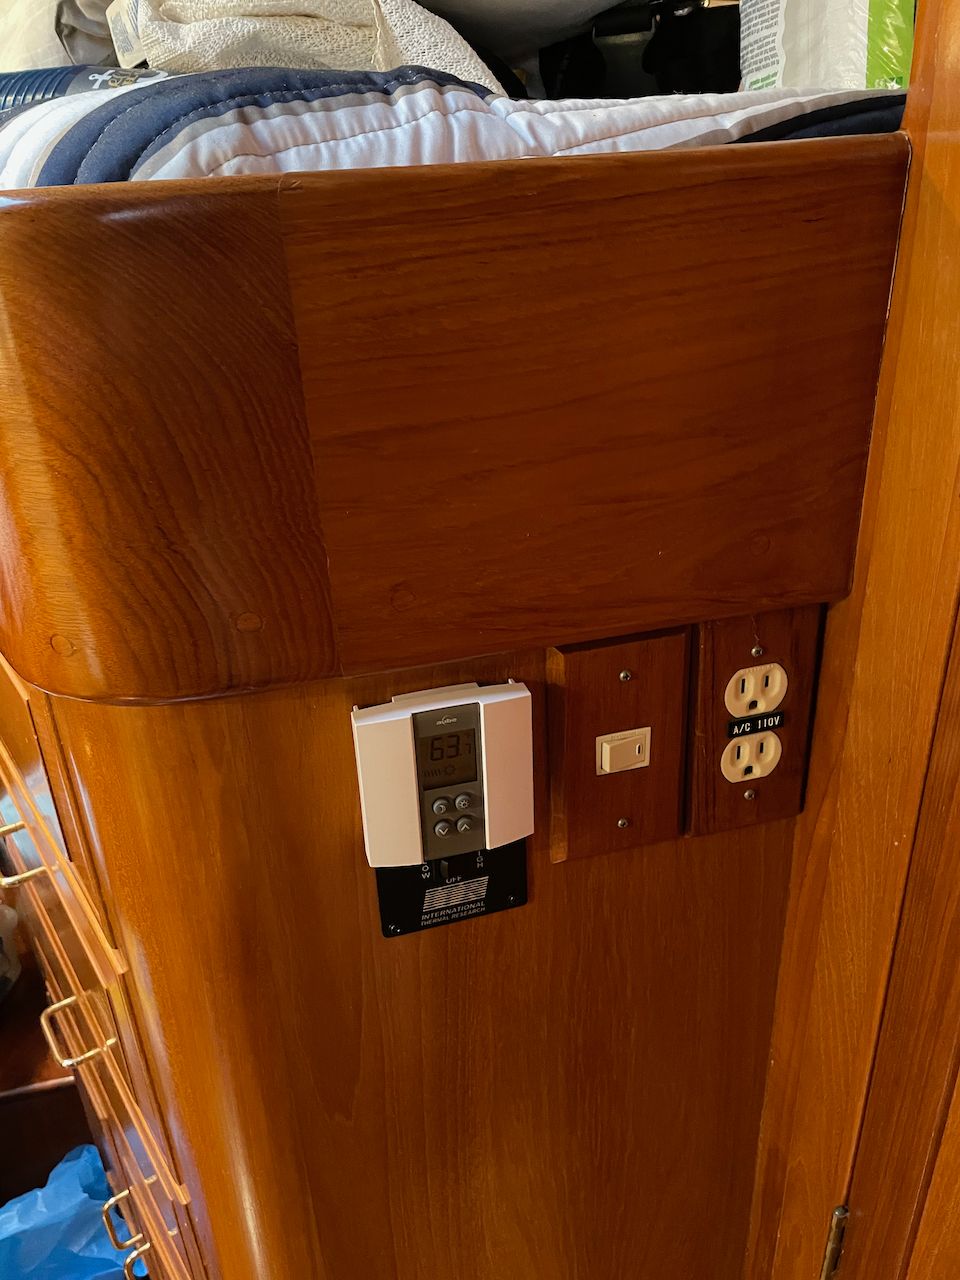
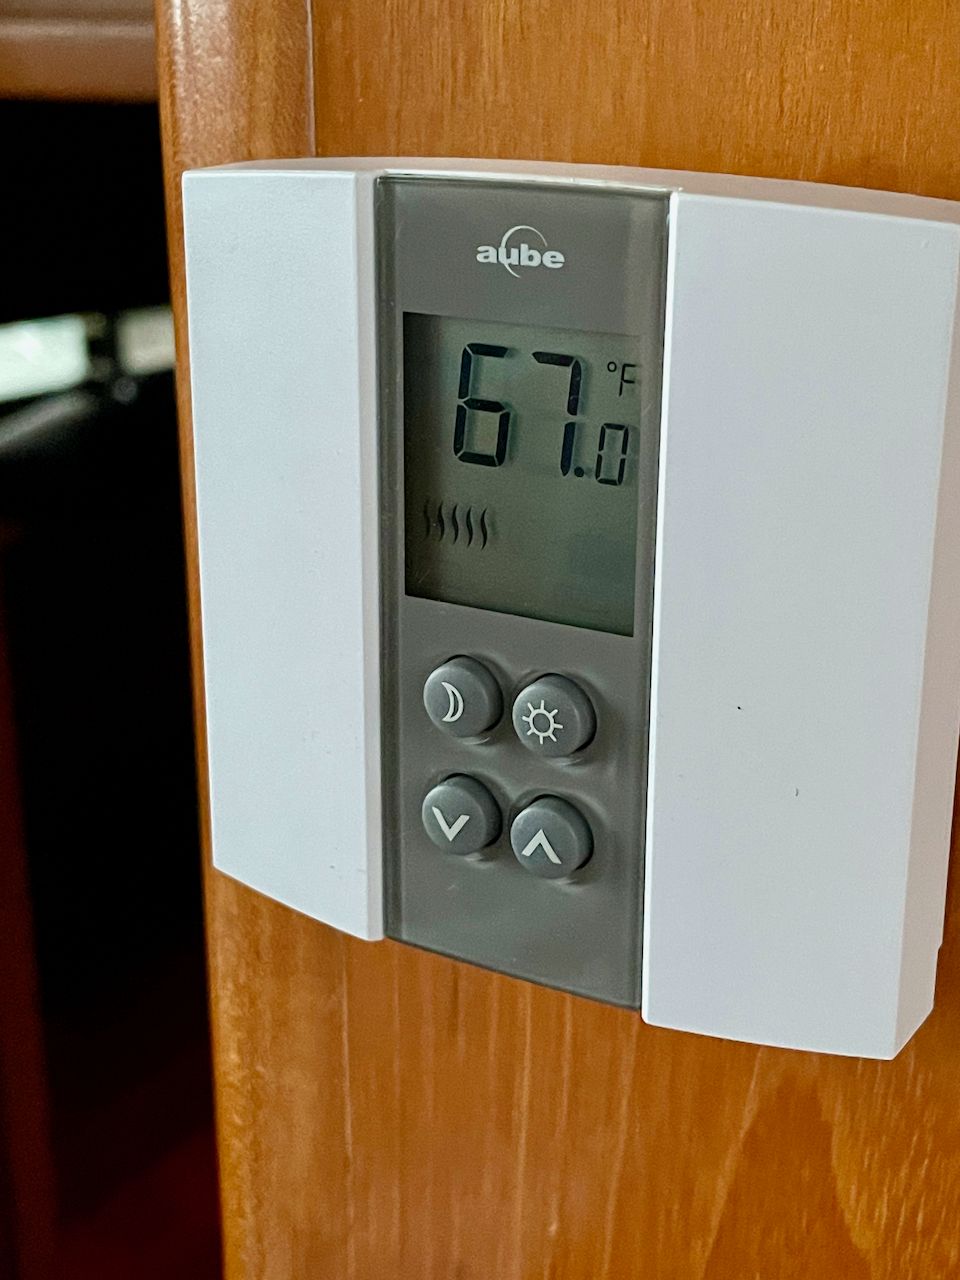
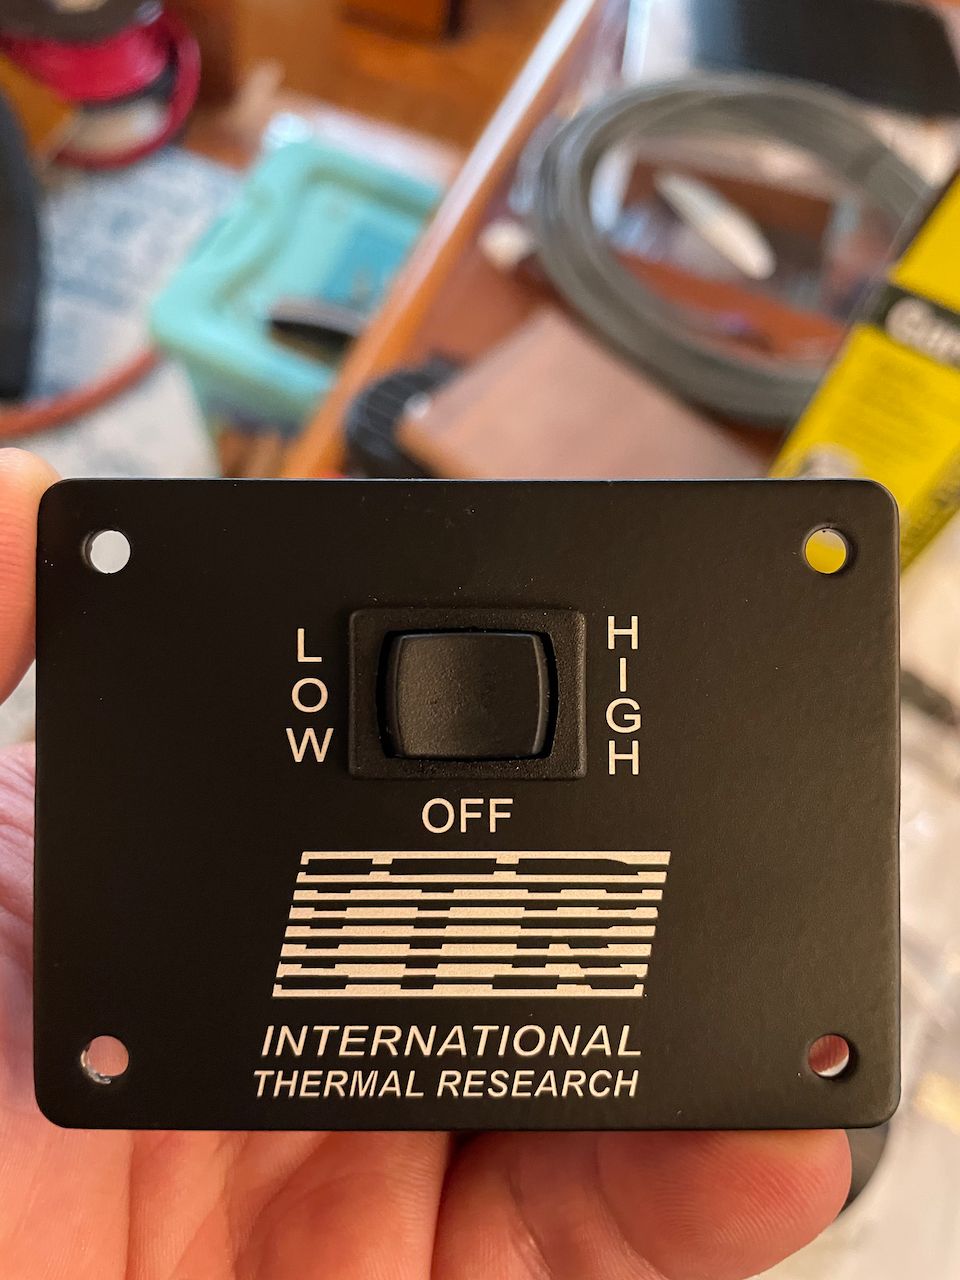
Aube thermostats in master and v-berth
I have been into home automation and control for many years, even before it became popular with the IoT world. Thermostats have been horrific for years, and even today, many of the fancy ones, like the Nest ones I have at land properties, are lacking some features.
There are very few good thermostats to choose from for these types of systems. ITR makes their own cheaper one, but it has a very wide temperature swing, something I hate. Aube has made thermostats for all sorts of heaters that I've used in the past, and ITR even recommends one which I chose for my installs.
They are nice and compact, and work reasonably well, but still have some faults. There is a day and night temperature, which is nice for a quick button push, but no scheduling or time based temperatures. Also, two of the thermostats have gotten "stuck" in heating mode and ran continuously until I removed the batteries and put them back in. This has happened 3-4 times, but it is still annoying.
Other than that, they are mostly reliable, have a dead band of 1 degree on either side of the set temp, which is nice for keeping things nice and consistent. As a comparison, some of the older Webasto and cheaper thermostats have a 6-8 degree variance which means you get really cold, and then really hot.
Fuel Installation
I already had a fuel line for my existing heater, and it was the appropriate size, so I was able to add an in-line fuel filter provided by ITR and connect it to the heater. None of the previous heaters required a fuel return, but the Chinook does. This initially was a concern, as running a pipe from the heater back to the fuel tank, drilling a new return, and ensuring it was within the max length for the heater was looking like a big job. However, I was able to add a tee into the fuel return manifold for the existing lines, and tapped in that way.

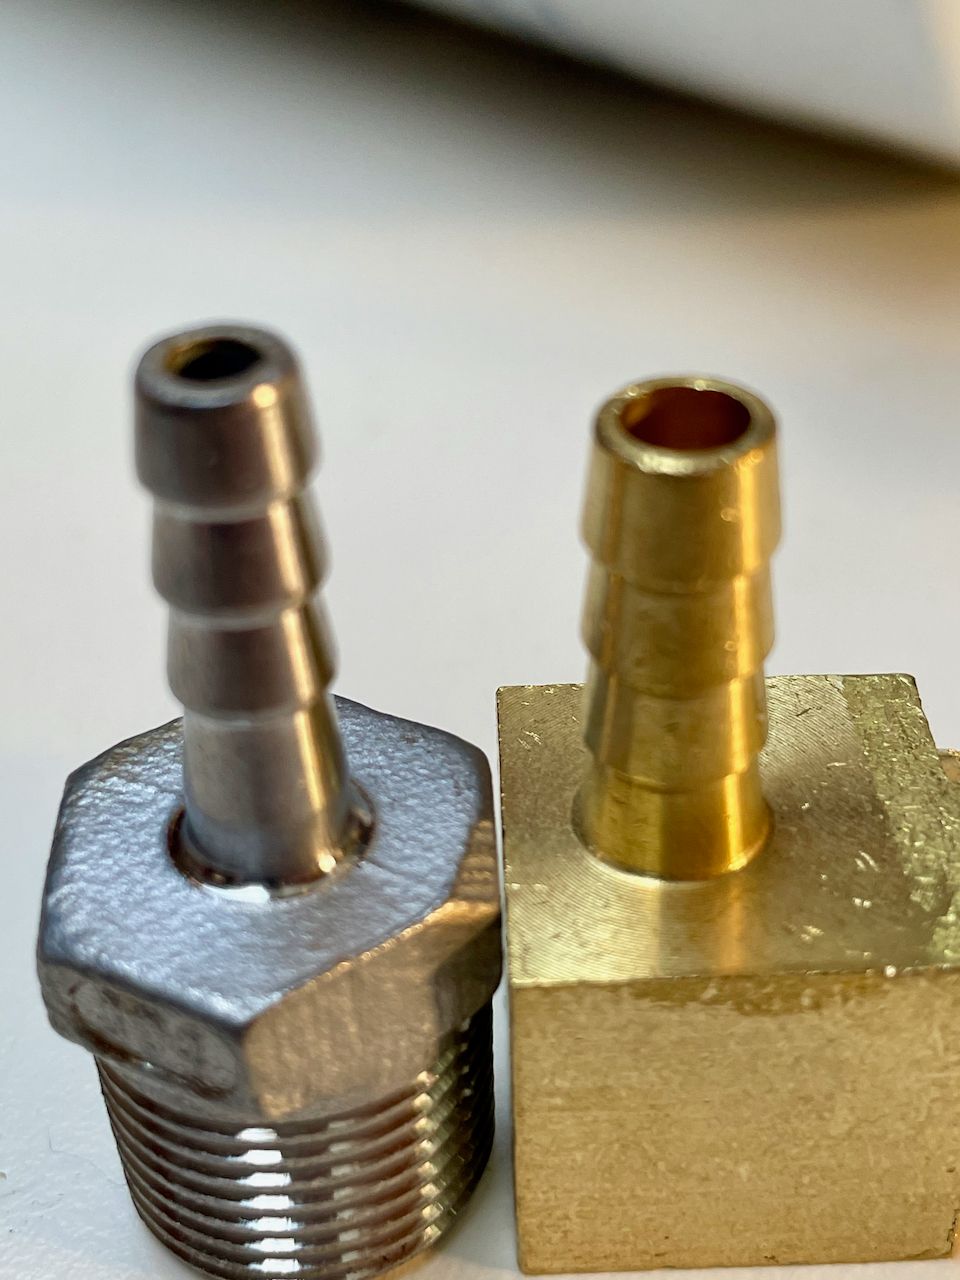
Amazon on the left, Sure on the right
One of the things I also ran across is the quality of fittings from unknown vendors on Amazon versus local places like Sure, Fisheries, or even Nebar. In the above pictures, the fitting on the left is from an Amazon vendor that claimed it was brass, and more importantly, a specific size (I forget what it was). The one on the right is from Sure Marine, same size. You can see that the one from Amazon is clearly not brass, and the inside diameter is quite a bit smaller than the one from Sure Marine. Beware cheap crap off of Amazon!
Final install
Once all of the hose was run, fan heaters were installed, wiring was pulled, exhaust and fresh air pipes mounted, the heater was screwed down and everything was tested through ITR's extensive startup checklist.
ITR recommends specific transfer fluid (aka coolant) to be used in their system. I ordered mine through Amazon a week or so before the unit was delivered. Part of the startup is filling the system, bleeding it, and ensuring the overflow tank is filled as well. I mounted my overflow tank to the side of the heater for ease of filling and maintenance.
Everyday Use
I've used the system now for a year, and am very pleased with it. Not only has it kept me warm during cold days, but it has provided hot water daily during the summer months as well without a single hiccup.
I have over 700 hours on the system so far, and have used it for hot water while at anchor for over 150 days. We had decently cold weather for the remainder of the spring, and we're now into winter again here in the Seattle area, and the system is on 24x7 providing heat to the boat.
The system appears to be well designed in terms of capacity and features. I have tried cooling the boat down to 40 degrees and running the system to get it to 64 degrees, and it is amazingly fast at doing so - about 20 minutes or so with the fan heaters on high. During cold weather, the fan heaters turn on and off every so often, and the main unit goes on every 15 minutes or so to keep the loop warm. Compared to other systems I've had, this is far less than I remember recording - the Webasto would go on more frequently, and the Wallas of course runs 24x7.
The boat is never really cold now, which I absolutely love. But my favorite feature by far is the essentially endless hot water. 1.5GPM doesn't sound like much, but that's at 120 degrees F. Average shower temp is 105 degrees, so you'll be mixing that 120F water with cold water which means there is plenty of capacity. I've run the shower while testing for almost 20 minutes - the only blip is around 6 or 7 minutes when the heater initial capacity is exhausted and it has to kick in to make more water. That lasts about 2 seconds and then is gone.
Electric Elements
One of the features of the Chinook is the two AC elements that you can wire up to provide additional heat, or to use the unit without the diesel burner. I tried this temporarily for a few days and found it to not be worth the effort. It is two 1500W elements, or 10,000 BTU. If you have a system that is near the edge of 50,000 BTU, I can see how this might be useful when at the dock, but that is also a concern if you have designed your system to be right up on the edge of the capacity of the unit.
I had hoped you could use these elements to heat hot water or run most of the unit at a lower power while on AC power, and turn off the diesel burner part, but it just isn't practical. 10,000 BTU isn't enough to heat the whole boat, and it takes too long to heat up water this way. If you think about your traditional hot water tank, like my Raritan, it's a 1500W system, and takes at least an hour to heat up 11 gallons.
Control Panel and App
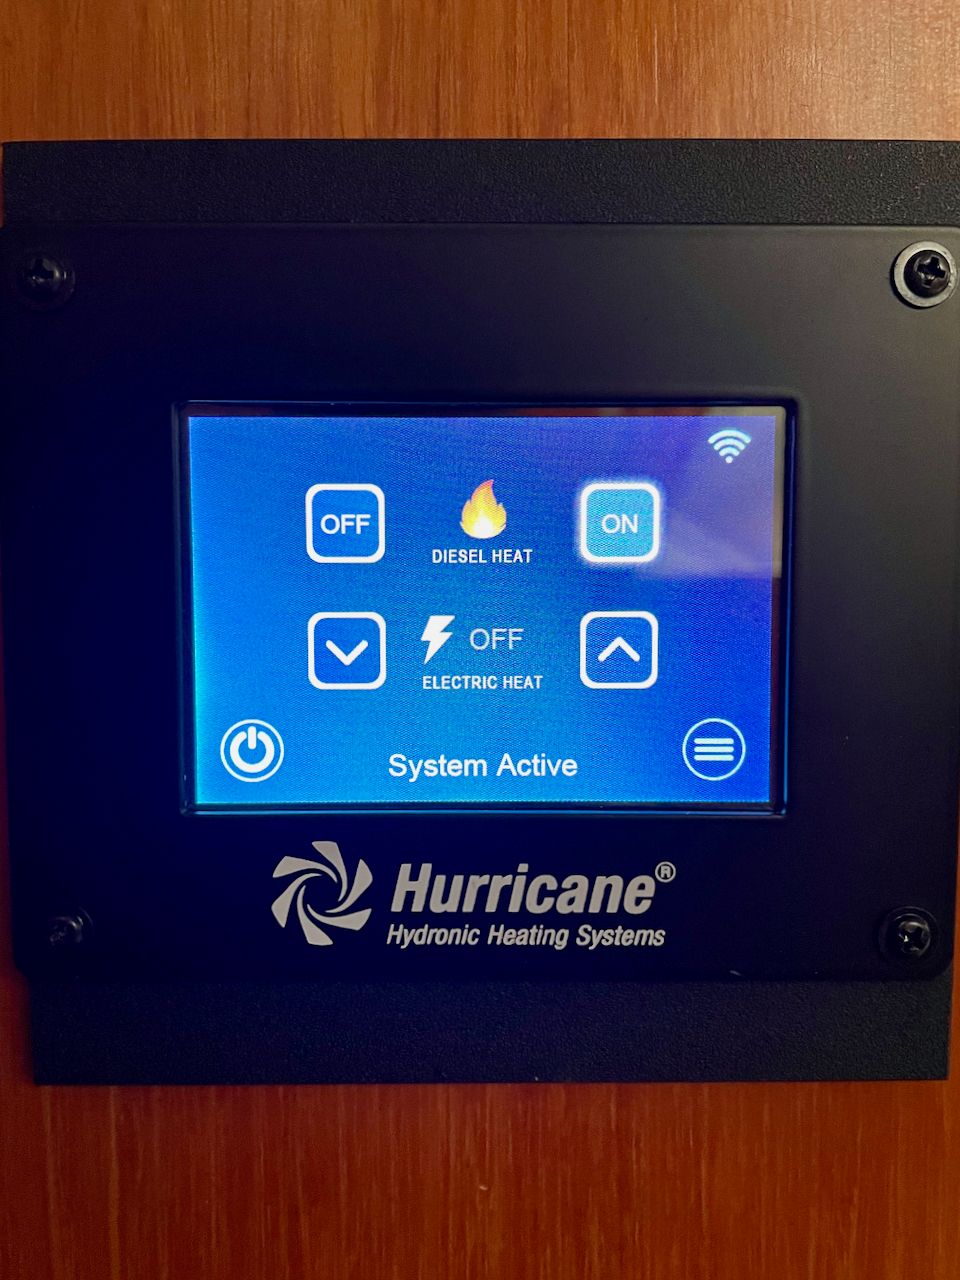
The touch screen is really easy to use with big ON and OFF buttons for diesel heat. In the winter, it was on most of the time and kept the boat warm even when I was away. In the summer it was also on a lot of the time to provide hot water. I disabled the engine pre-heat feature, so that doesn't show up, but you can't disable the AC element electric heat, so that is still showing, even though it is not connected.
Configuring the panel is pretty simple, and in fact, you don't really have to do much with it out of the box if you're OK with all options showing up. I decided to configure WiFi access as well, which allows you to use an app on a mobile device.
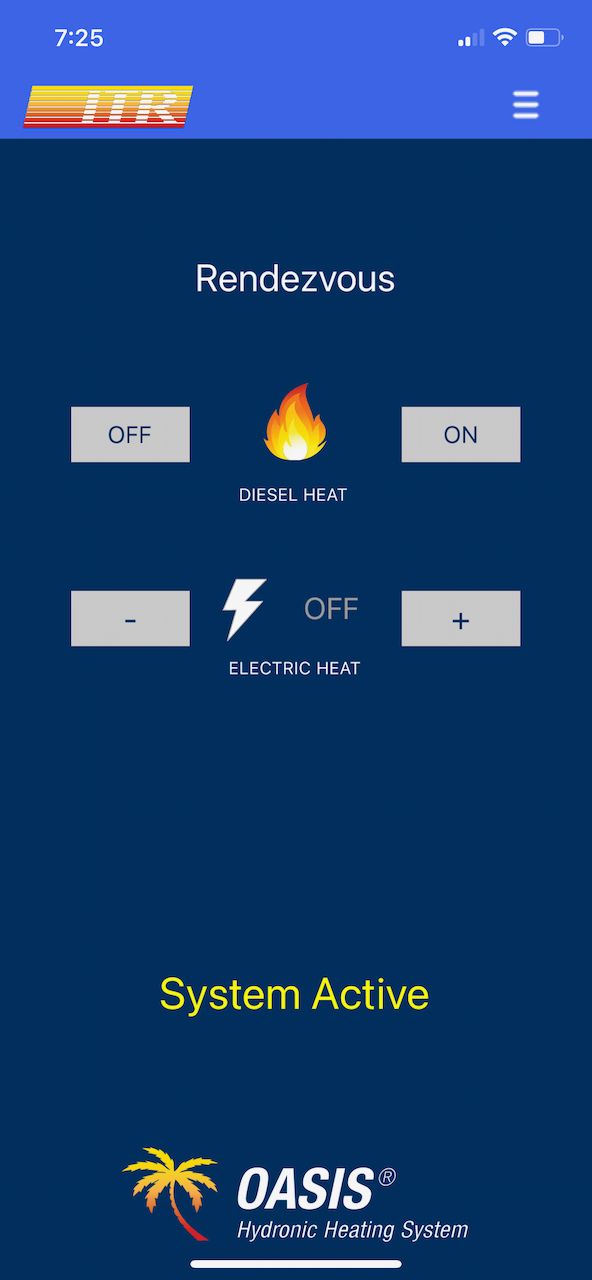
This allows you to control the power via your phone from anywhere. Most of the time, I would use it in the morning from my bed to turn on the heater for hot water in the summer. I couldn't be bothered to get out of the warm bed and walk 5 feet to the panel! I've also used it remotely a few times to turn things off and on.
Exhaust Noise
The exhaust noise is very low compared to the Webasto units I've had. The initial startup noise is sometimes distracting, but once it is burning fully, it sounds like an angry clothes dryer.
Conclusions
Pros
- Highly reliable, quiet heat with plenty of capacity
- Instant hot water is amazing, even in the summer
- Self contained, single unit with auto summer loop
- Touch screen controls, remote app, easy to use thermostats and fan controls
Cons
- Installation can be finicky, especially the exhaust - learn from an installation technician or pay to have it done
- Electric AC elements not worth wiring up
- The Aube thermostats are way better than the other choice, but still suck.
I would highly recommend ITR's Hurricane Chinook for a boat between 40-50' that desires a compact hydronic system with extra features like instant hot water and engine pre-heat.
Archived Community Comments
These comments were posted on the SeaBits forum before February 2026. Scroll down to join the current discussion.
Awesome writeup! I’m trying to figure out what to do for a full hydronic heat pump + diesel heat solution for our power cat. I originally contacted Webasto directly and had two guys come out and measure a bunch of stuff while we were on Lake Michigan, but they’ve been working on a full quote for 3 months now, and the initial rough one was riddled with mistakes and didn’t include diesel heat. So I’m considering doing this myself, exactly as you did.
Did you ever look at a fully integrated heat pump + diesel solution? I realize that there’s probably not a lot of need for A/C even in your warmest summer cruising up there, but figured I had to ask.
The webasto air handlers are also an order of magnitude more expensive than all of the units you looked at for this article, which is annoying. But maybe you need that to support both cold and heat or something… Still in pretty early exploration here, but your article supports my theory that I could completely do this myself, especially if I slowly add air handlers over the year as I have time to plumb things one by one, and eventually fully replace my existing triple heat pump system that came with the boat…
Thx for another well researched topic and fantastically detailed write-up. Very timely too, with temp at 19F at the hovel this morning, and for a friend who is outfitting an expedition sailboat.
-Mic
I have looked at these in the past, but I did not for Rendezvous mainly because of complexity and cost. There aren’t as many solutions out there that can do both, which further limits your choices.
I like combining things when they make sense, but it seems this industry hasn’t really gotten there yet. I was even worried about combining heat + hot water with the Chinook as some of the earlier models from ITR and others had issues from trying to do too much in a single solution.
I also think for redundancy it might be nice to have separate reverse cycle and diesel heating systems. I’ve seen plenty of boats that have had shared ducting for the air delivery side, so you could at least limit things on that front. But ultimately you’d have a reverse cycle system and associated handlers and water loop, and then a diesel system as well.
Aha! Good timing for sure! Outside air temp on Rendezvous got down to 23F last night with a wind chill of 17F.

In a perfect world I’d definitely like to do this, but I have the very first world problem of our boat having too many rooms, all of which want both A/C and heat and really do use both sets of things in the current system regularly with our great loop boating – and given that we want to take this boat back to the northwest to do Alaska several times once Starlink is available, the heat will be a super important part of that system.
We’re feeding air to 5 different major areas (2 bedrooms, office, the main living area, and the skylounge/helm), with 2 associated sub-areas (bathrooms) that can be linked to their associated bedrooms and just closed at the vent if applicable. So doing a second fully parallel system would require 14-18 air handlers instead of 7-9.
I’m not installing any heating systems this year or next, but I still enjoyed your article immensely, Steve.
Rendezvous looks to be like-new condition and should sell quickly.
fair seas amid the snow!
Rick
I think that is the challenge where you need both head and A/C in lots of spaces. I’ve only seen a few integrated systems, like the Webasto BlueCool, that do both, and they’re very expensive and proprietary to the point of being a single point of failure.
Sounds like a fun project!
Thanks for the kind words!
I’m very confident that Rendezvous will find a fantastic new home!
I’m curious what you find. I am in a considering a pretty similar sounding situation. Boat with existing cruisair tempered water system with 7 technicold air handlers and want to add a diesel boiler of some kind to the loop to allow heating without the large electrical demand of the reverse cycle.
TBH, I have found very little on the internet about anyone adding a boiler to an existing system. Have you found any references to this being done? I’m sure it must be a thing, and I probably need to just ring up sure marine or other vendors.
Mentally, it makes a lot of sense to me, but there are some technical challenges about how you interface the systems without them colliding.
The Webasto manual describes it in pretty good detail, but obviously relies on being a single-make integrated system – https://www.webasto-comfort.com/fileadmin/webasto__media/webasto-comfort.com/INT/Documents/083_StH__KAT_Marine_ENG_Einzelseiten.pdf
I haven’t seen anything else out there than the Webasto system, unfortunately.
Great writeup. We’ve been running this exact system on Turtle for the past two winters and it works great. Two things we’ve observed. 1) the system placement matters. We have it just behind the midship stateroom and it’s actually fairly loud. 2) the touchscreen occasionally (every few months) becomes unresponsive and the only way to bring it back is to cycle the power (by either resetting the system breaker or unscrewing the screen to unplug and replug it). ITR sent me a replacement unit and the new one does the same thing. You can still manage the system with the app, but not from the touchscreen, until a reset.
The unlimited hot water is amazing.
We just spent a frigid Christmas week at dock with 50A power and found that the AC elements reduced the diesel cycles by maybe 50%, which was really nice over the cold nights, given how loud ours is.
Over all, the system is a vast improvement over forced air.
I totally forgot about this! Mine has done this 2 times, and both times I unplugged the screen and plugged it back in, and everything started working again. I contacted ITR but never heard back from them as to their thoughts. Sounds like it is something funky going on!
Glad you have had good results with your system!
Happy Heaterdays! Quite a write-up in rich detail. I am about to replace the water supply piping on my boat but am favoring using Pex-A, the expansion type tubing. It’s the most flexible of the Pex family, and has less flow reduction from fittings, and it’s easy enough to insulate on the hot water side. Did the need to use special tools and fittings play a big part in your decision to use rubber water hose?
Nope, not really. I replaced almost all of of my water system throughout the boat with PEX a few months before this project. I have all of the tools for that too.
Hi Steve, Thanks for the great write up. I installed a Chinook in my boat last February and like you chose heavy duty thick wall 3/4" hose. Easy to run, connect and reconnect. I used screw clamps but will consider the spring clamps which are commonly used with Onix hose in residential and commercial hydronic systems. I haven’t connected the hot water yet as I was considering how to link the existing 20 gallon Raritan electric tank to the Chinook. Does your Chinook heat the contents of your traditional tank? I assume that your engine still heats the existing tank. Can you elaborate on your setup? Thanks
I think the ITR manual has a section on the hot water side as it’s a bit different than traditional hydronic setups.
Older setups used the in/out coolant ports on normal hot water tanks, like your Raritan, and circulated hydronic coolant through those to heat the hot water. It takes quite a while if the tank is cold.
The Chinook has its own heat exchanger inside the unit dedicated to providing what they call domestic hot water. If the unit is on, it essentially provides instant hot water by running cold water through that exchanger, and bringing the temperature up to about 120F.
In my article, I talked about how I built a series of valves to allow for me to use my existing Raritan hot water heater and run things through the Chinook. I think there is a diagram too that shows the piping. Essentially, the Raritan is “down stream” from the Chinook, and you have to disable or change the thermostatic mixer in the Chinook in order to use both in-line. You could also do this where you have multiple sources into a manifold but I think that the end result of what I’ve done is about the same.
My engine(s) were not plumbed to the hot water tank, so this is one of the reasons I wanted the Chinook to heat water while away from the dock. The only other way was to run the generator and then turn on the Raritan AC hot water tank, which would take 30-40 minutes to heat up.
I just started my installation of this exact system on my 49’ DeFever RPH. Thanks for the detailed write up. I’m using a combination of PEX (expansion fittings with the Milwaukee tool) and heater hose. Right now I’m trying to decide if it would be acceptable to run pex up the columns between the pilot house windshield and the flybridge. There’s a lot of wiring running up these columns in a tight spot so heat from the loop would be a concern. There’s no other good option top get heat to the flybridge so I’ll just do without if need be. I like your setup for the wiring next to the control board and id like to copy it but what is the part number for the block you used for the thermostat wiring?
It’s from BlueSea, part number 5045
https://www.bluesea.com/products/5045/ST_Blade_Compact_Fuse_Blocks_-_4_Circuits
Thanks. Found the one that will work for my application. Also, would you mind sharing a more detailed look at your final wiring at the control board?
I couldn’t find a more detailed photo in my library. Any particular part you were interested in? I can try to take some photos later tomorrow.
On Kensblog.com Equipment - Welcome to KensBlog he describes his kabola interface with his chilled water system. Specifically he has this diagram https://www.kensblog.com/wp-content/uploads/2019/12/tempered_water_interface_gb-70-1.jpg.
You can see that instead of putting the boiler directly in the main tempered water loop it has a separate loop that heats the main loop via heat exchanger.
That’s a pretty typical hydronic install. The Chinook has a separate heat exchanger built into it to do just this, separated from the one that does the hydronic side.
Sorry, missed your response. Might have to look to see if there’s a notification setting for the messages. Anyway, just looking to do a clean install and I liked how you have the control panel and wiring set up. I’m running the supply lines right now and hope to set the heater in place soon so I’m measuring out distances and layouts for the best options. Any additional pics might be helpful and would be appreciated. Thanks.
Hi Phil,
I haven’t been back to the boat since the last message, and am trying to bring the new boat back home, so I might not get a picture for at least another week.
Notification settings can be found by clicking your picture icon in the upper right, clicking on the person icon, then Preferences, then Emails. By default I think it sends you email if someone replies to one of your messages directly, but you might have been able to turn that off when signing up.
Sounds good. The new boat looks nice, BTW. Looking forward to your future write ups on it.
I’m at the point where I’m running the wiring for the thermostats. However, the wiring diagram is a little confusing and I’m trying to figure out how to wire them up. The manual lists each zone as a colored lead but doesn’t say how the lead is wired to the thermostat or whether or not they should be fused. Any help you might offer on this would be appreciated. Thanks
I wasn’t able to take any further photos before the boat went to the new owners, unfortunately.
Page 6-5 of the Hurricane Chinook installation manual talks about the wiring for the thermostats. You need a 12v DC source that has a 1 amp fuse going to the thermostat. The return from the thermostat then goes to the appropriate zone wire for that particular zone.
Many heaters are set up this way where the thermostat energizes a 12v circuit back to the zone board or control system to indicate when heat is required.
I think I was just overthinking it. That makes perfect sense now that I run it through my head. For some reason I was thinking that the thermostat had to be grounded as well. But, hey, one less wire to pull is great news in my book. I can’t believe how much wire I’ve already run for this project. I’m just happy that Fisheries is a pretty simple ferry ride away……
Hi Steve. I’m just finishing up the details on my install and I’m not at all happy with the cheap thermostats. I picked up one of the Aube thermostats that you installed but I’m confused to how that one is wired up. Any chance you could help me out with how to get it working?
Thanks
Hmmmm I don’t know that there would be any different wiring for the Aube than the standard ones that everyone uses. It’s essentially two wires, one positive (with the fuse that I had taken a picture of in the article) coming in to the thermostat, and a return going back to the zone that you want to activate. The Aube also require batteries, but most of them do that aren’t the super old mercury ones.
That’s what I was thinking so maybe I’ve got a bad one. It won’t call for heat and doesn’t allow me to change the temperature after I put the cover back on the unit. I’ll pick up another one and see if I run into the same issue. My other thermostats all work. The only problem I’m running into now is that zones 3 and 4 won’t kick on the circulating pump unless zone 1 or 2 is actively calling for heat. I’ve set the jumper as per the instructions but still not having any luck. When those zones call for heat I get the green lights on the control board and voltage out to the fans but the loop isn’t circulating. Waiting on a call back from ITR to see if they have a solution.
Do you hear a click and see the little wavy lines on the display when the thermostat calls for heat? Make sure you are connecting the wires to the covered contact points under the top center portion of the thermostat. I saw someone connect the wires to the telephone / remote activation contact points which won’t work.
There is no indication at all that it’s calling for heat. I’m confident that it’s wired correctly and I’ve checked it with one of the analog thermostats. Works fine that way. I’m pretty confident now that it’s a bad unit. I have another one on the way that I’ll try out.
Quick question. Our unit has an automatic summer loop (there’s no physical valve) and we’ve noticed when we run the water that the main cabin fan turns off. Does the same thing happen with your unit?
I ended up selling Rendezvous in December of 2021 which is where my Hurricane unit was installed, but I do not remember the main cabin fan going off when I ran the water at all. I used the water heating function all the time in the unit…
Wow, what an excellent post. I have a question regarding the “Summer Valve” and how it bypasses the heating fans. I assum that you have to close the loops going to the fans and then open the summer valve. My question that that will bypass the expansion tank! Do you not need the expansion tank in the summer loop?
Hi @Derick_Clack,
The summer loop is automatic with this system. You don’t have to close any valves or loops going to other places. Most of the other hydronic systems I’ve worked on or had on my own boats, including the one I have on Aruna, have manual valves that you have to close to the various loops to prevent circulating the coolant around the boat in the summer.
There is no expansion tank in this system. It is essentially built into the main unit, so you don’t have to do anything with the summer loop regarding the expansion tank.
Hi Steve. Thanks for responding so quickly. So my question is what is the summer valve in the picture for? How does the water not circulate to the the rest of the boat during summer?
@steve Ignore that, I see that the expansion tank was in the diagram from Sure Marine and you did not go for that design. My hydronic system is already installed and it is a single loop with the exception of valves used to direct a loop to a Torrid how water heater. So my issue is is that it seems like I will need to reposition my expansion tank so that it is always in any part of the system and currently it is not .
Aha, I wondered which diagram or item you were looking at. Glad that was cleared up.
Having the expansion tank in the summer loop as well is going to be important, but you could also add in a smaller tank just for the summer loop if that is easier. One of my other boats had two expansion tanks - one near the heater and in the summer loop, and one high up and meant for the full loop.
Aaah, I was wondering about a second expansion tank. So does the extra tank have to be higher than the summer loop? My loop is currently attached to the bottom of the saloon floor and will run down to the hot water tank. I don’t really have anywhere else to place the expansion tank higher. I assume that if I have a summer loop expansion tank and if its lower than my full loop tank, I will need a way to close it off so I don’t have two tanks in the full loop. Thanks for help btw, greatly appreciate it.