My navigation and electrical panel has been in need of an update for a while. In addition, I have never liked the electrical circuit layout, and am out of DC circuits. I have a general design of what I would like, but still have not settled on a final solution for the electrical panel. Here are the project goals:
- Hinged panel – I open and close the current wood panel frequently, and it is not very serviceable. Two screws hold it in now, and you have to slide it duown and out, putting some components at risk. I would like a hinged panel or something similar to allow for easy access.
- Layout components more sensibly – current layout was based on available space and existing components.
- Rework capable – I am sure I will replace one or more components through the life of the panel, and I would like to be able to swap the entire panel out easily with an updated one.
- Fix AC circuits – with the addition of an inverter with my power system upgrade project, I found inadequate fusing that I want to fix. I also want a better breaker for my shore power connection.
- Light up DC circuits – the current panel has a tiny light near each breaker when it is on, but nothing under or near the name. Some breakers lights have stopped working altogether. I installed a BlueSea 360 panel on Jammy, my previous boat, and loved the backlit labels.
- Add more DC circuits / split out others – I want to separate out some circuits that are combined now, and add one or two.
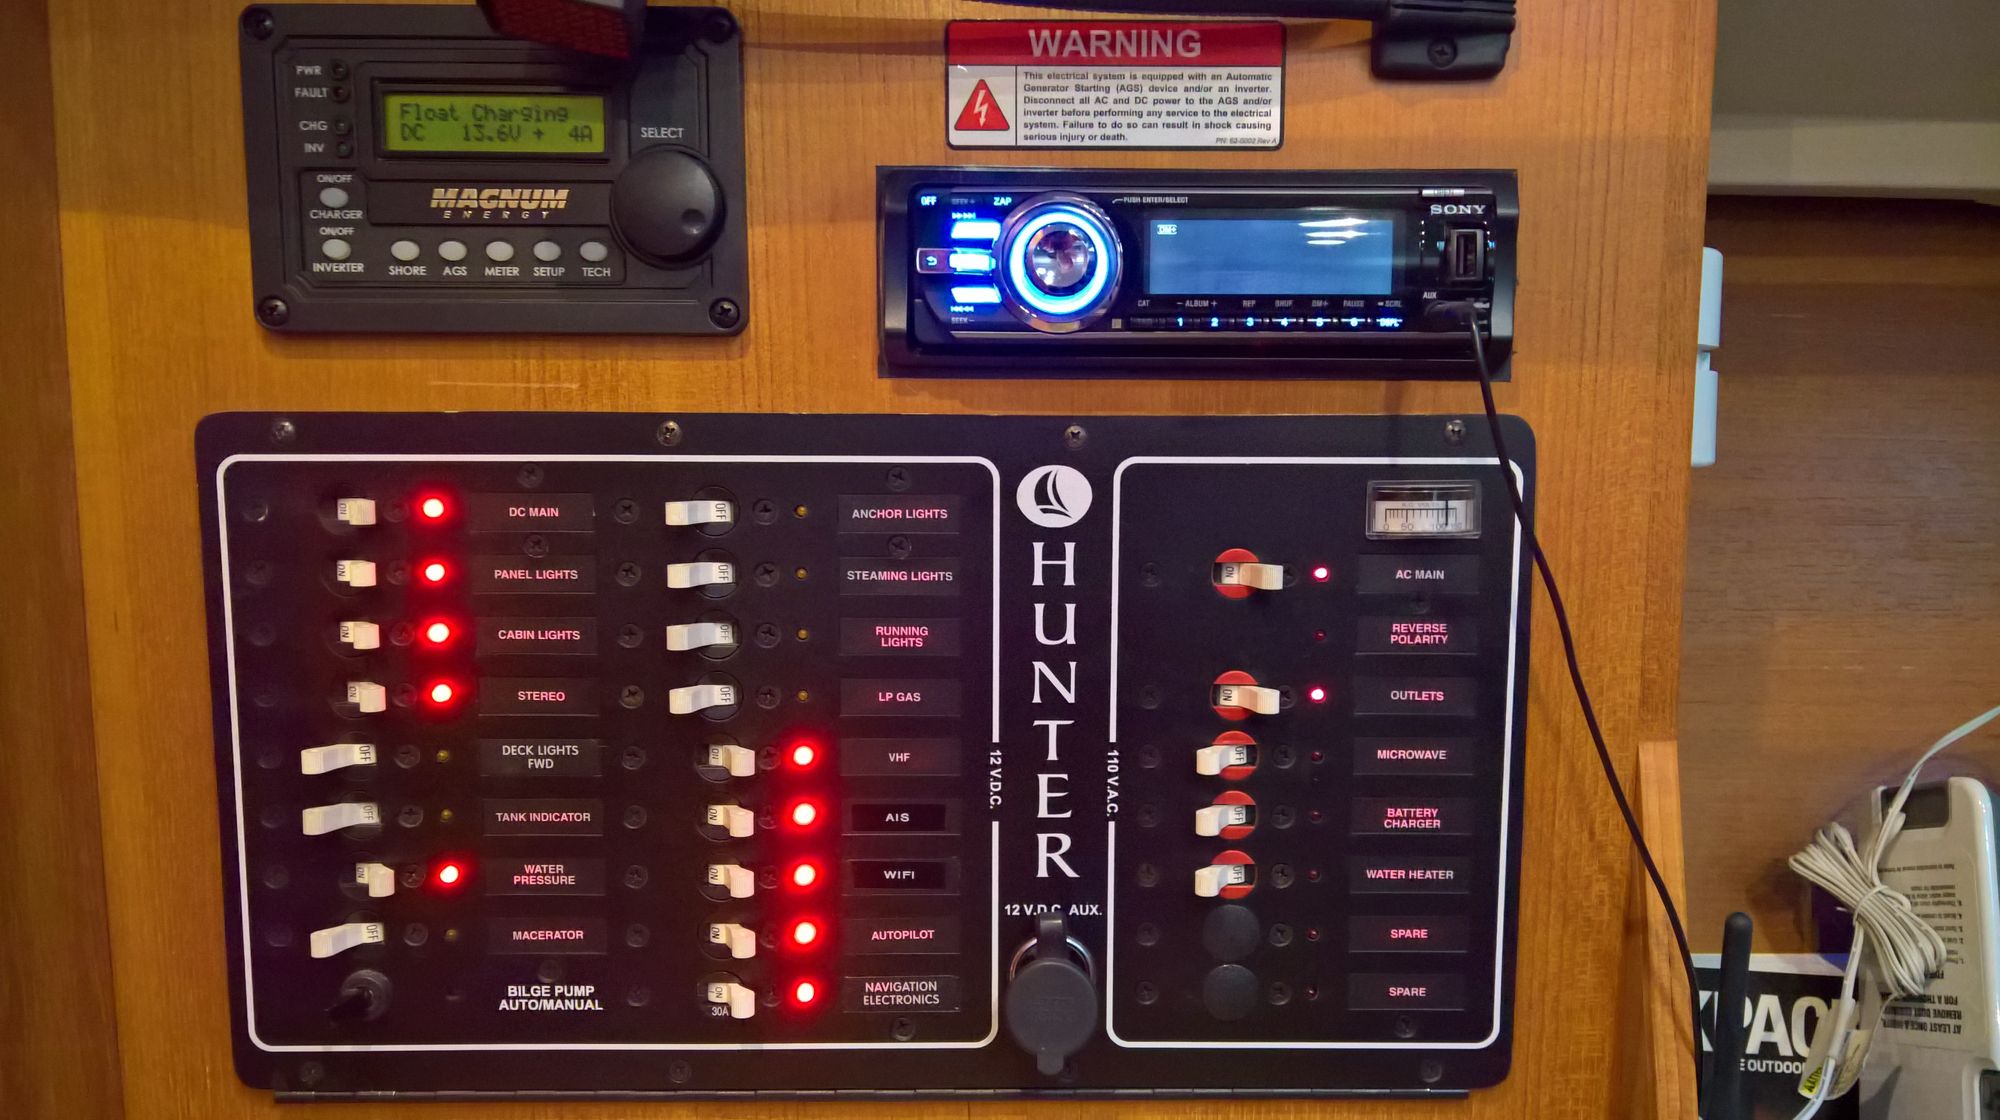
Current Panel
Current navigation panel
My current panel is nice wood that has been modified a few times by me and the previous owner. It requires unscrewing two screws and carefully lowering it down a bit before it folds out. I’ve already had to replace one screw with a bigger one after wearing out the hole.
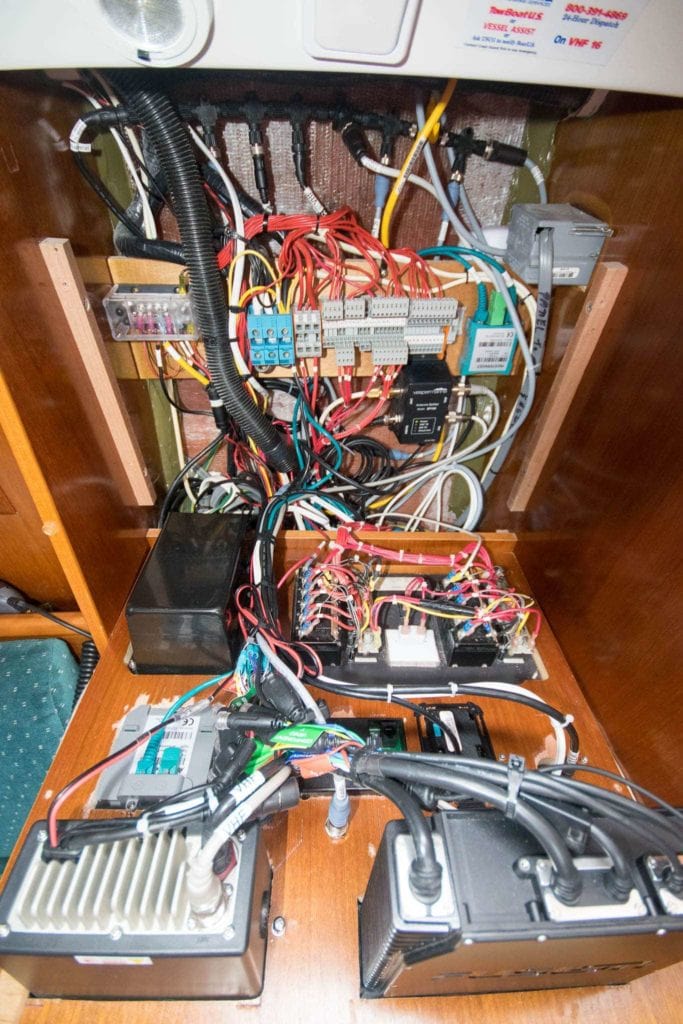
Reaching things once it is open is pretty decent, although I do have to put a pillow underneath the front to prevent any damage. Behind it is the main electrical distribution bus for all of the DC circuits.
Panel Choice
I have made my choice for the panel – I will be designing one using Front Panel Designer and having Front Panel Express produce it. I have done this before for the navigation panel on Jammy, and ended up making over 10 different panels with their service. The power is in the Front Panel Designer software, which allows you to choose the type of material, thickness, and coverings, make holes, squares, and other shapes, and add labels plus more. All of this is then easily sent directly from the software to their site, and your panel is manufactured on their state of the art systems and sent to you a week or two later.
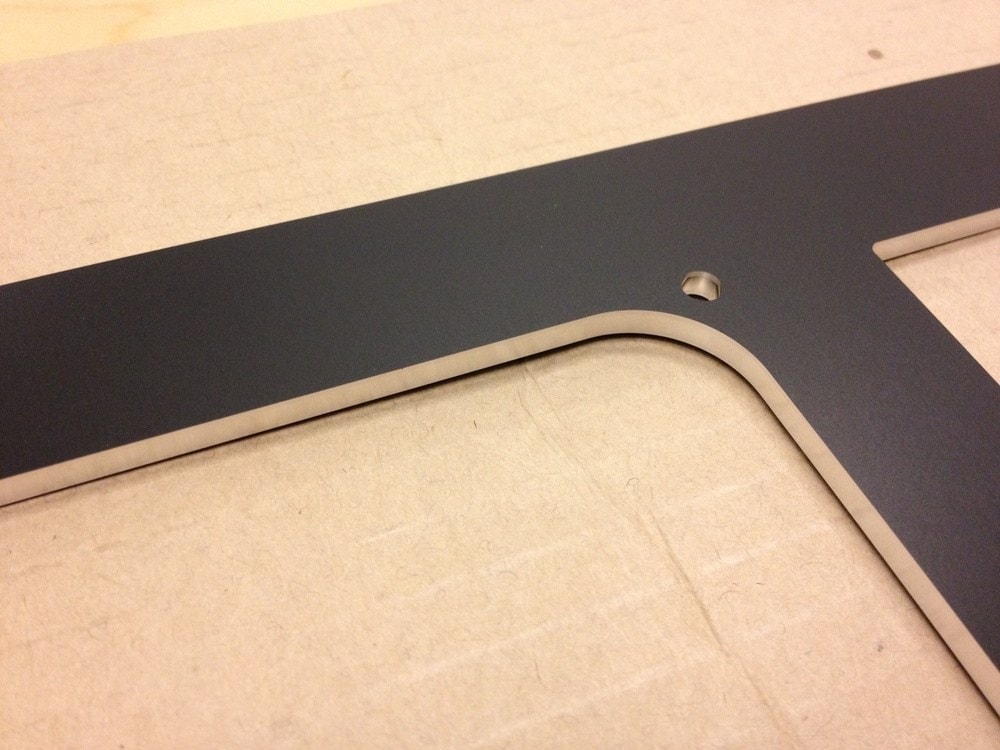
You can specify the color of the anodization, width of the overall panel material, if you want the edges sharp as a razor or with a bevel, and much, much more. Having made so many panels, I recommend always measuring your components and not relying on manufacturer cut templates or specifications, as they often vary. I also always add 1-2mm of extra space in cutouts as aluminum is very unforgiving and sharp, and very hard to shave off without creating a mess.
I haven’t figured out exactly how thick I want this one, but I think black would be the best color for all of the components that will end up going on it. I also think white lettering would be clear and easy to read.
In terms of serviceability, I believe attaching it to the bottom of the existing wood with hinges hidden behind it, and allowing the whole panel to fold out easily would be best. I haven’t figured out how to keep it from folding out too far, but there are a number of options there.
To keep it locked in, two surface bolts of some sort facing up into the top area (or something similar) – I haven’t figured that out quite completely yet.
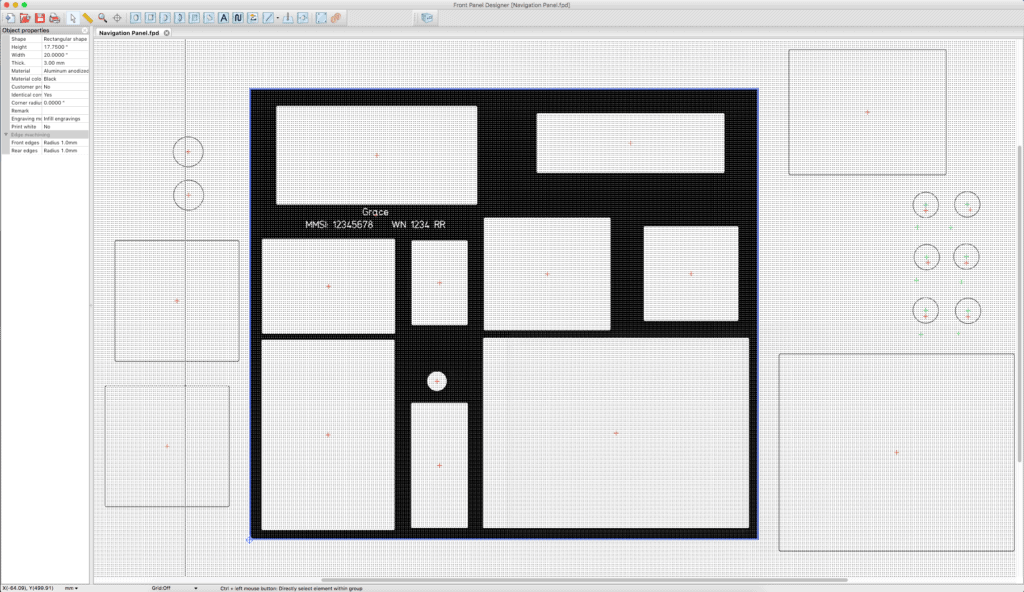
My current panel layout is still evolving, but Front Panel Designer makes it easy to move things around to see how things look. Everything fits, but it is still pretty tight overall. I’ve got a lot of alternate panels and layouts outside in the margins and drag them around to figure out exactly how I want it to look.
You can also export it to PDF and see how it would look as a final product.
After a few iterations, I knew I had the general panel design pretty close, but I needed to decide exactly what components I was going to order!
DC Circuits
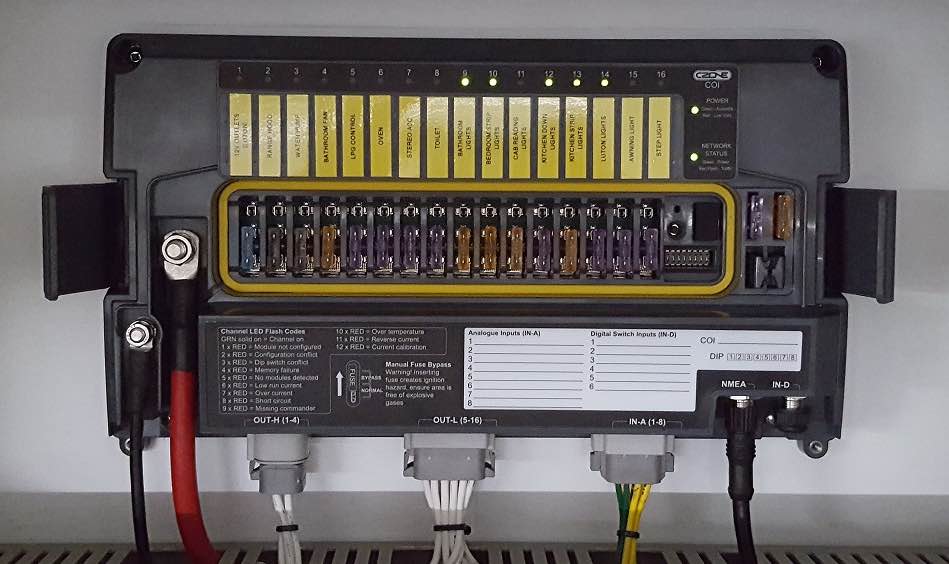
I currently have 12 DC circuits with my existing panel, and would like to have a couple more circuits, both for expansion and to break out some existing items that I don’t like having combined.
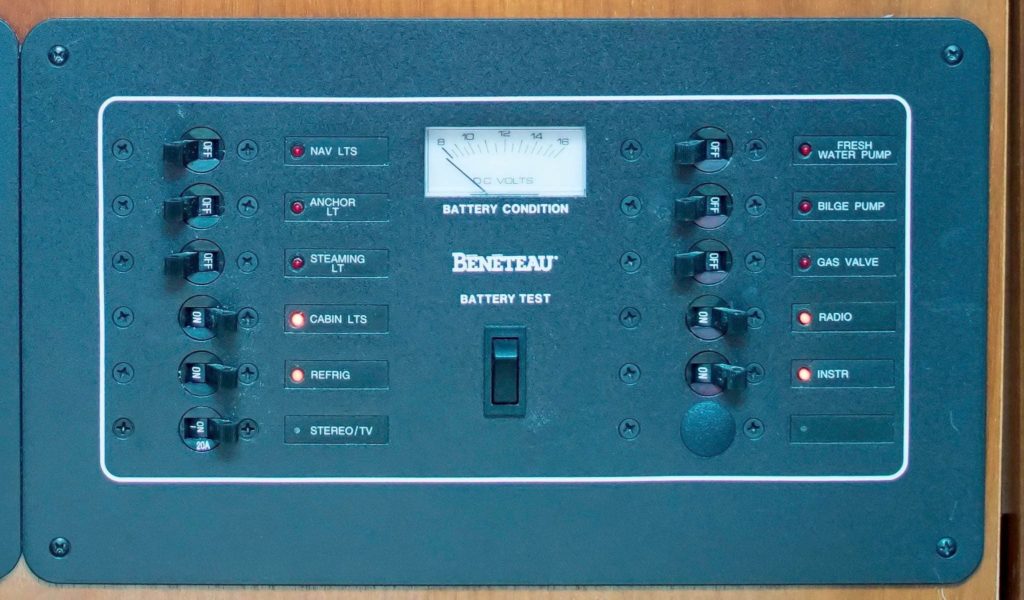
I think the panel takes up far too much space for 12 circuits, and I hate that I can’t ever figure out where the cabin lights circuit is when I am in the dark. The battery test button and meter is not needed with all of the MasterVolt instrumentation I have. While the circuit breakers are relatively inexpensive, finding ones that have the light has been challenging, and I don’t like the bus in the back that you have to work with.
BlueSea vs CZone
The biggest choice in my DC system is whether I use a BlueSea panel, or go networked and use a CZone system.
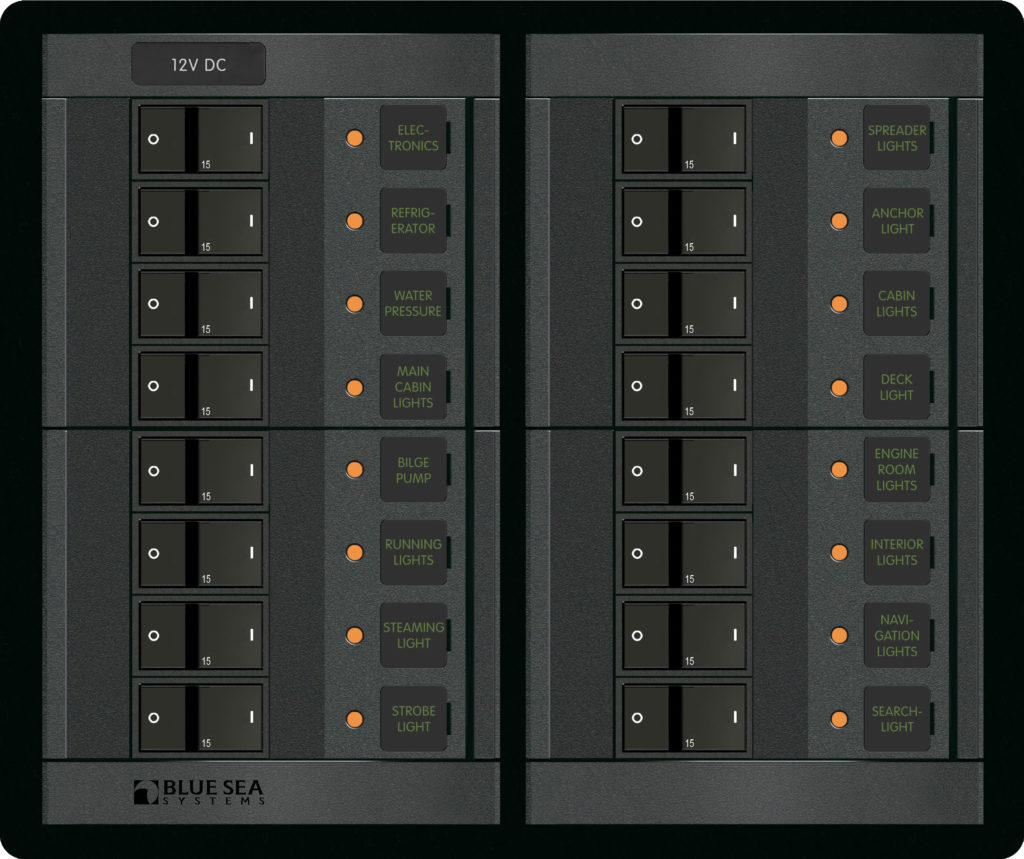
BlueSea is one of my favorite manufacturers. I have used their stuff everywhere for years, and love it. I prefer their 360 panels, and installed one on Jammy that worked perfectly for the years I owned her. There is a 16 position 12v panel that would be great for everything I have now, plus expansion. It is more compact than the Traditional Panel below, and does not have extra busses wired on the back which I don’t need.
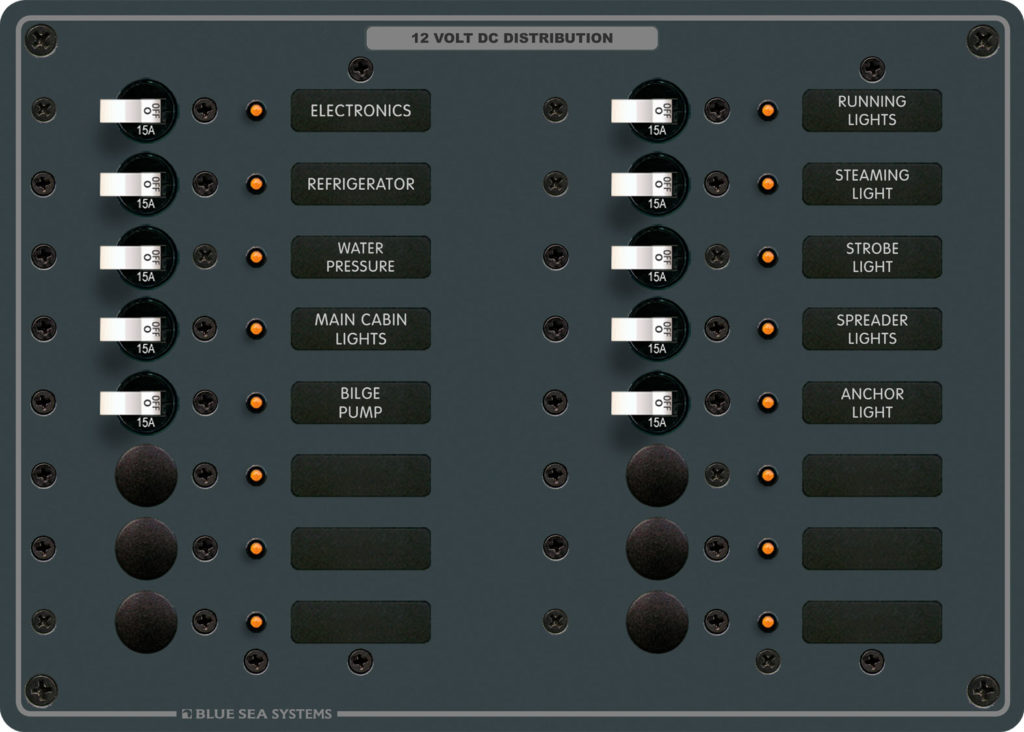
I am also considering the BlueSea traditional panels as I know for the AC side, I am going to be stuck using those. This one is only 1.25″ wider than the 360 panel, but it would match the AC panels which might look better.
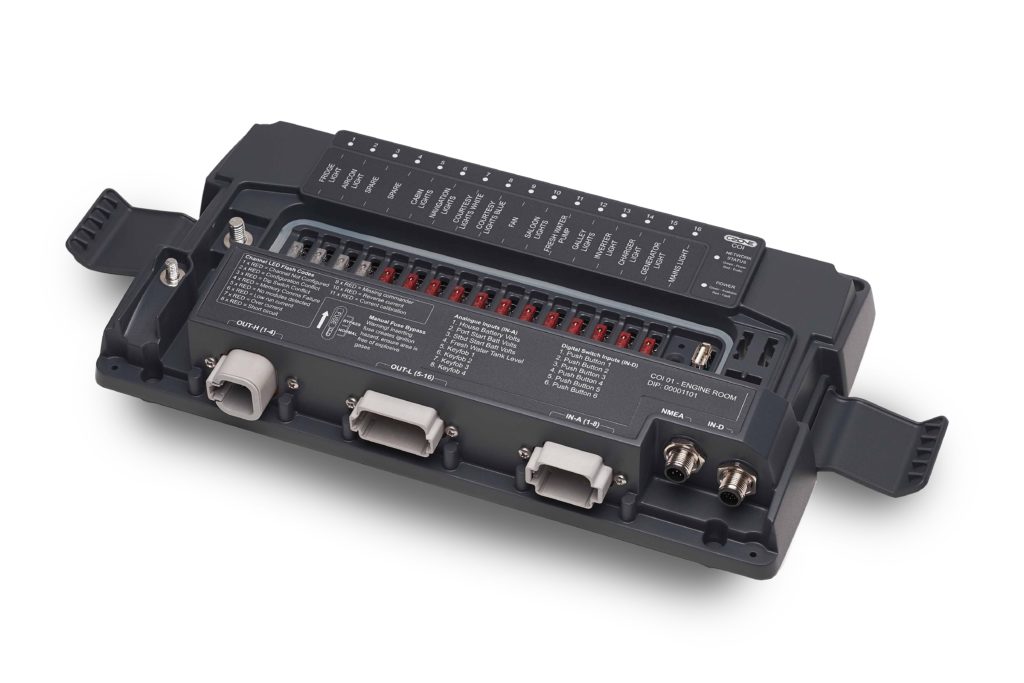
CZone COI
CZone has a product called the Combination Output Interface, or COI. It is a beautiful little box that has 4 high current and 12 low current outputs, 8 analog inputs, NMEA 2000 network connection, and a connection to a manual switch box. This would allow me to eliminate the DC panel itself to save room, and have a lot more freedom and control over the system from around the boat or even remotely via the NMEA 2000 connection.
However, I would want a few manual switches for critical things, which requires another interface box and cable, and I would use my B&G Vulcan 5 to control scenes and other switches that are less used, which would take up some space on the panel.
This solutions seems more my style, but it is more than double the cost of the BlueSea solution. It also has a few more parts:
- CZone COI box
- Breakout box for analog switches
- 6 analog switches
- Analog switch cable connectors
- CZone to MasterBus interface
- Crimper for specialized connectors
- USB CAN bus programmer to program COI box
It still is very attractive to me because of its networked ability and space saving, but is it worth the price? I haven’t been able to find many people with boats my size who have used this solution.
AC Circuits
After adding the inverter last year, I have been wanting to redo the AC part of the panel to eliminate some breakers that are not used, update the shore power breaker, and separate out the inverted vs non-inverted circuits better. I reviewed the 360 and Traditional Metal Panels from BlueSea, and am leaning towards the Traditional because they come pre-wired with all busses on the back of the panel. The 360 panels require separate busses for neutral and ground, which would be more space and components that I probably don’t have room for. Right now this is my leading solution:
- 1x BlueSea 8100 ELCI Main 30A double pole shore power circuit breaker
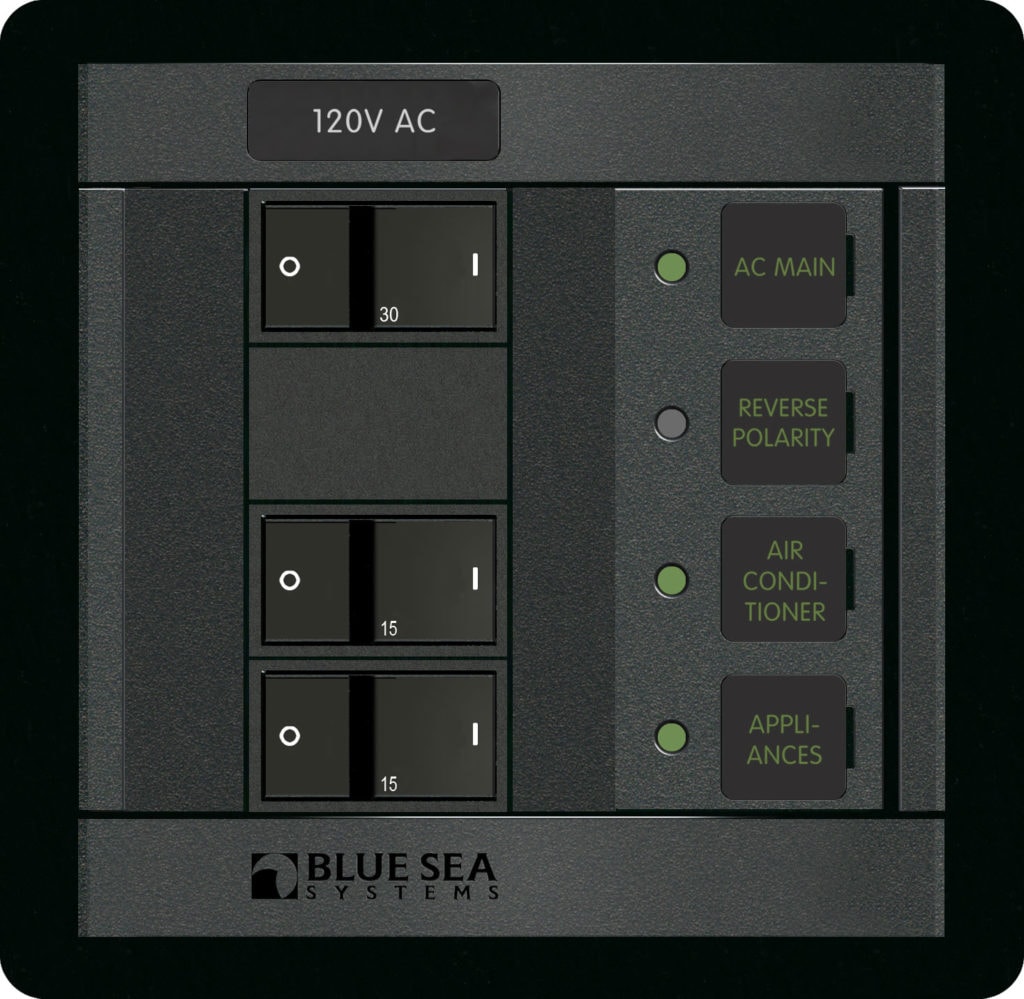
- 1x BlueSea 8027 6 position + AC main panel
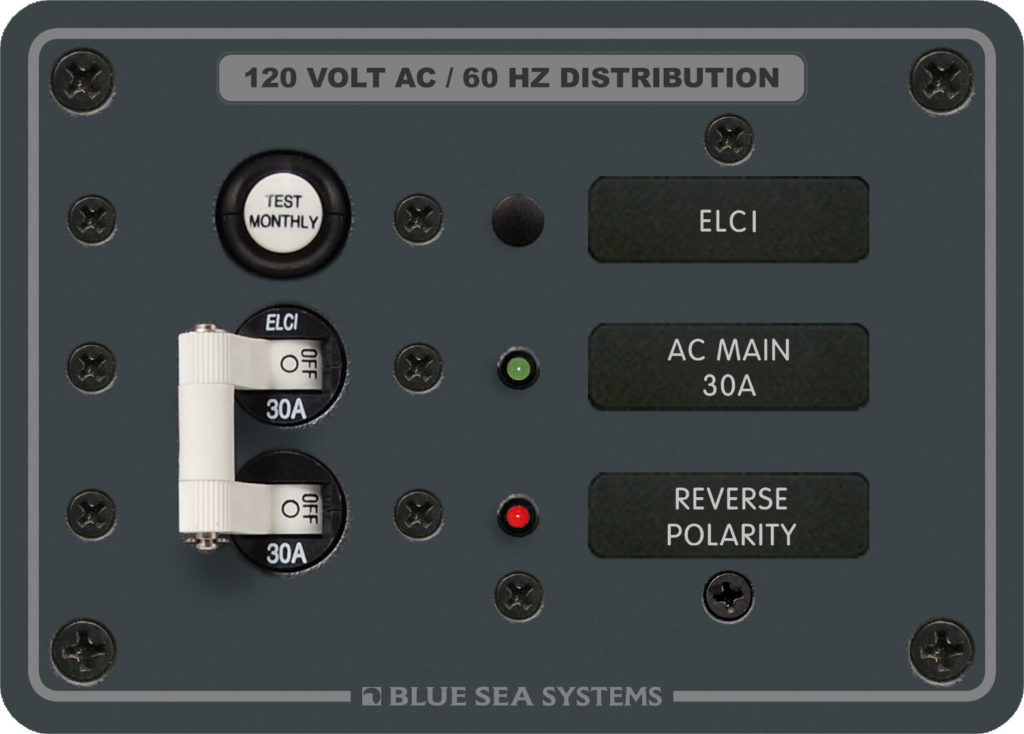
BlueSea 8100
The BlueSea ELCI would take my main shore power connection and provide a better overall circuit than the existing one. The output from that then goes to the inverter, which passes on inverted and non-inverted AC. This allows the inverter to “see” all of the AC power coming from shore, and adjust various things on the fly depending on how much of my 30A shore power connection I am using.
I love this feature, and have used it a bunch when visiting other marinas that have lower breaker (or trip at a lower level) shore power connections. In the summer, I can have the air conditioner and water heater on, which draw quite a bit from shore, and the inverter will slow down the battery rate of charge so that things are comfortable. I could just bypass this part of the inverter, and only run inverted circuits through it, but I would likely trip the shore power circuit breaker which would be annoying.
BlueSea 8027
The two different AC circuits would then make their way to this panel. The non-inverted would go to the bottom three circuit breakers, and the inverted would head to the main AC breaker at the top. From what I have read, this is pretty common, and you can cut the busses on the back to isolate them from each-other. Also according to specifications, the normal AC (non-inverted) power has an upstream master breaker (the 8100 above) and the inverted power has the one on this panel, which is safer than what I have now.
BlueSea 1214
I could go with the 360 panels, and put two of them in – one for inverted, and one for non-inverted power. That adds an additional master circuit breaker for the non-inverted power, which isn’t a bad thing, but from what I understand it isn’t required. In addition, this limits me to two circuits for each panel, instead a total of 6 with the combined panel above. In addition, as I mentioned above, 360 panels do not have neutral or ground busses integrated, so I would have to provide those somewhere.
Example Layouts
So let’s take a look at the three layouts I am considering. I’ve used the export to PDF functionality from Front Panel Designer, and then imported it into OmniGraffle. The next step was to find front facing images of all of the equipment, resize them down to the layout cutout, and overlay them to see how it looked in the real world.
Layout 1 – BlueSea Traditional Panels
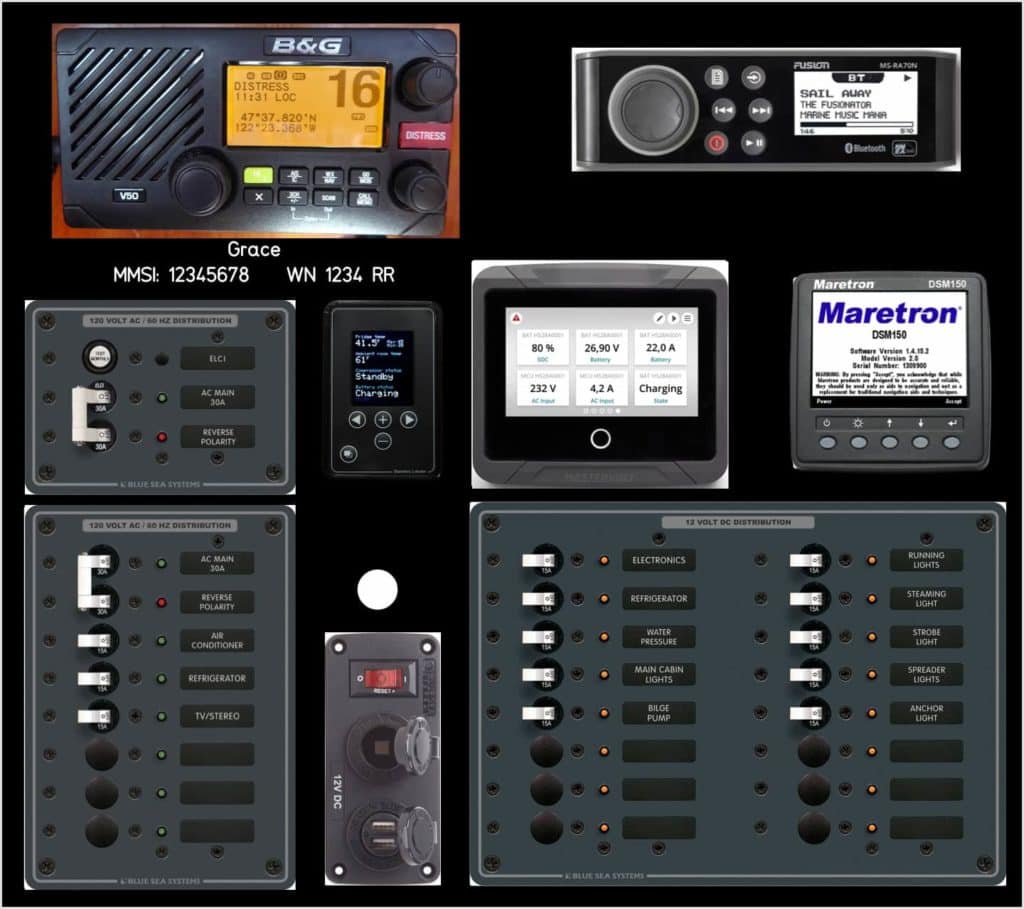
This uses BlueSea Traditional Panels for both AC and DC, gets me more circuits for both AC and DC, and meets my requirements for lighting and such. However, they are bigger than any other solution, and leave little room for other things.
Layout 2 – BlueSea 360 Panel for DC, Traditional for AC
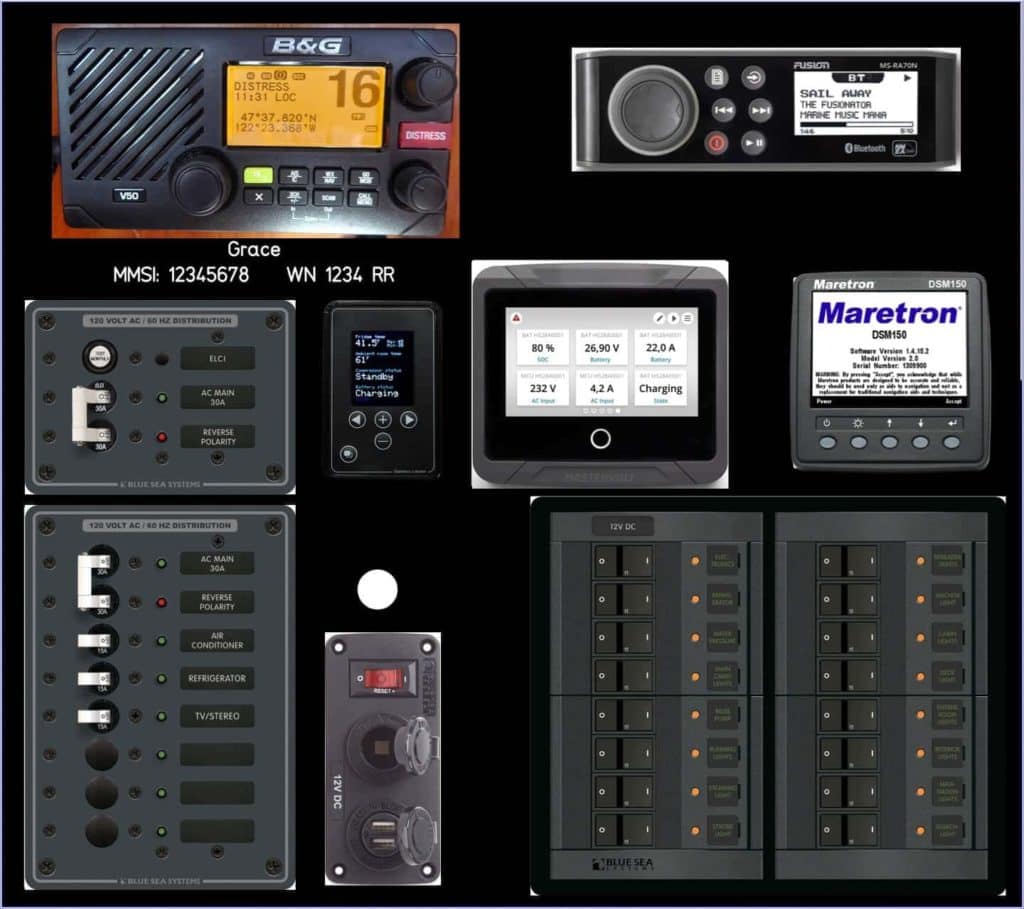
I deliberately did not move anything on this layout other than replacing the traditional DC panel with BlueSea 360 model 1222. It is quite a bit narrower, but slightly taller. They don’t look too bad mixed on the layout, and if I took some time, I bet I could re-arrange some of the upper instruments to get more space and a better layout. Layout 1 definitely looks more cohesive though….
Layout 3 – CZone COI and B&G Vulcan 5
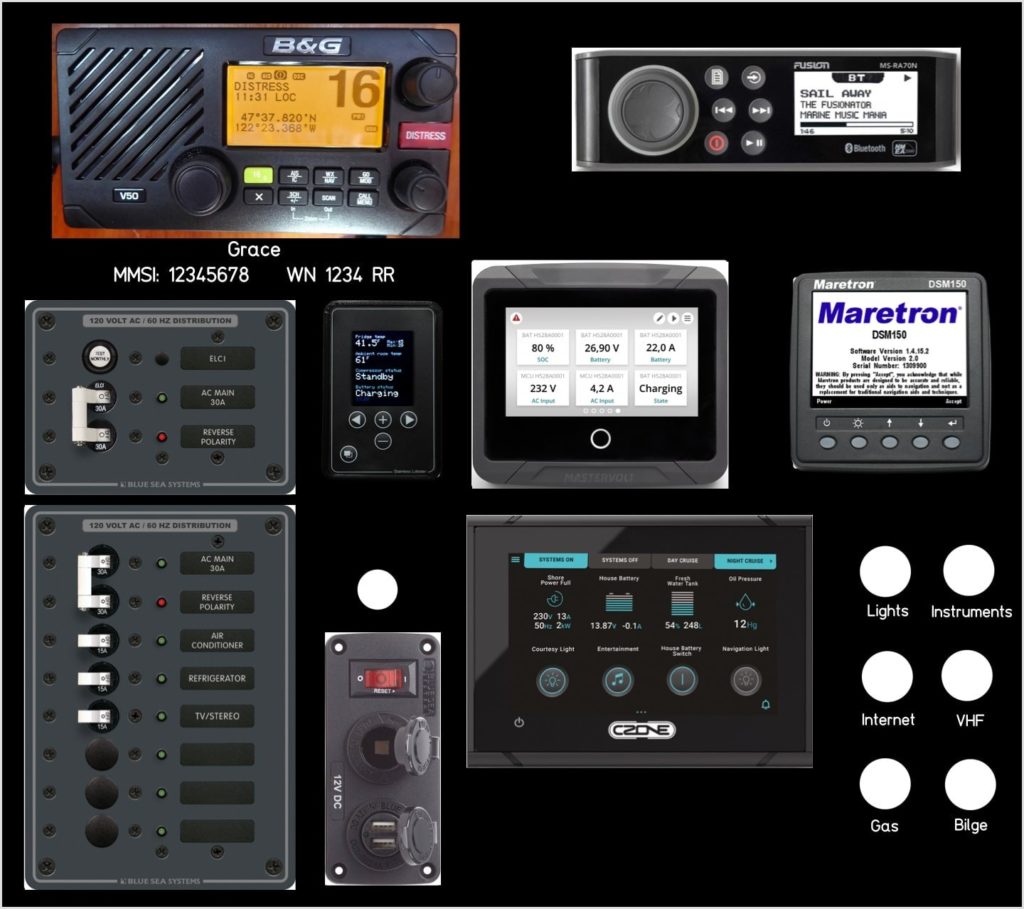
I used the CZone Touch 5 graphic above to show the electrical screens, but the display from my B&G Vulcan 5 would be similar, plus I would have charts, NMEA 2000 data, and be able to remove the Maretron, saving even more space. The 6 white circles and names to the right would be the push buttons to turn on/off critical circuits even if the Vulcan or the NMEA network were down for some reason.
This layout gives me a lot more flexibility with space, and could mean adding more AC panels if the combo one doesn’t work. However it comes at double the cost and more complexity. The COI unit would have to be mounted behind the panel, which is OK by me since it would not hinge out and likely be safer.
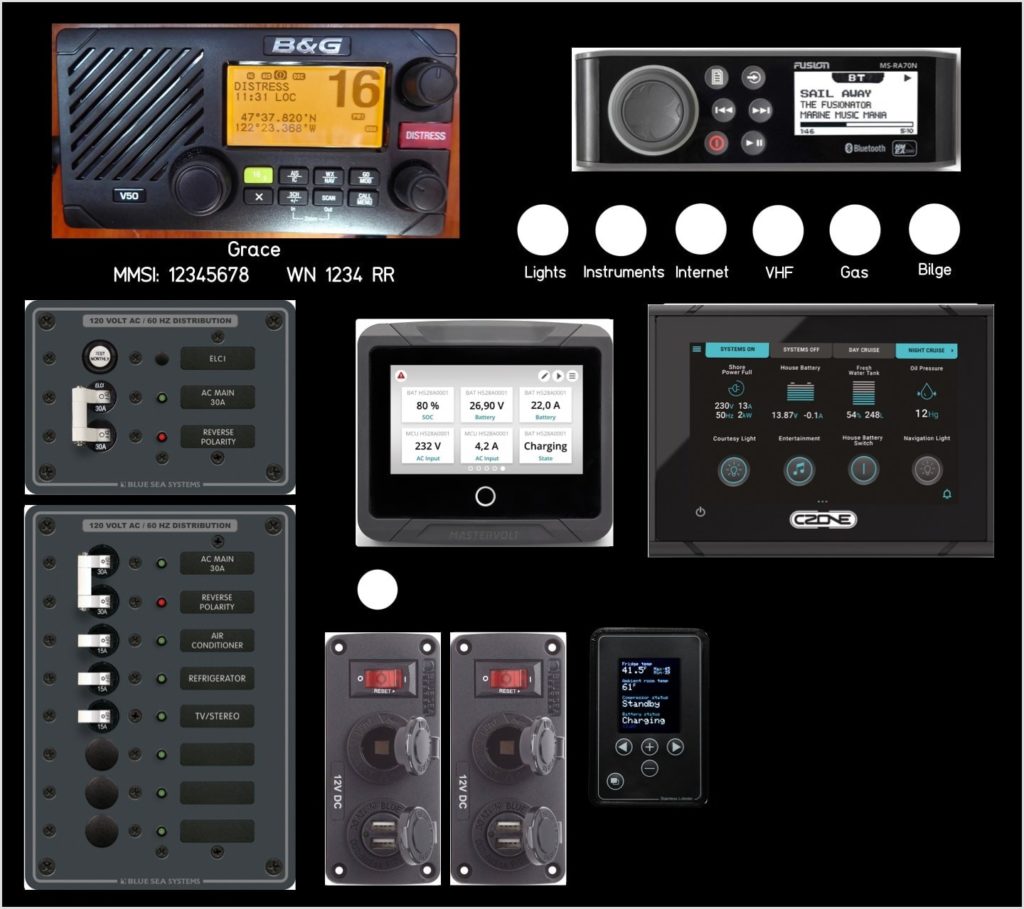
Here’s an alternate for Layout 3 that eliminates the Maretron since the Vulcan can show everything it can, which gives me even more room. I added a second 12V socket / USB block since those are always in high demand for charging various things. I also moved the buttons for the critical circuits up higher so they are easier to find. This layout might be necessary if I have to add more AC panels or use larger panels in general.
Thoughts
I would like to have this project done in the next couple of months prior to the time when we start taking more frequent trips. I think the overall approach is OK and can’t find any major problems with it. I have been thinking this through ever since I started my power project last year.
The CZone system has a lot of appeal to me from the networking perspective. It also would make it much easier if I wanted to swap the aluminum panel out for future instruments, as all of the DC wiring would be moved into the cavity behind. It is harder to add new wiring – requiring crimpers and potentially removing the large plugs from the unit. But the space I gain is considerable.
Normal BlueSea panels don’t require networking, but they take up a lot more space. If I were to go with one of those, I would have to consider going from 16 to 12 DC circuits, which is a bummer. I really want to break out some things that should not be sharing circuits (VHF being the top priority) and have some room for expansion for things like spreader lights and a dedicated circuit for the radar.
Any way you cut it this will be a fairly decent sized project. All of the AC and DC wiring is in place, so it is a matter of choosing the new panel solution, ordering it, measuring everything and finalizing the Front Panel Express order, and then diving in!
Any suggestions or comments are much appreciated. Have you ever used or worked on a CZone system? If you have inverted and non-inverted circuits, how have you paneled or routed them?
Archived Comments
These are read only comments from the old system. Scroll down to participate in SeaBits Discussions, our new interactive forum attached to each article.
Walter
January 22, 2018 at 3:17 am
My Suggestion would be:
1) Use 360 Panels if you can justify the cost, they look clean and modern
2) Utilize Sub panels incorperating either 360 panels od weatherdeck switchs instead of Czone.
3) Place the audio equipment vertically stacked and the displays horizontally stacked
I would have a DC 360 panel with grouped sub-systems on each Circuit breaker, and then branch those systems off to a WeatherDeck with the internal fuses.
You could have one circuit on the DC main “External lights” and then place a WeatherDeck just inside the companion way with each switch for a dedicated light. The labels change color indicating on (green), off (red), and no power (out). And you can easliy access and veiw from inside or the helm while underway.
Another Weatherdeck could be on a “Nav Equipment” Circuit, placed at the Helm. From here you could turn on Radar, chart plotter, AutoPilot ect. Allowing you to power down or power up the helm station from the Nav station before and after a voyage.
MrSteve007
January 22, 2018 at 11:11 pm
On my Hunter 326, the nav radio is near the companionway (with a remote mic at the helm). This has never been a problem for me. For some monitoring devices, such as the PV power system, they’re mounted on the side of the Nav station, vs. in the main panel wall.
Although, I too have been having issues with my DC panel getting too crowded. I wouldn’t mind separating both the radar and the AIS from the “Nav/Electronics” breaker – although I have discovered it isn’t too hard to power down the radar from the Raymarine Chartplotter’s interface.
Howard Tucker
January 23, 2018 at 4:16 pm
Do you really need the cigarette lighter plugs? Maybe just get USB panels?
Ludovic Francois
January 25, 2018 at 12:09 am
What about the smart gauge? Not happy with it? I got one for $60 at West Marine last week, so now I see you are not sure to keep it. I am curious about that 🙂
Steve Mitchell
January 28, 2018 at 5:40 am
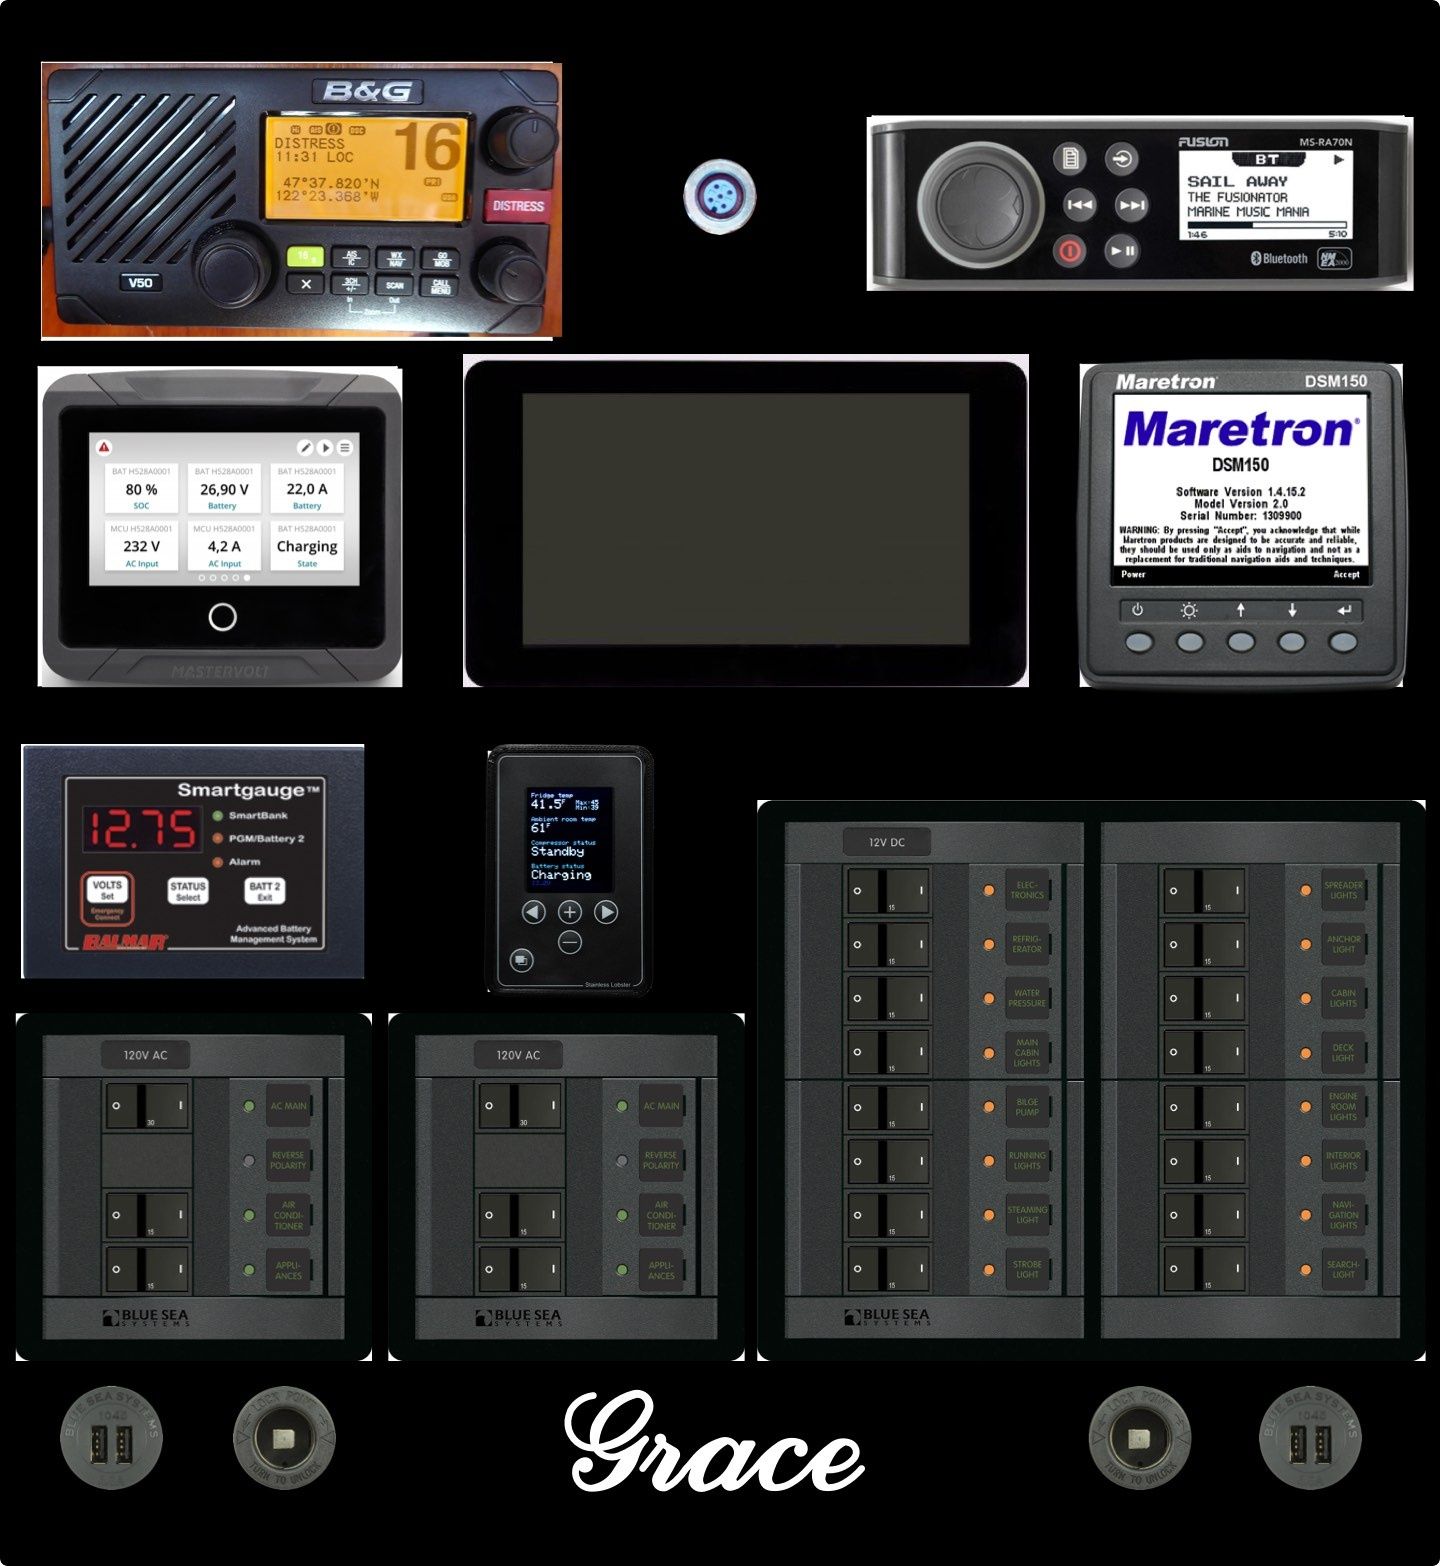
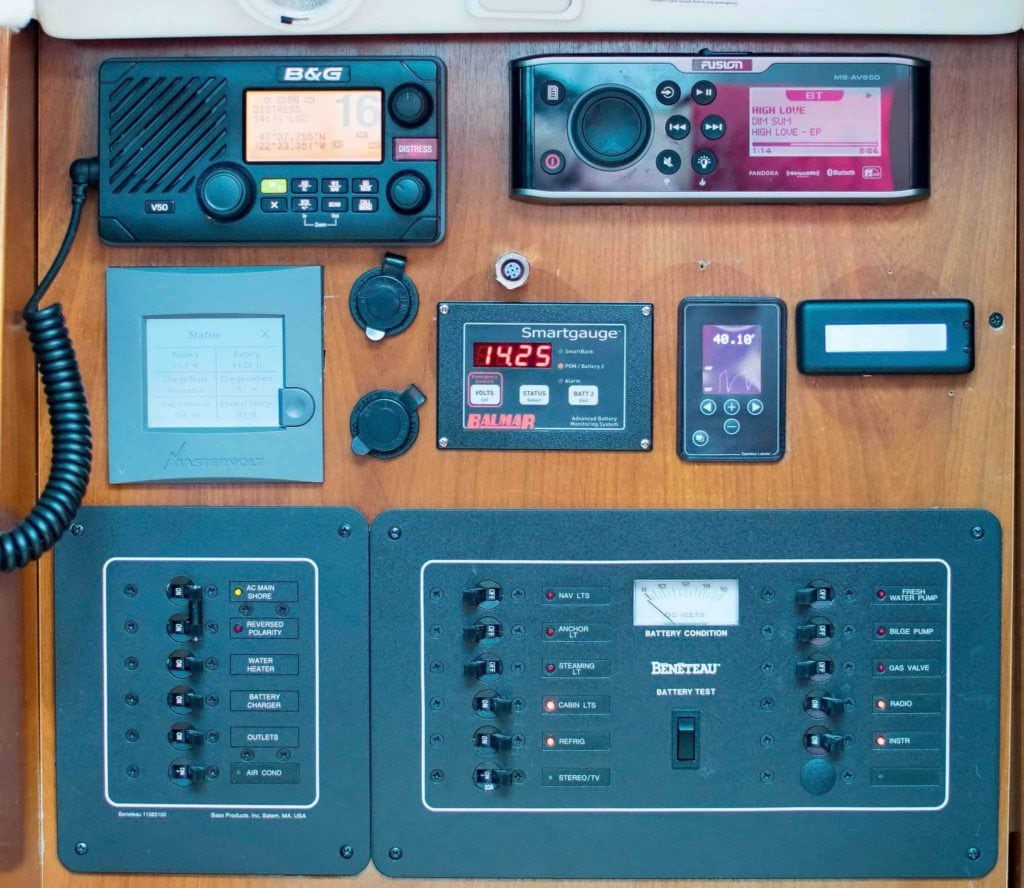
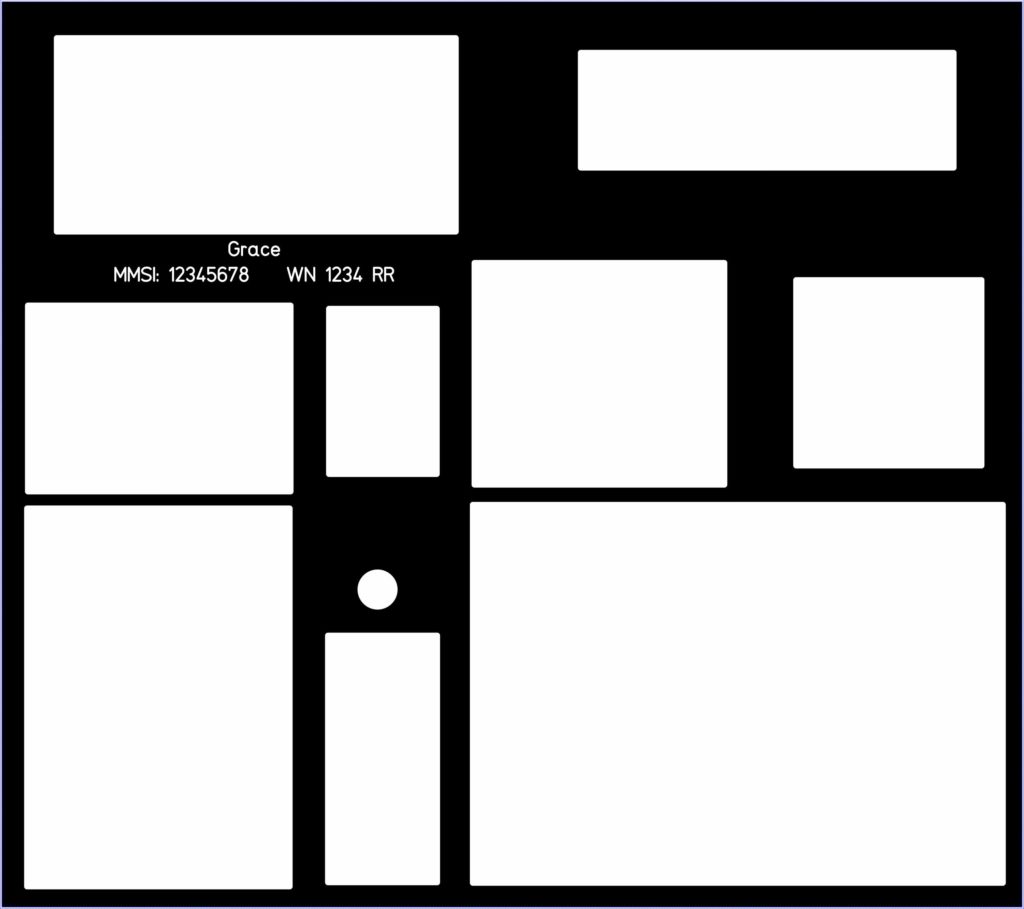
The latest revision of the panel is below. I have definitely settled on BlueSea 360 panels which I have already received and measured, and moved some things around to help balance stuff. From the top down left to right:
B&G V50 VHF (may switch to Standard Horizon)
NMEA 2000 port
Fusion MS-RA70N radio
MasterVolt EasyView 5
Raspberry Pi 7″ touch screen
Maretron DSM 410
Balmar Smart Gauge
Stainless Lobster Fridge Optimizer
AC Panel 1 (inverted)
AC Panel 2 (non-inverted)
DC Panel
USB/12V/USB/12V
I will be doing some final measurements tomorrow and then submitting my panel for production.